

*** UNDER CONSTRUCTION ***
What's needed for a dash-cam ?
Your basic DIY Pi Zero Camera and, optionally, a microphone. You might also want to add some control buttons = and that's more or less it !
A microphone is a good idea, but no Pi has direct support for audio input. Instead you will need a USB audio adapter, which will likely mean a USB hub
Powering the Pi
If you want to use it as a 'security camera' you will need to keep it powered-on when the car ignition is off. If you are powering the Pi from a 12v USB adapter (in the car 'cigarette lighter socket'), most vehicles will remove the 12v when the car ignition key is removed (more modern cars have USB sockets, however these are also 'powered off' when the car ignition is off).
As a DIY enthusiast, you can, of course, just run a wire direct from the car battery +12v. However whilst the Pi Zero consumption is small enough not to worry about flattening your battery over-night (or even over-weekend), if you go off on holiday for a couple of weeks it would be all too easy to come back to the airport car park and find you have a flat battery !
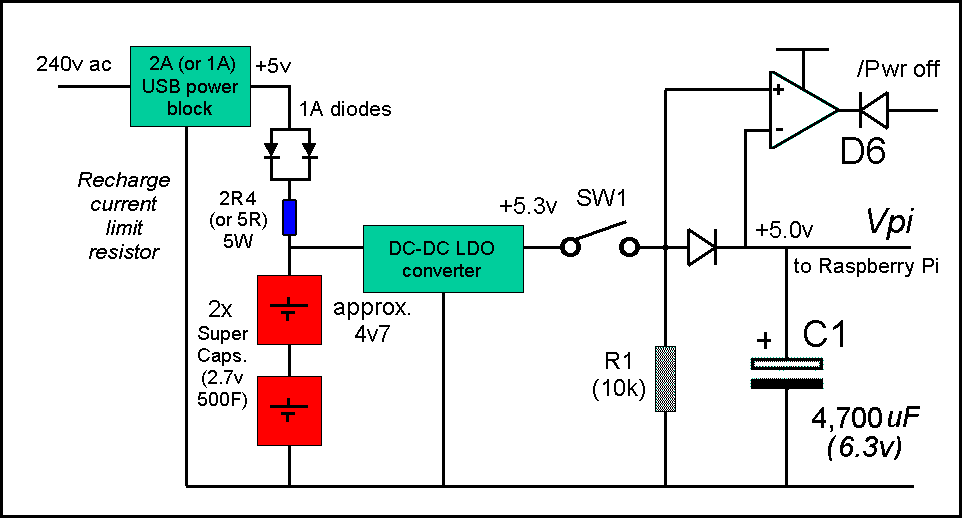
 To avoid a flat battery, use (the guts of) a £1 PowerBank (Poundland) and some Schottky diodes. This will keep your Pi camera running for an hour or so after the ignition is turned off i.e. during the 'high risk' period immediately after you leave your car unattended.
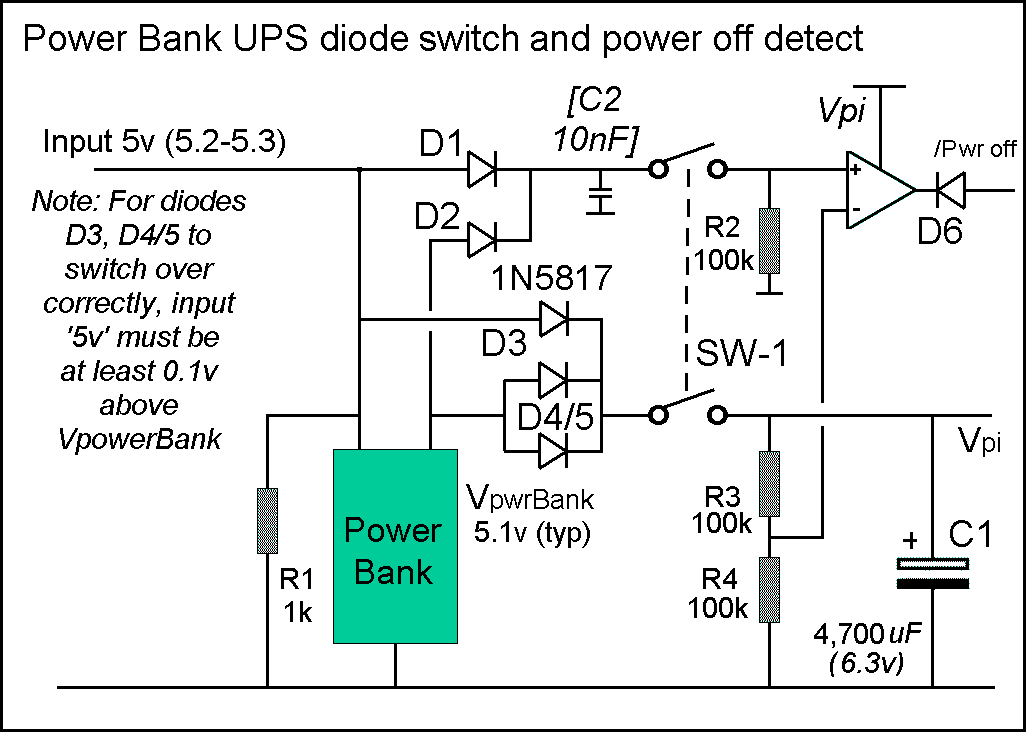
Note. The 12v-5v regulator needs to be rated at 1A or more since it will need to recharge the Powerbank and power the Pi at the same time. It's output also needs to be adjusted to between 5.2 and 5.3v (as it needs to be higher that the Powerbank output (which is typically 5.1v) for the diode 'switch-over' circuit to work)
How it works
The switch-over circuit
When the 12v is present, the output of the regulator (which should be set to about 0.1v above VpowerBank output) charges up the Powerbank (if it needs it) and is passed (via D3 and SW1) to the Pi.

When the 12v is removed, R1 ensures the regulator output falls off rapidly. As soon as the Powerbank 'spots' the regulator '5v' has been removed, it turns on it's output and powers the Pi via D4/5 and SW1 (two Schokly diodes, D4 + D5, are used in parallel to minimise the voltage drop). During this switch-over, C1 keeps the Pi running.
The 'power off' circuit.
Note, it's vital that the Pi act on 'power off' and stop writing the video stream to it's SDHC card since a power-loss during an actual SDHC write operations is the major cause of file system corruption. The '/Pwr off' signal (0v) indicates that the 12v supply has been removed and that the Powerbank has discharged to the point that it has turned itself off.
Detecting 'power off' is made more complex by the Powerbank. When the Powerbank is 'charging' (i.e. 5v appears at it's recharge socket), most Powerbanks will turn off their output. It is only when the charge voltage is removed that the Powerbank output becomes 'live'. When the Powerbank internal battery is almost completely discharged, it's output is again switched off.

D1 and D2 thus pass 5v to the comparator '+' input. This is compared to the Pi voltage 'halved' by R3 and R4. So long as either the 12v reg. or the powerbank is supplying 5v, the comparator output will be 'hi' (5v). D6 prevents the 5v Hi reaching the Raspberry Pi i/o pin (which can't cope with 5v input) so the Pi i/o pin will be pulled hi by it's own 'internal pull up' (so make sure to select that option when setting up the Pi i/o). Note - the comparator o/p may 'glitch' Lo when the 12v is removed until the Powerbank 'switches on'. To prevent this, a small (10-100nF) cap. can be used (C2).

When both the 12v regulator and Powerbank 5v are lost (or switched off via SW-1), R2 will ground the '+' input whilst the '-' remains at 'half Vpi'. The comparator output will go 'Lo' (0v) and this will pull the Raspberry Pi i/o pin Lo (via D6).

Note that the value of C1 needs to be large enough to keep Vpi above 4.85v both during the 'switch over' (when the 12v is removed and the Powerbank takes over) and for long enough to keep the Pi going until it acts on the '/Pwr off' signal and shuts itself down.

For more on shutting down the Pi, see below
(-) Auto shut down
Shutting down the Pi
Shut down is by software 'command'. So what's needed is some way for the Pi to 'discover' that it's running on batteries and that the battery power is about to 'run out'. This does not have to be very 'clever', just 'reliable' (we don't want to shut down when there's plenty of power remaining and we don't want the Pi to be writing to the SDHC card when the power fails).
If you are using LiPO batteries, then you need to stop using them before they are totally flat (a LiPO battery can't be recharged from totally flat)

Most systems cut the LiPO off at 3.0v - and it's easy enough to wire up a Zener diode together with a 'Op Amp' style comparator that will 'flip the switch' when the battery reaches 3v0
To give the Pi a chance to shut itself down after power is lost, fit a decent capacitor across the 5v supply = if you trigger 'power lost' at 4.9v, then the Pi has until the capacitor drops below 4.75 to shut down cleanly
Pimoroni clean-shutdown code
If you wire your 'low power' detection to any GPIO pin between #4 and #27 (Hi = run, Lo = low power), you can use the existing clean-shutdown daemon from Pimoroni (for more details, see end of this page)
Detecting 'Mains lost'
From this 'How To' reference and the Raspberry Pi GPIO pins spec, it's obvious that the pin you choose to 'sense' the power state can be controlled by software to enable a 'default 0' (internal pull down resistance).
To 'detect' a 24v supply as 'mains-enabled' = 'logic 1', we have to 'pull-up' the pin above 1.3v (or 2v = reports differ) but it's vital not to exceed 3.3v (or at least limit the current to 0.5mA). The internal 'pull down' appears** to be about 50k. For a 24v supply to 'pull up' this up to 2v requires a 24/2x50k = 600k resistor. Current flow into the pin from the 24v would be 22/600k = .04mA (well within the .5mA limit)
**The internal pull down is specified at 40-65k.
So, the cost of 'detect mains lost' is approx 1p (one resistor) !
Ethernet loss as system shutdown
If your Pi is being used as part of a CCTV camera, and has PiPO (or other) battery backup, you might want to keep it running (and saving to SDHC card) even when the Ethernet cable is cut :-)
However if you are only using PoE (so Ethernet out = no power) or if the Pi is unable to funtion without the Ethernet, you ca use 'los of Ethernet' == 'power-down'.
Of cousre this is a lot easier with any model B Pi since they have built-in Ethernet. The Pi B+ and later have 2 LED's on the Ethernet socket itself :-

The Yellow LED is on for a 100-Mbps connection (and this off for 10mbs or when connection is lost) = same as '10M' LED on the B
Green LED is on for 'link established' and blinks for 'link activity' (and off for 'no link') = same as 'LNK' LED on the B

One Pi user has written custom software to monitor the Ethernet 'link' (the B 'system LEDS', which includes 2 Ethernet LEDS, '10M' or '100' and 'LINK' or 'LNK', are all accessible to the Python user, see here)
The 'best' choice on the B+ for 'Ethernet LAN down = power loss' would be to pick off the yellow LED (no modern Ethernet runs at 10mbs)
Detecting 'Low Battery'
For PI's with battery backup, the 'obvious' approach to discovering that 'we are running out of (battery) power' is to monitor the battery voltage 'directly' with some sort of 'voltage detection' circuit (e.g. built around a 741 op-amp and a Zener diode etc. (see image)). An alternative is to use a special 'low voltage detector (LVD) chip' (such as the STM1061).
For example, NiMH battery voltage holds up very well during the discharge cycle with quite a steep voltage 'drop off' as it's capacity is used up, so the 'drop off' point is easy to spot.
An alternative approch is to montor the supply 'input' voltage and compare it to the Pi volts = as soon as input drops below Pi, the '/Pwr off' can be triggered. The drawback to this approach is that quite a decent capacitor is needed on the Pi 5v line to keep the Pi running long enough to shut itself down
If you can vary the voltage of the Pi 5v supply, adding a single diode in series with the Vpi power line means a simple 'comparator' can be used.
So long as the regulator is supplying power, the '+' input will be higher then the '-' and the comparator output 'hi' = 5v (D6 prevents this reaching the Pi i/o pin which is limited to 3v3 input max.).
When the regulator 'cuts out' and drops below Vpi (which is supported by capacitor C1) '/Pwr loss' goes 'Lo' (0v) and this is passed to the Pi i/o pin via D6.
If you are using LiPO batteries, then you need to stop using them before they are totally flat (a LiPO battery can't be recharged from the totally flat state). The typical cut-off point is 3v0 (so you need to 'trigger' the 'power-off' at 3v1 and have the Pi respond with a 'disconnect' when it shuts down). If you are using a Powerbank, this will 'switch itself off' as soon as it's internal battery voltage drops too low.
A more complex circuit is needed if you can't change the Pi power input voltage.
The circuit (right) 'monitors' both the supply input voltage and the actual battery voltage.
The comparator output will be Hi (5v) so long as the supply or battery '5v' is higher than the Pi 5v.
As soon as the power supply cuts off (and drops below the Vpi voltage) the comparator output will flip to the Lo (0v) state. Again, the capacitor on the Vpi line has to hold up long enough for the Pi to perform an 'orderly shut-down'.
One of the above approaches should work for all UPS designs.
This note last modified: 4th Jun 2017 15:27.
Note - whilst the Pi camera has to be mounted so it can see the road, there is no need for the back-up power battery pack to be placed nearby
Do you need a display ?
The main reason for fitting a display is so you can check that your Pi Camera is 'pointed' in the right direction and is actually running. If the Pi Camera is 'fixed' into position (and you are transmitting the video stream via WiFi to your LAN), you may not need an actual display screen in the car at all
If you are using the Pi B+, for about £25 you can get a touch display from eBay ("3.5 Inch TFT LCD Display For Raspberry Pi 2/B+"). However, if want to keep costs down (why else use the Pi Zero ?) you can't use the 'normal' Pi 'touchscreen' display (as the Pi Zero lacks the display ribbon SPI socket)

Finding a cheap small display for the Pi Zero is not easy, especially if you want one that's simple and easy to use = ie. one that just plugs straight into the Pi 'TV' composite video (RCA/AVI) or the HDMI output.

You can find some small displays aimed specifically at the Pi and driven via the Pi I2C pins (these are usually designed as a 'HAT' or 'shield'), however setting them up is a real pain (unlike the 'composite video display' which only needs you to switch the Pi from HDMI to TV out), plus (of course) they cost 'an arm and a leg' ..

A 'composite video input' 4.3" display intended for use with a 'reversing camera' in a car can be had for £10-£12 (eBay, "Video Input 4.3Inch 480x272 Car Rear View Monitor .." or similar)
Video recording
Whilst the video can be saved to the SDHC card, that makes recovering the video clips a bit of a pain.
The problem is, there is no easy way to use your PC to copy the files since, on first boot, the Pi NOOBS re-formats all the available SDHC free space into a series of Linux partitions that your PC can't read (whatever the original FAT32 partition size was, it's shrunk down to the minimum possible size (i.e. just sufficient to contain the original NOOBS files in what now become the 'recovery partition'))

To 'preserve' more FAT32 space means preventing NOOBS from shrinking it down so much - and that means 'pre-packing' the FAT32 partition with 'dummy' files using your PC (after copying NOOBS onto the card and before moving it to the Pi)

Of course FAT32 is not a very 'robust' file system, and if you use it to store video files there is a very good chance that power will be lost during file write operations thus corrupting directory

However using the SDHC card is the cheapest option.
A more 'robust' solution is to use a USB memory stick = this suffers from the same "power off = directory corruption" risk, but swapping a USB stick is a lot faster than generating a relacement system SDHC card
Use as a Security camera
If you add WiFi capability, when parked in your driveway your Dash-cam can be integrated into your home security system (for as long as the battery back-up lasts).
To avoid the need for a USB hub, you can 'swap out' the USB Memory Stick (video store) for a WiFi 'dongle' when you reach home.

To avoid pulling out the Memory stick during video file write operation, an 'eject' button can be fitted
Case
Only the 'Official Raspberry Pi Zero Case' comes with a Camera lid - however this will cost you 2 or 3 times the price of the Pi Zero (and has no room for anything else inside) and I just couldn't stomach being ripped off in 'dollars' for a bit of plastic that I know is made for pennies
Searching eBay did not turn up a Pi Zero case/box with camera lid. Lots of Zero cases can be found, but none have any room inside for anything except the Pi Zero.

I did find the "Enclosure Shell Hard Case Support Camera for Raspberry Pi B+/Pi 2/Pi 3 Grey" for £1.98 (post free). It's plenty big enough to take both the camera and a Pi Zero, but the USB socket holes are on the 'short edge', so it would be no good for use with a standard USB hubs (which are 'long sticks' not (dual) 'stack sockets') although it looks as if there might be room for a 'micro-USB to standard USB cable' to be 'coiled up' inside.

All the 'standard' i cases are simple just too full of holes - and I wanted something that would keep out dust, direct and 'little fingers'. In the end, I decided to go with my 'Really Useful Box' approach, which has the advantage that I can 'custom cut' holes for whatever access I need.
The case needs to provide a slot for access to the SDHC card (so it can be switched out without needing to 'open the box'), a hole for the power lead, mounting point for an RCA socket (for 'TV out' i.e. direct connection to a display) and mount at least one standard sized USB socket (Memory Stick video store or a WiFi 'dongle') and mount at least one push-button (USB 'eject'). As usual, the Camera module would be bolted to the inside of the lid
The Pi Zero's own 'ACT' (Activity status) LED can be used to provide 'feed-back' (such as 'safe to remove USB device') :-