

(For more detail on the Hardware required for Astrophotography using the Canon 350D, see here)
The overall goal is to achieve an accuracy (or 'drift') of less than '1 pixel' during the actual exposure time.
Plainly, the higher the zoom lens used, the longer the exposure needed - so the longer the exposure, the harder it is to maintain accuracy.
What's the max usable zoom (Focal Length) ?
The first limitation is the inherent accuracy of your BarnDoor unit (mechanical construction, NCP alignment and drive timing) - this has been addressed at great length in the preceding pages.
The second limitation is the CCD sensor V's zoom lens - there is no point in attempting to 'see' at higher magnifications than the pixel resolution of the sensor = as a 'rule of thumb' sensor resolution (pixel size) should be double the resolution of the zoom lens.
The pixel sizes of some popular camera models are shown below :-
![]()
What's the Max lens size Formula /
For general lunar & planetary work, the general 'rule of thumb' limit is 1/4 arc-seconds per pixel & for 'deep sky', 2 arc-seconds per pixel.
Applying the well known formula 206 * Pixel Size (microns) = Focal Length (mm) * Resolution (arc-seconds) we have the following maximum usable 'zoom' (focal length) settings :-
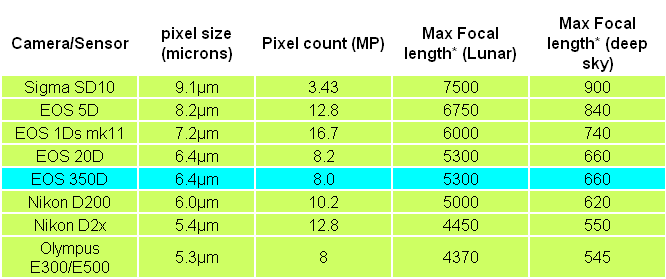
* Note that for the EOS standard zoom Lens range, the focal lengths marked on the actual Lens will be for the 35mm 'sensor size'. Thus a Canon EOS 500mm Lens will be 500mm focal length for EOS 5D & 1Ds but for the 350D (the camera I have) a 500mm Lens will be equivalent to [ 35mm / actual sensor size (22.2) ] * 500 = 800 mm. This is fine for Lunar work but will exceed the maximum recommended zoom (which is only 660mm) for deep sky work.
Note also that MOST telescopes will have focal lengths in the 1m range ... this is almost twice the recommended limit and suggests that a 'focal reducer' adapter should be employed.
What about Aperture ('f' number) and ISO settings ?
You should choose the maximum possible aperture to keep the exposure times to a minimum. However, although 'depth of field' is irrelevant, the higher the aperture the more difficult it is to focus. This is where focusing methods (such as a Bahtinov Mask) are of great help.
For a digital camera 'ISO' means 'noise' .. the higher the ISO setting the more 'noise' you will get. However the lower the ISO the longer the exposure required (so the more 'smearing' or 'trails' you will get due to tracking inaccuracies).
As a general 'rule of thumb', if your tracking accuracy is good enough, you should set your camera's ISO to one stop below it's maximum.
What's the Astrophotography exposure calculator ?
A maximum Exposure time (to avoid 'trails') calculator is available here (free download). Software to calculate effect of polar axis misalignment can be found at the same site
Our Milky Way Galaxy, photographed on a BarnDoor mount.
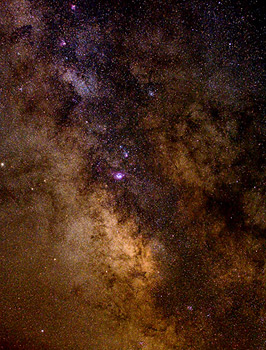
Finally, to give you some idea of what can be achieved, see the photo left (from Popular Photography, How-To: Astrophotography 101.)
This image was taken by Paul LeFevre using a Canon 5D, 70mm lens at f/8, ISO 800, with a 10-minute exposure time on a basic (single arm) Tangent Drive BarnDoor.
© Paul LeFevre
Click 'Next >>' (in Nav bar, left) for my Astrophotography pages