

Why is a digital drive circuit required ?
Of course, for really accurate control we should be using a '1 second clock tick' and the drive nut should generate 60 triggers per revolution. This would get our max. error down to fractions of a second and allow the use of a motor with virtually any 'nominal' speed (just so long we don't choose one that's too slow).
At first sight, it would seem that generating 60 triggers per rev. from the drive Nut would be extremely difficult. However it is highly unlikely that we will drive the Nut direct from the motor - rather it will have to be driven via some sort of reduction gearing.
So if the Drive Nut 'gear wheel' had exactly 60 teeth (e.g. Meccano part no. 27d :-) ) it could be driven via a Worm gear (Meccano part no. 32) that would need to be rotated at exactly 60 rpm (i.e. once per second) - and then a simple 'once per turn' operated micro-switch fitted to the end of the Worm gear would generate the required 60 per rev. (1 per second) triggers.
What about the 1 second clock triggers ? Well, unfortunately, simple battery operated quartz clock mechanisms do not generate 1 second electrical 'pulses' - rather they have a micro-motor that continuously 'winds up' the second hand arm gear against a plastic 'spring' type cog, which, after one second, 'snaps' over to cause the hand to 'jump' to the next position (whilst at the same time making an audible 'tick').
So the best approach is to remove the second hand itself and fit a thin plastic or card 'disk' in its place. With 60 holes punched evenly around the edge of the disk, an optical sensor system can then be used to generate the 1 second triggers.
Since high speed Relays (which would be needed to switch at sub-1 second intervals) are both expensive and difficult to obtain, a better approach is to build an Analogue or Digital based electronic circuit.
How do you design the speed control circuit ?
The basic operation is essentially the same as the 'hurry up & wait' circuit, i.e. each clock trigger means 'go' faster & each worm gear trigger means 'stop' slower.
So if we use the worm gear trigger as a 'slow down' control and the clock trigger as a 'speed up' control, then (eventually) the Motor speed will reach a point where the 'slow down' and 'speed up' triggers are in exact balance (i.e. they cancel each other out) and the motor is running at the exact required speed.
This can be done by Analogue means (using an 'Op-Amp' integration circuit) or by Digital means (simple 'up/down' counter).
 If something causes the Motor speed to change e.g. battery voltage, ambient temperature, friction / resistance, belt slip (or something else affects the motor speed) then the triggers will become 'unbalanced' again and the system will self adjust !
In theory it would be possible to design an analogue circuit using op-amps to 'accumulate' the 'up' and 'down' triggers and set the motor voltage after 'comparing' the two. However, with any analogue circuit where some sort of comparison is required, it is very difficult to prevent 'drift' and 'bias' creeping in and upsetting the balance (or 'null') point.
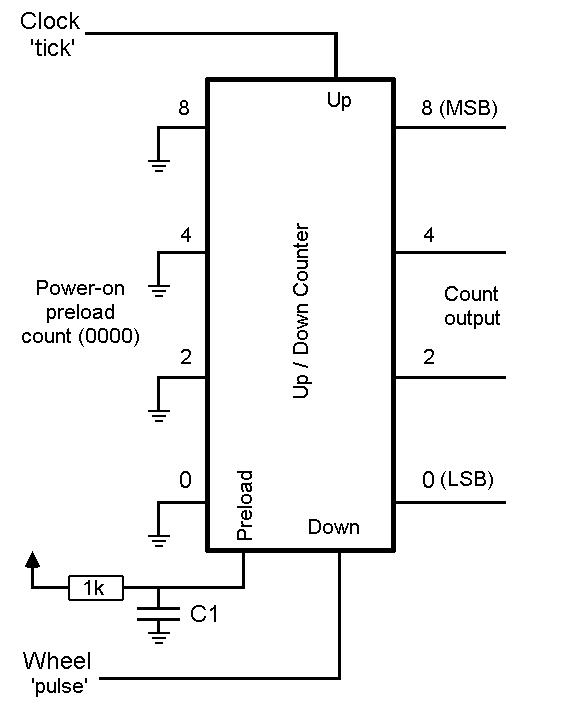
We thus move immediately to the simple digital circuit shown on the left here.
Clock ticks are applied to the 'count up', gear wheel pulse to 'count down'.
When power is applied, C1 & 1k ensures the Counter 'preload' is triggered and loads a count zero (motor stopped).
As soon as clock ticks start to arrive, the count will gradually increase (and the the motor will start up). After a period of 8-10 seconds the 'mid point' speed is reached which should correspond to the actually required speed.
This allows the motor to speed up gradually and avoids a sudden 'jump' from stop to speed that could cause drive belt stretching etc.
The count from the up/down circuit is converted into a motor control voltage by a simple R-2R resistor 'ladder' or "D-A converter"
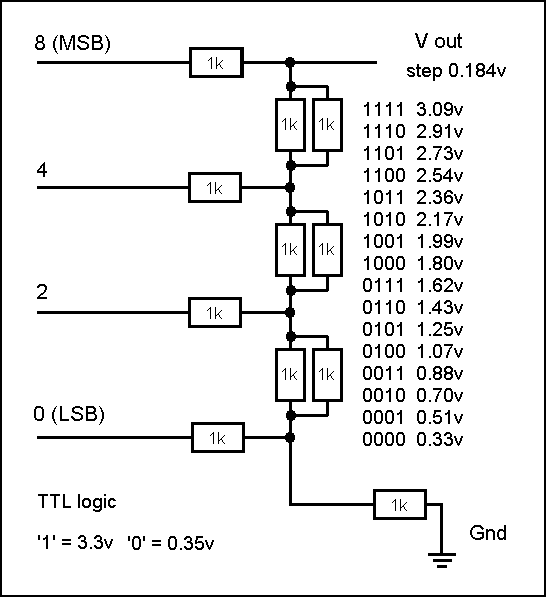
Note that 11 equal value resistors are required & the 5 singles and 3 pairs must be balanced to within better than 6 ohms (about 1/2 %).
Absolute value is irrelevant, so selecting 'best matched 11' from a 'job lot' of 100 (& then pairing the 'hi' & 'lo' extremes of the selected 11 to make the pairs) should be possible (if necessary, additional parallel resistors in the 100k range can be used to 'trim' any that are 'too high').
The resulting circuit (V out) drives the servo motor via a simple Pulse Width Modulation (PWM) circuit.
The motor drive circuit must such that the 'correct' speed is obtained at a count of 7 or 8. This allows the maximum 'lag' / 'lead' count of +/-7 to be supported before the counter 'bottoms out' (or overflows).
Note that the count need only vary the motor speed by a few percent about it's 'correct' speed (i.e. it is not really necessary for 0 to correspond to 'stop' or 15 to correspond to 'max speed' .. indeed the count steps need not correspond to equal changes in motor speed = the step from 6 to 7 or 9 to 8 (i.e. near the 'correct' speed) should only cause small changes, whilst the step from 1 to 0 (or 14 to 15) should cause a large change).
How to use a belt drive (instead of worm/gear) ?
If a belt drive is used, in order to avoid problems with belt slippage etc. the 60 per revolution 'trigger' must be taken from the actual drive nut turning (and not from the motor). This can be achieved by fitting a 60 'index mark' grating to the nut drive wheel.
To create the grating, see below (in fact, the number of index marks is not vital, just so long as the clock 'count per rev' == the drive nut 'count per rev'). Note especially re: use of transmission sensors with printed transparent plastic card. Note also that the size of the wheel may have to be limited to less than A4 width (220mm) = printer limit.
What's the alternative ? (gearing Drive)
Meccano gears with exactly 60 teeth are hard to find - and belt drives could slip. They are also difficult to fit = remember a 14mm hole is required for the drive rod to pass through and the remaining gear then has to be firmly (and accurately) fixed to the Drive Nut.
Plainly a larger gear wheel will be easier to fit. However it is still required to rotate the Nut at 1 rpm i.e. at the same speed as the Clock second hand per minute (1 rpm).
Thus, for example, if a 95 (or 133) teeth Meccano gear is used to turn the Drive Nut, and a worm gear applied to that. is still used to generate 1 'trigger' per tooth, then the Clock 'seconds arm' must be replaced with a disc with 95 or 133 holes in it - i.e. an exact copy of the 95 (or 133) teeth gear wheel.
If a worm gear is used to drive 95 (or 133) then it is still easy to take a 'one per rev' trigger off the worm .. and since we now have 95/133 'off triggers' this has to be matched by 95/133 'on triggers'. i.e. the clock must be fitted with a 95/133 hole 'grating' used to generate the 95/133 'on' triggers.
How do I create an Index Grating ?
A 95 Index Grating is shown here (after being colour 'inverted' from the black index marks on white background to give index 'holes' on a black background).
 Using photo-edit software (e.g.. Paintshop Pro) a high resolution template was created as follows :-
Define a large 'page size' in terms of pixels e.g.. 4500 x 4500 with a white (0% colour) background.
Place a single black pixel at the exact centre & a line of black pixels (for the first 'index mark') near one side edge. We are going to successively copy, rotate & merge this to generate all the other marks.
Calculate the required angle between successive Index marks - for example, for 95 marks we need 3.79 degrees between marks (to the nearest 2 decimal places i.e. limit of PaintShop Pro's 'rotate' command). The max. error after 94 rotations = 95x3.79 = .05 degrees.
Copy the whole image, 'paste' as new layer, rotate by the first step angle, check centre alignment, 'merge down' the layers. The black pixels will be added to the white background.
Paste as new layer again, rotate by twice the angle, merge down. Continue with 3 times, 4 times, 5 times etc. until you achieve the required number of Index marks.
Finally, 'invert' the image so you have 'white' marks on a black background.
Some printers (typically those that support printing onto CD/DVD's) will allow you to print onto stiff (transparent) plastic = this avoids the need to 'punch out' the Index marks using a (small) hole punch. If this is not possible (and you have to print onto thin card) try to obtain a 'reflection' type optical sensor.
Note that a worm driving 95/133 gear will generate triggers at sub-1 second intervals. At these speeds, using micro-switches or magnetic reed switches is asking for problems and it is recommended that the worm gear sensor be replaced by a transmission optical sensor (with single hole index wheel - i.e. such that the sensor is 'mostly off').
With no concerns that the motor will run too slow, the worry now is that inertia in the system will cause it to run too fast !
So, what about Stepper Motors ? Well for that, click 'Next>>' (navigation bar, left) for my (almost) final topic ....