

Basics of using your digital camera (such as Canon 350D)
Note that much of the material found on this page will apply to any digital camera. Even the design of the serial cable used for manual 'shutter release' can be adopted for almost any digital camera with a 'bulb' setting (note, the Canon 350D 'bulb' mode is hidden in 'M' (manual) mode by 'winding the exposure time past 30 seconds' = you camera may have a separate dial position, or a 'button' (or something even more well hidden)
NB. The 350D User Manual can be hard to find on-line (for a PDF, right click and Save As here).
IR blocking filter
In common with all DSLR camera's, the EOS 350D has a built in IR blocking filter. Unfortunately this reduces it's response when imaging Deep Sky Object's (DSO's), such as nebula and galaxies, where a lot of the light is in the Red region. This filter can be removed, however this is not an easy task for the 'amateur', especially if you ever expect to use the camera with it's standard lens for normal daylight photography again. Fortunately a number of experienced individuals (mainly in USA) have been offering 'IR filter removal' services for some time so many modified 300/350D's are 'out in the wild' that occasionally one is offered for sale on eBay.
Street light filters
If you live in the UK, your images will benefit from the use of filter that blocks the (yellow / orange) street lights etc. There are some 'specialist' types ('narrow band' blocking filters - designed for SPECIFIC types of street lights) which I no longer recommend as the sky is now filled with a mixture of 'low pressure' and 'high pressure' sodium vapour street lamps as well as 'white light' sports field/car park lights, with many councils replacing the older types with 'white light' LED type - so you would need 3 or 4 'narrow band' filters if you wanted to block it all.
Instead you might as well stick to the more generic anti-'sky glow' types known as 'CLS' filters.
TIP - it is possible to obtain a specialist 'CLS' filter that mounts inside the Canon 350D camera itself. Very occasionally they can be found second-hand on eBay (or new from Telescope House).
The main drawback is the cost = these are on par with the standard 2" screw fit CLS (which is about double the price of a 1.25" CLS). So when choosing your EOS <> T mount telescope adaptor tube assembly, make sure it is threaded to take 1.25" standard filters !
ISO
Since we are going to use Stacking and Dark Frames to remove noise, there is no point in exposing at anything other than the maximum ISO** setting supported by the camera. So select 'manual mode' and set the 350D to ISO1600 (if the CHDK firmware 'hack' is used (see later), ISO3200 can be selected). Even if you are not using dark frame subtraction, you are better off taking short exposures at high ISO than long exposures at low ISO (2 at ISO1600 can be Stacked to deliver half the noise of one at ISO800), so long as you stay within the 'noise limit' of the camera (about 1 minute)
'ISO' when applied to a digital sensor may seem to make little sense .. what the ISO setting does is to increase the 'gain' (or 'amplification') applied to the sensor. Needless to say, the higher the 'gain', the greater the effect of noise - so many users recommend setting the camera ISO to 1 or even 2 stops lower than it's maximum - but all this does is increase the required exposure times, which increases the effect of tracking errors etc.
Whilst a 1 minute exposure at ISO1600 contains almost exactly the same noise as 2 minutes at ISO800, if you take 2 images at ISO1600 (of 1 minute each) you can stack them to halve the noise ....
Further (for a given ISO), noise is actually a non-linear function of exposure time - in other words, if you double the exposure time at a given ISO, you MORE than double the noise !
So, rather than spend 2 minutes taking one image at ISO800 or two 1 minute exposures at 1600 (and stack to half the noise), you should actually take 4 exposures of 30s (at 1600) and stack to achieve 1/4 the noise (each doubling of the image count halves the noise - see Stacking later)
In conclusion - don't waste your time using anything other than max ISO and always keep your (multiple) exposure times 'short' (for the 350D and most Canon camera's that means 'less than a minute').
Focus
The easiest way to focus is using a Bahtinov Mask (see later). If possible, initial focusing should be done using the camera viewfinder (or rear display - but see re: night vision). Exact focus can only really be achieved by viewing a sequence of images.
Once the focus has been achieved and 'locked', you need to minimise any further fiddling with the camera (such as trying to manual set exposure times etc). The 350D is limited to a maximum exposure setting of 30 seconds (there is a reason for this - it's the fact that camera noise starts to be noticeable above 30s or so). However we will be using 'bulb' mode to take 'manually' timed exposures via the 'cable shutter release' - which can be controlled by software running on a laptop computer via the Serial or Parallel port (see below).
TIP - to avoid the need for a laptop 'in the field', there are many manufacturers offering an equivalent to Canon's TC 80N3 wired remote timer (which Canon offers for the EOS 5D etc.) for the 350D. A typical eBay price is £20. This can be used instead of a Laptop to set up an exposure sequence.
Of course, if you are operating in your backyard, chances are we still need the laptop for PHD (tracking control) and monitoring of images as they are taken, so using it for exposure control as well is not going to impose too high an additional load.
We will be using RAW (.CR2 file) image mode (see below). One exceedingly annoying 'feature' of the 350D is the delay, which can be up to 30 seconds, imposed after each 'raw' shot as the (unbelievably primitive) Canon Camera firmware refuses to allow the next exposure to be started whilst it is saving the current RAW file to the CF card. Fortunately the CHDK firmware 'hack' (see http://chdk.wikia.com/wiki/CHDK_firmware_usage ) overcomes this stupid restriction (when exposure times are longer than the CF card save time) and successive RAW frames can to be taken 'back to back' with an inter-fame 'gap' of no more than 3 seconds.
TIP- it is highly recommended that you purchase the fastest possible CF card available. High capacity is not required = a 5 minute exposure will generate less than a 12mb RAW file. A 1Gb card is thus sufficient for over 7 hours of continuous imaging (something you are never going to achieve with the UK weather :-) ) .... and you can always move images from the card to your laptop down the USB cable if you do seem to be in danger of running out of space.
TIP - whilst 'the more frames the better' there is a limit to how long you will be prepared to stay awake and how long you can keep tracking the 'target' across your garden sky. Generally, each frame will take 2-5 minutes to expose and you will need to obtain a MINIMUM of 10 'light' frames, plus 2 or 3 'darks' (at the same exposure time) i.e. about an hours worth of imaging. When stacking, it is easy to see a difference between 10 and 20 frames, less easy to see the difference between 20 and 30 ... so the limit is about 30 frames - after adding in 5-10 darks this gives a 'maximum' imaging time of just over 3 hours. On a particularly good night you should stay up 6 hours and get in two 'targets'.
Focusing
By far the best aid to focusing is the Bahtinov Mask. This slips over your telescope's front aperture and creates 'spikes' that can be used to determine if your focus is 'too far in' or 'too far out'. You can purchase a ready made mask (eBay) generate your own or download a PDF template print it out and cut your own mask.
Unable to reach focus - refractor
Some Refractor telescopes it may not be possible to achieve focus even with the focus draw tube in the fully 'out' position. In this case, you will need some sort of 'extension' - often you can 'get away' with using a 90 degree right angle mirror, otherwise you will be forced to obtain an (expensive) extension tube.
TIP - when starting out with your camera and a refractor telescope, before buying a single expensive extension tube, check what size is needed to achieve focus using your Barlow as well - if you intend any planetary imaging at all, it is almost guaranteed you will need to use a Barlow to get even a tiny image - and a 'set' of tubes is not much more expensive than a single.
You should also check out 'Macro tube' sets for your camera - they are a fraction of the cost of an 'astronomical' extension tube
Unable to reach focus - reflector
Newtonian Reflectors - and especially the fancy SCT's and MAK's (Schmidt- and Maksutov-Cassegrain's) - often have the reverse problem i.e. the draw tube is unable to 'focus in' far enough. Of course the manufacturers own proprietary custom designed 'mega expensive' (i.e. 1000% gold plated profit margin) camera adaptors will work just fine (of course) .. but the 'generic' off-the-shelf multi-purpose adaptors (at 1/10th the cost) may not.
TIP - many camera adaptors are 'multi-use' and it may be possible to unscrew and re-arrange the elements to shorten the mount adaptor. Other 'T' thread components are likely to match the adaptor thread - it may be possible to achieve what you need by combining parts from multiple sources. Many camera adaptors also support 'eyepiece projection' (where an eyepiece is inserted into the adaptor) & it may be possible to insert the 1.25" adaptor / eyepiece assembly 'well into' a 2" focus draw tube (just watch out you don't run it into the right-angle secondary mirror :-) ). If you have a 'field reduction' lens adaptor, try that (together with a slightly more powerful eyepiece).
If you have the older 'rack & pinion' style (with it's usual horrendous backlash) you may wish to switch (to a Crayford type, with 10:1 slow motion focus), in which case look for a low profile one. Note that you will have to screw down the Crayford wheel lock to prevent the weight of your camera moving the focus - and if you forget to loosen the wheel clamp after your imaging session you risk distorting the rubber wheel !
If all else fails, and photography is a 'must', more drastic measures are called for. First, if the manufacturer offers their own adaptor, consider 'chopping up' your generic one to match it's dimensions. On other scope's you will just have to guess.
A final solution you might try if you are really desperate is to move the primary mirror. If you move it forward (to lengthen the focus point) be aware that your secondary mirrors has to intercept a wider 'cone' of light from the primary - go too far and you will loose light 'around the edges' (as well as having to worry about reflections off the secondary mirror mountings etc.)
Using 'Live View'
Although the 350D has no 'live view' mode it does have a 'Video Out' capability. When a cable is plugged into 'Video Out', the 350D's rear display is disabled and whatever would have been shown there is sent down the Video Out cable instead.
TIP - even if you decide not to use the Video Out capability, it is a good idea to have a 3.5mm jack plug handy so you can disable the camera's display during actual use in the field (there is nothing so annoying to other Astronomers, than to have their night vision destroyed by your camera flashing up menu screens etc. when you press the wrong button in the dark). Talking of flash, make sure this is "disabled" in the camera's Menu = if you accidentally leave the mode selector in 'auto' instead of 'manual', then the remote shutter trigger could cause the camera to use it's built in flash !
To use 'Video Out' to assist focusing, set the image 'Review time' to 'Hold' .. this will ensure the just taken image continues to be displayed until it is replaced by a new one. Note that, whilst a new image is being exposed, the display is blanked.
If a laptop is being used in the field, a PAL USB 'dongle' will be required to display the Video Out image on the laptop screen. If a separate LCD Display is being used, a PAL Video to LCD Display 'converter' is recommended - these often incorporate a 'display switch' allowing you to select between the Video (PAL) source and your PC. NOTE - some 'generic' PAL adaptors found on eBay DO NOT work with LCD/TFT displays (the clue is in the wording - if the seller says 'Suitable for TV's and computer displays' your should assume they mean CRT ONLY)
TIP - if you are using a CCTV type CCD camera for auto-tracking (or 'auto-guiding' = see later), the PC's USB 'dongle' can be 'reused' after focus is complete (remove the camera Video Out cable and plug in the CCD CCTV cable instead).
To focus using the Video Out, first set the Camera to max. ISO & JPG "small (1728x1152) / fine" mode = most PAL USB adapters output a maximum of 1280x1024 (some are 800x600), so there is no point in choosing a higher 'original image' resolution since it just uses up CF Card space and takes longer to generate & transmit to your laptop.
Then set-up the DSLR remote shutter control software (see below) to take e.g. 100 exposures of a few seconds each and adjust the focus between shots until perfect focus is achieved. Lock the focus knob & then 'cancel' the shutter exposure sequence. Don't forget to remove the Bahtinov Mask and reset the camera to RAW mode before starting your 'real' exposures (it is not necessary to change the 'review time' since a plugged in Video Out cable disables the camera display).
TIP - to speed up the display during focusing, the camera can be set to 'B'/W' (Black & White ) mode (in Menu 2, under 'parameters').
Remote shutter control
The 350D is limited to a maximum timed exposure of 30 seconds (OK for the Moon and planets, no good for DSO (deep sky object) imaging) so you will need to operate the shutter in manual control = 'Bulb' mode. This is achieved by switching to Manual mode on the camera 'dial' and then using the control wheel (just behind the shutter release button) to 'wind' the shutter time past 30" (30 seconds) into 'bulb' mode.
Note that Canon's own brain dead software for the 350D, the "EOS Utility" Remote Shooting control (which connects to the camera via a USB cable) is also limited to a maximum exposure time of 30 seconds (and refuses to operate the shutter at all if you have set the camera to 'bulb', 'mirror lock' or 'Noise Reduction' (dark frame subtraction) mode = a small yellow triangle appears and the 'camera icon' (= shutter release) button is greyed out). This restricts it's use to photographing the Moon, where the multiple exposure 'delay shooting' Tool option can also be used (although the software imposed minimum of a 5 second 'gap' between shots is yet another unwanted limitation).
To control the 350D shutter in 'bulb' mode you can use the Canon 2.5mm jack cable "RC-1", the infra-red control (RC-5), a hand-held multi-shot timer similar to the TC 80N3 (not available from Canon for the 350D, but available from 3rd party manufacturers and sold via Amazon or eBay etc) or (better) a laptop PC using via a Serial or Parallel (printer) port (or via a USB to Serial converter) plus a 'home brew' 2.5mm jack cable (see circuit below).
There are many manufacturers offering a 350D equivalent to Canon's TC 80N3 wired remote timer (which Canon only offers for the EOS 5D etc.). A typical eBay price is £20, so it's worth investing in one even if you never plan to work without your Laptop, since, sooner of later, you will find yourself with perfect conditions and a flat Laptop battery :-)
The fully functional (and free !) DSLR Shutter software is the ideal choice for camera shutter control on the Laptop. It supports both serial and parallel port control - and parallel port 'trigger' via the D0 or D1 data line (pin 2 or pin 3).
Serial link shutter control
Users of Meade AutoStar mounts (and other mounts that can be auto-guided via a PC's Serial Port) should use the PC's Parallel Port to control the camera shutter. If you start by building a Serial Port cable for your camera, you can be sure that, sooner or later, you will be taking it all apart again (as soon as you realise the need for auto-guiding).
Serial port RS232 signal levels switch between +12v (= 'Hi' or 'on') and -12v (= 'Lo' or 'off'). Plainly the camera MUST be isolated from such voltages. Further if mains adapters are being used, it is vital to avoid 'earth loops' between Laptop, Camera and Mount controller. Thus an opto-isolated design must be used.
Note the 1N4148 diode positioned to protect the opto-isolator and LED against the serial RS232 -12v 'Lo' voltages.
Other designs seen on the web place the diode between pin 1 & 2 of the opto-isolator, and whilst this may protect the opto-isolator from any negative voltages, it also means that the laptop battery will drain via R2 during the hours when the serial ports RTS is 'Lo' (as well as placing -12v across the LED via R1, and potentially blowing it).
One problem you will encounter is that not all laptop serial ports (or USB to Serial 'converters') actually output 'proper' RS232 voltage levels. RS232 should be +/- 12v, but some laptops output only +/- 6v ... so the value of the Resistors ('R1' & 'R2') must be selected to match whatever your 'RS232 port' generates.
Note - some laptops and "USB to Serial Port" adaptors do not generate negative voltages at all (i.e. they switch between 0 and +5v or 0 and +12v), however even if yours is one of these, do not be tempted to omit the 1N4148 (or similar) protection diode. If you do so, you can guarantee that at some future date you will plug your RTS cable into a 'standard' serial port and blow the opto-isolator.
Note the connection from Serial Port pin6 DTS<> pin4 DTR. This is required by some software to detect that the cable is plugged in.
TIP - the 'shutter open' LED may seem pointless, however when the camera fails to operate, this is VITAL to fault finding (if you can see the LED glowing you have eliminated all software control problems and any Serial Port 'device driver' issues at the laptop :-) )
Parallel port shutter control (controlling 2 camera's)
Unlike the Serial port, Parallel port signals do not go negative - in fact the parallel port is usually driven by 'standard' TTL output (0v Lo, 5v Hi). Thus no protection diode is required. However (unlike the Serial port) the Parallel port 'Hi' drive current capability is very limited - indeed some Laptop implementations may be unable to drive more than 4mA ! It is thus vital to use high efficiency LED's and opto-isolators (if a suitable low power opto-isolator is not available, the LED can be left out and all available current used to drive the opto).
To connect to the parallel port, you need a 25pin 'D type' male type plug (i.e. with pins). DSLR Shutter can be set to use either D0 (pin2) or D1 (pin3). Gnd can be found on all of pin18 to pin25 (all these pins are Gnd).
TIP - when constructing the Parallel Port adaptor it is worth building it for two camera's (even if you only ever intend to use it with one) and fitting a pair of (2.5mm) sockets (so you can choose which 'bit' to use). In this way, if one 'bit' fails for any reason you can simply switch to the other - and even be in a position to offer 'debug' assistance to any other astro-photographer set-up nearby who is encountering problems.
To control 2 camera's, launch the DSLR Shutter software twice i.e. run 2 'instances'. Set one 'instance' of DSLR Shutter to D0, and the second to D1 ... each instance of DSLR Shutter will correctly control ONLY it's own 'bit' without 'overwriting' the state of any other 'bits' on the same port (this has been confirmed with the software author and proved during March 2010 with software v1.9 using a pair of 350D's).
Camera 'Mirror Lock'
Canon's 'mirror lock' delays the actual expose by 2 seconds after the mirror is moved to reduce the effect of any vibration introduced by the mirror movement. Whilst vibration could be a problem with ultra-light tripods, it's unlikely to have much effect when taking images of deep sky objects (DSO's) using multi-minute exposures.
If the camera is set to Mirror Lock mode, the Mirror Lock 'option box' in DSLR Shutter should be 'ticked' and DSLR Shutter will then automatically add 2 seconds to your chosen exposure time to allow for the camera's 2 second delay.
RAW mode images
Always choose 'RAW' (or RAW + Jpeg) mode.This is the only way to get the uncompressed and unprocessed, full resolution (12bit per pixel) raw CMOS sensor data. RAW allows proper 'dark frame' subtraction (i.e. before the 12 bits per channel 4 sub-pixel Bayer Matrix data is processed and reduced to a single RGB pixel of 8 bits per colour).
A Canon 350D 8 mega-pixel RAW (.CR2 format) file will typically be 10-12Mb in size (3456 x 2304 pixels @ 12 bits per pixel, loss-less compressed in Canon CR2 format), as opposed to the 2 to 4Mb for the 'Large / Fine' (3456 x 2304 pixels) Jpeg. RAW Dark Frames are typically somewhat smaller (8 Mb) - this is because the Dark Frames, being 'all black', achieve better loss-less compression (and have an embedded Jpeg that has been jpeg compressed to 'nothing').
Note that, when using the camera in 'bulb' with 'RAW' mode, unless the CHDK firmware 'hack' is used, the brain dead Canon firmware will keep the camera in 'busy' mode for up to 30 seconds after each exposure (during which time the images are being saved to the CF card) before allowing the next manual exposure sequence to start. The 'speed' rating of the CF card will have some effect on this 'save' delay, so you should do your own tests and then set the appropriate 'delay between shots' on DSLR Shutter.
Using the CHDK firmware 'hack'
CHDK is mainly aimed at extracting RAW from Canon's low end 'Power-Shot' range of cameras. The one thing that can make focusing with a Bahtinov mask 'easy' is 'live view' mode. Unfortunately, to date (2013), I have not seen it on the 350D (the camera most often modified for astro-photography work by removing the iR filter)
Canon's entire range of DSLR camera's, from the 'most expensive' Professional to the 'low end consumer' model use the same type of CPU (or course the faster camera's use faster CPU's (or even 'dual' CPU's) but the software is essentially the same). Many 'features' depend only on the software - and the features offered on the 'low end' camera's are only limited in order to 'differentiate' them from the high end ones - for example, saving the RAW mode image and the ability to set-up timed expose sequences from the cameras own menu. Needless to say, since all Canon camera's have some means of 'firmware upgrade', it was not long before enthusiasts on a budget found ways to get 'higher end' features on lower end cameras :-)
Note that the lower end cameras do have slower (= cheaper) CPU chips, so not ALL the high end functions will work successfully at the low end
Using the CHDK 'hack' firmware is essentially a 2 step process. First you update the camera firmware so that it will support 'booting' from a CF card (you have to be VERY CAREFUL that you start with the 'right' Canon firmware version in your camera - start with the 'wrong' version and you can 'brick' the camera). Then you make your CF card 'bootable' and place the CHDK firmware on the card. Each time you turn on the upgraded camera, it checks to see if a bootable CF card has been inserted, and if so, 'boots' from it.
TIP - if you intend to use CHDK features you should make sure you copy the bootable firmware to all your CF cards, even if you use the cards for other camera's. A camera that has not been upgraded to 'boot' from the CF card will safely ignore the firmware, whilst if you insert the 'non-bootable' CF card you picked up in a hurry on your way out to the observing venue for the night, your camera will revert to running it's normal built in firmware as soon as you turn it on :-)
Using Canon's built in 'Noise Reduction' mode
You should really only use this for a 'real' manual 'bulb' exposure i.e. when you actually control the shutter 'by hand' (rather than 'by clock') so do not know the exact exposure time. When set to 'bulb' + 'noise reduction', the 350D will automatically 'expose' a second image with the shutter closed, of identical time to the just taken image. This generates a 'dark frame' that the camera then subtracts internally from the raw sensor data of the first image. The dark frame is not saved.
Whilst the exact details of the process have not been found, it is a 'reasonable guess' that the camera sensor pixels are some-how 'counting backwards' during the 'darkframe' expose i.e. the actual exposed image is left sitting on the sensor and the pixels are then 'negatively biased' to 'subtract' the 'dark currents' with the shutter closed. This would explain why there is no 'darkframe' to save.
The main advantage of this mode is that it automates the dark frame process for images that have been fully manually exposure (i.e. not accurately timed). However the disadvantage is that every exposure sequence is doubled in length and, because it is not saved, the dark frame can not be reused.
When taking multiple shots all at the same exposure time (using DSLR Shutter or similar software), you need only take (and save) a single dark frame (or perhaps two, one at the beginning and one at the end of the sequence). With exposure times typically in the 5-10 minute region, only needing to take one dark frame can mean the difference between obtaining 5 images (before the UK weather closes in) or 9 images (+ 1 dark) ...
It's worth noting that, unless you perform Dark Frame subtraction with RAW mode images, the camera's own 'noise reduction' function will be far superior to anything you can possibly achieve with JPEG images.
NB. To use DSLR Shutter with 'Noise Reduction', set the 'delay between shots' to the 'CF card save time' plus your chosen 'exposure' time.
Sensor Cleaning (and pixel defects)
Any dust on the sensor will cause large 'glob like' (out of focus) intensity reductions. Examination of the RAW files will also reveal isolated pixel defects that the camera normally interpolates around when generating JPEG's. These will be the few 'hot pixels' ('always on') and (often) slightly more 'dead' or 'dark' ('always off') pixels.
Whilst isolated pixel defects can be 'fixed' by processing with a FlatField (see later), any large 'glob' of 'darkish' pixels should be investigated. Follow the camera manual's instructions to put it in 'sensor cleaning' mode which will lock up the mirror and open the shutter (eg for the 350D, Menu 'Tools 2', Sensor Cleaning) and investigate with a bright light and a hand held rubber 'bulb' air puffer.
Be exceedingly careful never to touch the 'sensor' = although a glass plate (iR filter or clear glass replacement) is mounted in front of the actual sensor any grease on this glass will be almost impossible to remove !
If you must attack the glass with, e.g. a cotton bud dipped in some dubious 'lens cleaning' fluid, don't blame me when all your images end up out-of-focus :-).
Battery Eliminator
 It's almost guaranteed that your Canon Camera Battery NB-2LH (7.4v) will go flat part way through a single evenings observing....
If AC power is available, it is highly recommended that the Canon ACK-E2 (for the 300D, about £70) or a cheaper 'look alike' - Maplin L69BQ (about £20) or generic/used from eBay (about £30) can be used to supply the camera with 7.2 to 7.5v.
Canon also makes a Battery Grip (BG-E3) that can take 2 Canon Batteries (NB-2LH) using the standard GM-E3L magazine, or a set of 6 rechargeable AA batteries in the (optional ?) BGM-3LA magazine. However this is expensive (Canon charges over £80 and even the 'generic' version found on eBay is about £40 + batteries extra), so the DIY approach is to run a cable from a hollowed out old battery to a external battery power pack.
The 'DIY' approach requires a battery pack of 5 x 1.5 dry-cell batteries (for 7.5v) or 6 x 1.2v NiMH rechargeable cells (to give 7.2v).
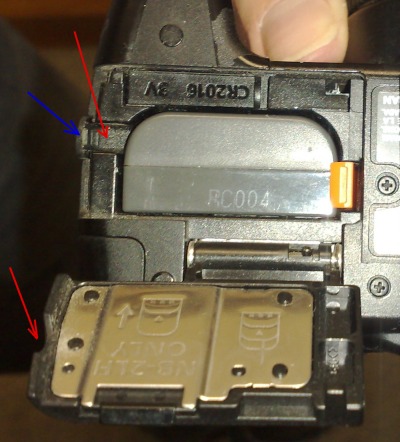
An old Canon Battery shell can be 'hollowed out' to provide the connections. The Canon Battery shell '+' should be wired to the battery pack '+', whilst both the central connector ('T') and the '-' connector are wired together to 0v ('Gnd').
A channel (red arrows) allows the cable to come out sideways = there is a small rubber flap (blue arrow) that bends out of the way when the cover is closed on the wire.
Note - if you are using a pair of 6v lead-acid batteries to obtain the 12v needed to drive your mount, you can add an additional 1.2v rechargeable off the first battery to give 6 + 1.2 = 7.2v. If you do this, MAKE SURE YOU HAVE A SINGLE COMMON 0v 'GND'.
Some Notes on cables
1.-Use detachable cables
It's generally a 'good idea' to make your various cables 'detachable' .. so, for example, you can swap battery packs without having to remove the dummy battery from the camera and mount/dismount your camera without having to play with the 3m trailing cables running from the OTA to your laptop ....
2.-Use a different plugs type for each cable
Using different plug types is HIGHLY RECOMMENDED = if two cable plugs / end sockets are the same type/size, then in the dark it is only too easy to plug a 7.2v battery pack into the camera remote shutter control cable (or your mounts 12v battery pack into the camera 7.2v power cable) ... and destroy the camera ... or plug the Video Out cable into your Shutter Control laptop serial/parallel port adaptor (& risk damage to the camera Video o/p by shorting it to Gnd via the opto-isolator)...
TIP - the Canon 350D Remote Shutter socket is 2.5mm and Video Out 3.5mm. It is thus quite possible to plug a 'live' Remote Shutter (2.5mm) into the Video Out (3.5mm) and short it out. To avoid this, you should always start by plugging in cables to the camera from the bottom (i.e. USB first, then Shutter, finally Video) ... if you can't make the middle one fit, you are trying to plug the Video cable (3.5mm) into the Shutter socket (2.5mm) :-)
NB. Plainly the power cable should be connected last (just in case the camera has been left in the 'on' position).
3.-Run a USB cable as well
Even if you have no intention of using your computer to control the camera using USB, however you will kick yourself later if you leave it out now and then chnage camera's or find some other reason why you need it (for example, to download images during the observing session so you can check everything is working OK & maybe start work on one set of images whilst the rest are being captured).
DeepSkyStacker has a 'live view' type function that allows you to 'monitor' the RAW images as they are fetched into a 'watched folder' on your laptop. This is HIGHLY RECOMMENDED since there is nothing so pointless as to run your comera for hours before discovering that 'tracking' failed 5 minutes into the sequence (and all you have is a set of out-of-focus images of your neighbours trees ... ..)
4.-Use a cable 'tidy'
It's all too easy for loose hanging cables to end up being 'wrapped around the mount head' or caught up on the tripod leg wing-nuts etc. and being ripped out whilst tracking (or during a 'goto').
TIP - unless your camera & it's cables are permanently mounted, it is highly recommended that you connect the cables to the camera only after the 'Auto-Star' set-up is complete and you have completed the 'goto' your chosen imaging target (and can see it in the eyepiece) == high speed 'goto' in the dark is the fastest possible way to rip out your camera's cables !
The control & power cables should be 'strung' along the scope barrel to the mount head RA axis point and then carefully draped down one tripod leg (choose the leg toward which the RA drive is moving the scope :-) ). Sufficient 'slack' must be allowed for 'tracking', but not so much that the cable can snag on the tripod leg wing nuts etc.
TIP - to reduce the possibility of a 'dangling' cable getting caught, all 4 should be gathered together using a 'cable tidy' (at least over the 'slack' distance) - but be very careful to select the lightest available - a heavy / stiff cable tidy may negatively affect the mount drive accuracy.
TIP - use Veralco or similar to secure the cables to the telescope / mount ... using tie wraps etc. will almost guarantee ripped cables - or even damaged mount gears / motors - in the event of any mishap .. 'veralco' will pull loose - and the ripping sound may alert you in time to prevent any real damage.
Almost final TIP ... a set of in-line connectors (see above re: using different connector types) up near the camera end that will 'pull out in sequence' (ideally, camera power first, of course) are your final defence against a mishap that could lead to disaster = you do NOT want 4 nice strong cables ripping your camera out of the telescope focusing 'draw-tube' or the 90 degree mirror mount .... especially as the camera's next destination is likely to be your patio floor :-(
Final TIP - add your mount power cable to the camera cable set - so if (when) the camera cables snag and pull out, the mount motor power is 'automatically' removed
Eliminate the cables completely
One more camera cable TIP = get rid of them ! If you control your mount and camera using WiFi (and a Raspberry Pi) you can eliminate all the trailing cables (by mounting everything on the mount head / OTA itself) - it's relativly easy to setup the Pi as a 'WiFi to serial link' for mount control whilst at the same time using it to control the camera exposure (via a 'GPIO' pin) whilst at the same time supporting 'camera USB to WiFi'
TIP - when mounting 'stuff' on the OTA, batteries etc. can go on the opposite end to the camera and help balance it's weight
Eliminating the DSLR
A Raspberry Pi plus the Pi Camera is likley to cost about the same as the 'adapters' needed to mount your DSLR onto the focus assembly alone ! However that's another Project = see my Navigation menu, left (or see here to build a Pi camera 'eyepiece cap') !