

Auto-ducking
'Ducking' is when you merge two audio sources - typically 'background music' with a 'voice over' - and 'mute' one steam (the background music) when the other is detected (the voice over)
In the old days a simple two channel audio 'mixer' consisted of a 'slider' potentiometer, the two audio inputs connected one to each end of the potentiometer and the output tapped off the slider. To control the 'mix', you would manually move the slider from one source to the other.

One source would be an amplified microphone - and you would slide the mixer towards the Mic. input when the narrator started speaking.

These days the 'slider' is an electronic amplifier with a gain that is set by an electronic 'voice detect' circuit (a 'delay' circuit stops the music level being restored when the narrator pauses i.e. in the gaps between sentences), hence 'auto-ducking'.
NOTE THAT 'Audacity' (the software media player) has an 'auto-ducking' capability. This is typically used to merge two pre-recorded audio streams, however it chould be possible to merge one live and one pre-recorded stream. On the other hand, for 'live' narration, a simple hardware 'mixer' (fitted between the music player and the amplifier) that does not require a working PC will be much more reliable and flexible
Of course, a hardware mixer only 'works' if an analogue music 'path' exists :-)
How it works
The MIC and Music inputs are both amplified and then merged to produce the output. The output of the MIC input amplifier is used to control the amplification of the Music input. When the MIC level exceeds some set value it is assumed that narration has started and the Music input is 'muted' (amplification reduced to 0). A 'timer' is used to maintain the 'muting' over any pauses in the narration.
Op-amps are used as the input amplifiers and, after 'mixing', as the output drive.

The 'gain' of the Music op-amp's is controlled by a 'voice level detect' circuit fitted after the MIC amplifier.

This can be done with MOSFET's in the OpAmp feedback (gain control) circuit. Since a MOSFET is essentially 'voltage controlled', a simple 'diode' circuit can be used for the 'voice level detect' without worrying about current flows.
Power supply
Op-Amps can drive 'rail to rail', however if the output reached the Hi or Lo rail limit this would result in 'clipping'. Since audio line voltages can go to +/-2v, we need a supply of at least 4 volts (+/-2). The availability of cheap USB power supplies (and Power-Banks) makes 5v the obvious choice
A micro-USB socket can be fitted so the mixer can be powered from an external USB power-block.
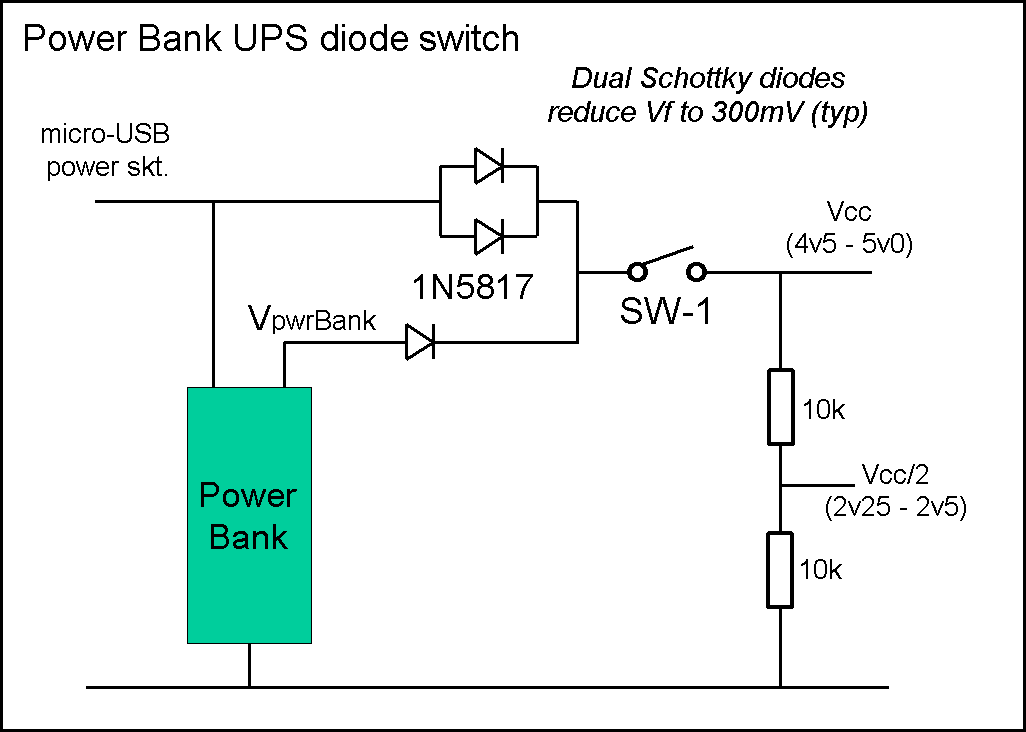
To maximise flexibility, a 'power-bank' can be fitted internally. There is no need for any fancy 'switch over' circuit = it doesn't matter if the audio 'drops out' for a second or so when the USB power cable is plugged in = a couple of Schottky diodes will do the job.
If the 'mid point' or 'offset' voltage Vcc/2 is generated using a 2 resistor 'chain', then the 'absolute' value will depend on the actual supply voltage i.e. will differ between power-bank and USB power-block supply. Whilst Zener diodes could be used to ensure 'absolute' values, there seems little point - instead a combination of the MIC input amp. adjustmanet and the 'level detect' adjustment will be used
The 555 timer trigger is Vcc/3, so (to some extent) will 'compensate' for variations in the Vcc/2 mid-point voltage
Inputs
Audio levels within the unit will be in the range +/-2v. The Op-Amps will run from the 'single rail' 5v supply - a pair of 10k resistors is all that is needed to set the Vcc/2 'mid point' - this will only be used at the op-amp '+' input, so effectively zero current will ne drawn.
A LM324 quad op-amp will be used for the input amplofiers (and a LM358 dual will drive the outputs).
Given that the music input can be expected to be 1v pk-pk 0dB 'line' voltages, the input op-amp 'gain' can be pre-set (using trimmers) to '100%' (or 'times 1.0') i.e. there should be no need for any user adjustment
In theory the same applies to the output op-amps - these can also be pre-set to 100%, so the input audio music levels are 'passed on' to the outputs without change
Audio
The music source 'line output' has a typical impedance of 100-600 ohms at 0dB (1v pk-pk), although you should allow the level to reach double that (2v pk-pk) before you 'clip'. The music line inputs should present a load impedance of at least 10k (Op-Amp input is Mohm).
With the Op-Amps running from a 5v supply (+/- 2.5v), this means the Music op-amp input amplification will be 'times 1' (or, during 'ducking', 'times 0')
Microphone
The typical 'high quality' dynamic microphone is a passive device with a medium impedance (anything from 600 to 10k ohms) that delivers very low voltages (compare to the normal +/-1v 'Line' level)
Microphone performance is tested with a 1Pa ('100%' level) 1kHz test sine wave and expressed with reference to 1v peak-to-peak (which is 0dB).

A typical microphone spec. might be "-44 dB" = which means the 1Pa audio sound (max. level) will prodcue a -44dB output i.e. 17.8mV pk-pk.

Even the cheaper electret microphone (which has to be provded with a 5v feed via 10-22k on the line) delivers no more than 100mV.

Since the human voice will deliver 70dBA, the typical -44dB microphone only generates a 0.00056301v peak voltage (i.e. about 0.5 mV !).
To reach 1v pk-pk, the MIC input will thus need an amplification of up to 2,000 !
In practice, due to the very wide range of microphones that could be used, a MIC input vol. control will need to be fitted that delivers anything from 100 to 3,000 times amplification (to reach the required nominal 1v p-p (max 2v p-p) internal 'line voltage' levels)

The 'line voltage' output of the MIC op-amp will be fed to the 'muting' circuit
Muting
To 'mute' the music, the music input op-amp amplification is reduced to 'times 0' (using a MOSFET (Field Effect Transistor) in the 'gain' feed back path) when the MIC audio level reaches some set level.
The 'mute' control is derived from the output of the MIC input op-amp.

A potentiometer is used to 'tap off' a suitable level and a simple diode can be used as the 'threshold detector'. In practice, the 'simple diode' will be a low-power LED (so we get visual feedback of the 'detect' level).

A typical 3mm Red LED Vfwd is 1v8-2v0, which more or less forces us to use the 'narration detect' MIC op-amp in rail-to-rail (i.e. 'clipping') mode. This means that the voltage 'left over' to control the MOSFET will be Vcc/2 - Vfwd i.e. in the 0v5 range.

At least 5mA should be allowed to light the LED (the MOSFET's are voltage controlled, so we can ignore the current flow to the muting cct)
A NE555 timer is used to 'sustain' the 'mute' for a second or two during narration pauses.
This is by far the hardest thing that has to be arranged. In effect, the 555 must be 'triggered' by the 'loss of trigger' (i.e. then the narration (MIC) levels drop)

The 'trick' is to feed the MIC level to the 555 'reset' input (which holds the timer 'off') whilst feeding the 'raw' MIC to the 555 'trigger'.

Remember = the audio '0' is VCC/2 (2v5), whilst 'high' level is 0v / 5v, so disodes will be used to ensure the 'correct' levels are 'seen' by the 555.
Sustain
A NE555 timer is used to deliver the auto-ducking 'sustain'
(+) 555 timer operation
Sustain operation
In the auto-ducking circuit, the timer is used to maintain the 'ducking' control signal during pauses in narration. The timer thus has to run from the 'end' of MIC input (rather than from the start) i.e. trigger on 'silence' (but only after 'naggation').
This is quite hard to achive, however the 'trick' is to remember that we are using single-rail op-amps in the MIC circuit. So, whilst with a dual-rail (+/- V) op-amp 'no signal' (silence) is 0v, on a single-rail it is the mid voltage (2.5v) that is 'silence' and 0v (& 5v) = maximium volume !

So if MIC op-amp output is fed to Reset, the flip-flop will be held in reset when MIC input is lound enough to exceed 'less than 0v7'. If it is also fed to the Trigger input, the flip-flop won't set until the MIC volume 'falls' from 'above' 0v7, but is still less than 1v6 (as it falls towards silence at 2v5).

This means the flip-flop sets as the MIC input falls away (but not when silence is reached) .. and that starts the timer .... if MIC input volume 'rises' towards 0v and reaches 0v7 (or less) again the timer is aborted and the flip-flop resets (and discharges the timer cap. so it starts at T=0 again)
MOSFET duck control
A MOSFET is (essentially) a voltage controlled switch. The control voltage is applied to the 'Gate' (current flow is essentially zero). The other two terminals are the 'Source' and 'Drain'. There are two types, N-channel and P-channel :-
N-Channel For an N-Channel MOSFET, the Source is typically connected to ground. To turn the MOSFET on, we need to raise the voltage on the Gate (above 0 i.e. above Source). To turn it off we connect the Gate to ground (i.e. below Source). P-Channel The Source is connected to the power rail (Vcc). To turn on, the Gate needs to be pulled below the Source (to turn it off, the Gate needs to be Vcc or above). 'Off' resistance is 'infinite', 'On' resistance typically a few ohms.