

MS Windows is designed so that it can only 'boot' from Hardware it has been 'installed' on. Whilst all sorts of spurious 'reasons' (such as 'installing the required drivers' and 'configuring the SSID') may be given, the actual reason is Licence enforcement. To support OEM's (who refuse to spend hours installing on each computer) MS provides ways to 'pre-build' a Windows installation on one computer so that when first booted on a similar on the installation is finalised. Even so, this makes it exceedingly difficult to network boot & run Windows on a diskless workstation (from a RAM disk)
What 'solid state' devices can be used to 'replace' a hard disk ?
IDE 'replacements', such as Disk On Module 'DOM' or Compact Flash (CF) cards (via IDE>CF adapter) can be used, and (on modern motherboards) USB 'Memory Sticks' (or other USB devices) can also be used as a 'boot device'.
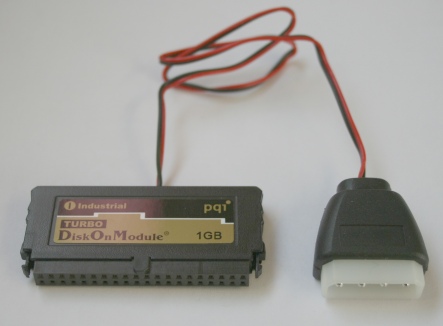
The PQI brand 'DOM' seen right plugs directly into an IDE hard disk socket on the motherboard.
At the time of writing (early 2012), 256Mb IDE Disk On Modules (DOM's) can be found on eBay for £4.50 and the 512 Mb capacity for only £5. If you are aiming at DOM's or CF cards, there is really no point in squeezing your XP installation down to fit on 256Mb (unless your already have lots of 256Mb DOM's or CF cards). Indeed, a 1Gb SATA DOM can be had for as little as £12 whilst 2Gb IDE DOM's start at £16
Whilst a 512Mb CF card can also be had for £5 you will have to add the cost of the CF <> IDE converter @ another £1.50 before comparing to DOM (CF <> SATA converters exist, but these start at £10). The advantage of going the CF (as opposed to DOM) route is that you can prepare them on any computer with a CF card 'media adapter' socket (whilst to prepare a DOM you have to remove the case on a computer with an IDE interface)
If you need to squeeze down for the smallest possible footprint for a RAM disk, go back to my 'Going beyond nLite' page and then directly to my 'BOOTP & RAM disk page' instead of continuing here
Why Compact Flash (and not SD / XD etc) cards ?
CF cards are designed to 'look like' IDE hard disks. This means a simple adapter (with no electronic parts) can be used to plug them directly into a normal IDE cable
Other types of memory card (SD etc.) all use rather clever 'serial control' interfaces that are interfaced to USB (so, to use a SD card, plug it into a USB adapter & then follow my instructions for booting from USB memory sticks)
Because CF was the first type of 'Memory card' to be introduced, they started off in very low (by todays standard) sub 1Gb capacities. These lower capacity cards can often be found on eBay at 'cheap' prices, although you should note that very old CF cards are incapable of being used as boot devices
Using nLite (to generate a cut-down install CD) it's quite possible to install XP directly onto a 512Mb CF card. By installing first onto a hard drive and then 'cutting down' the installed 'image' (& using Sysprep to make a new installer, or 'cloning' the image and swapping the hard drive for the CF card), you can even get XP onto a 256Mb card !
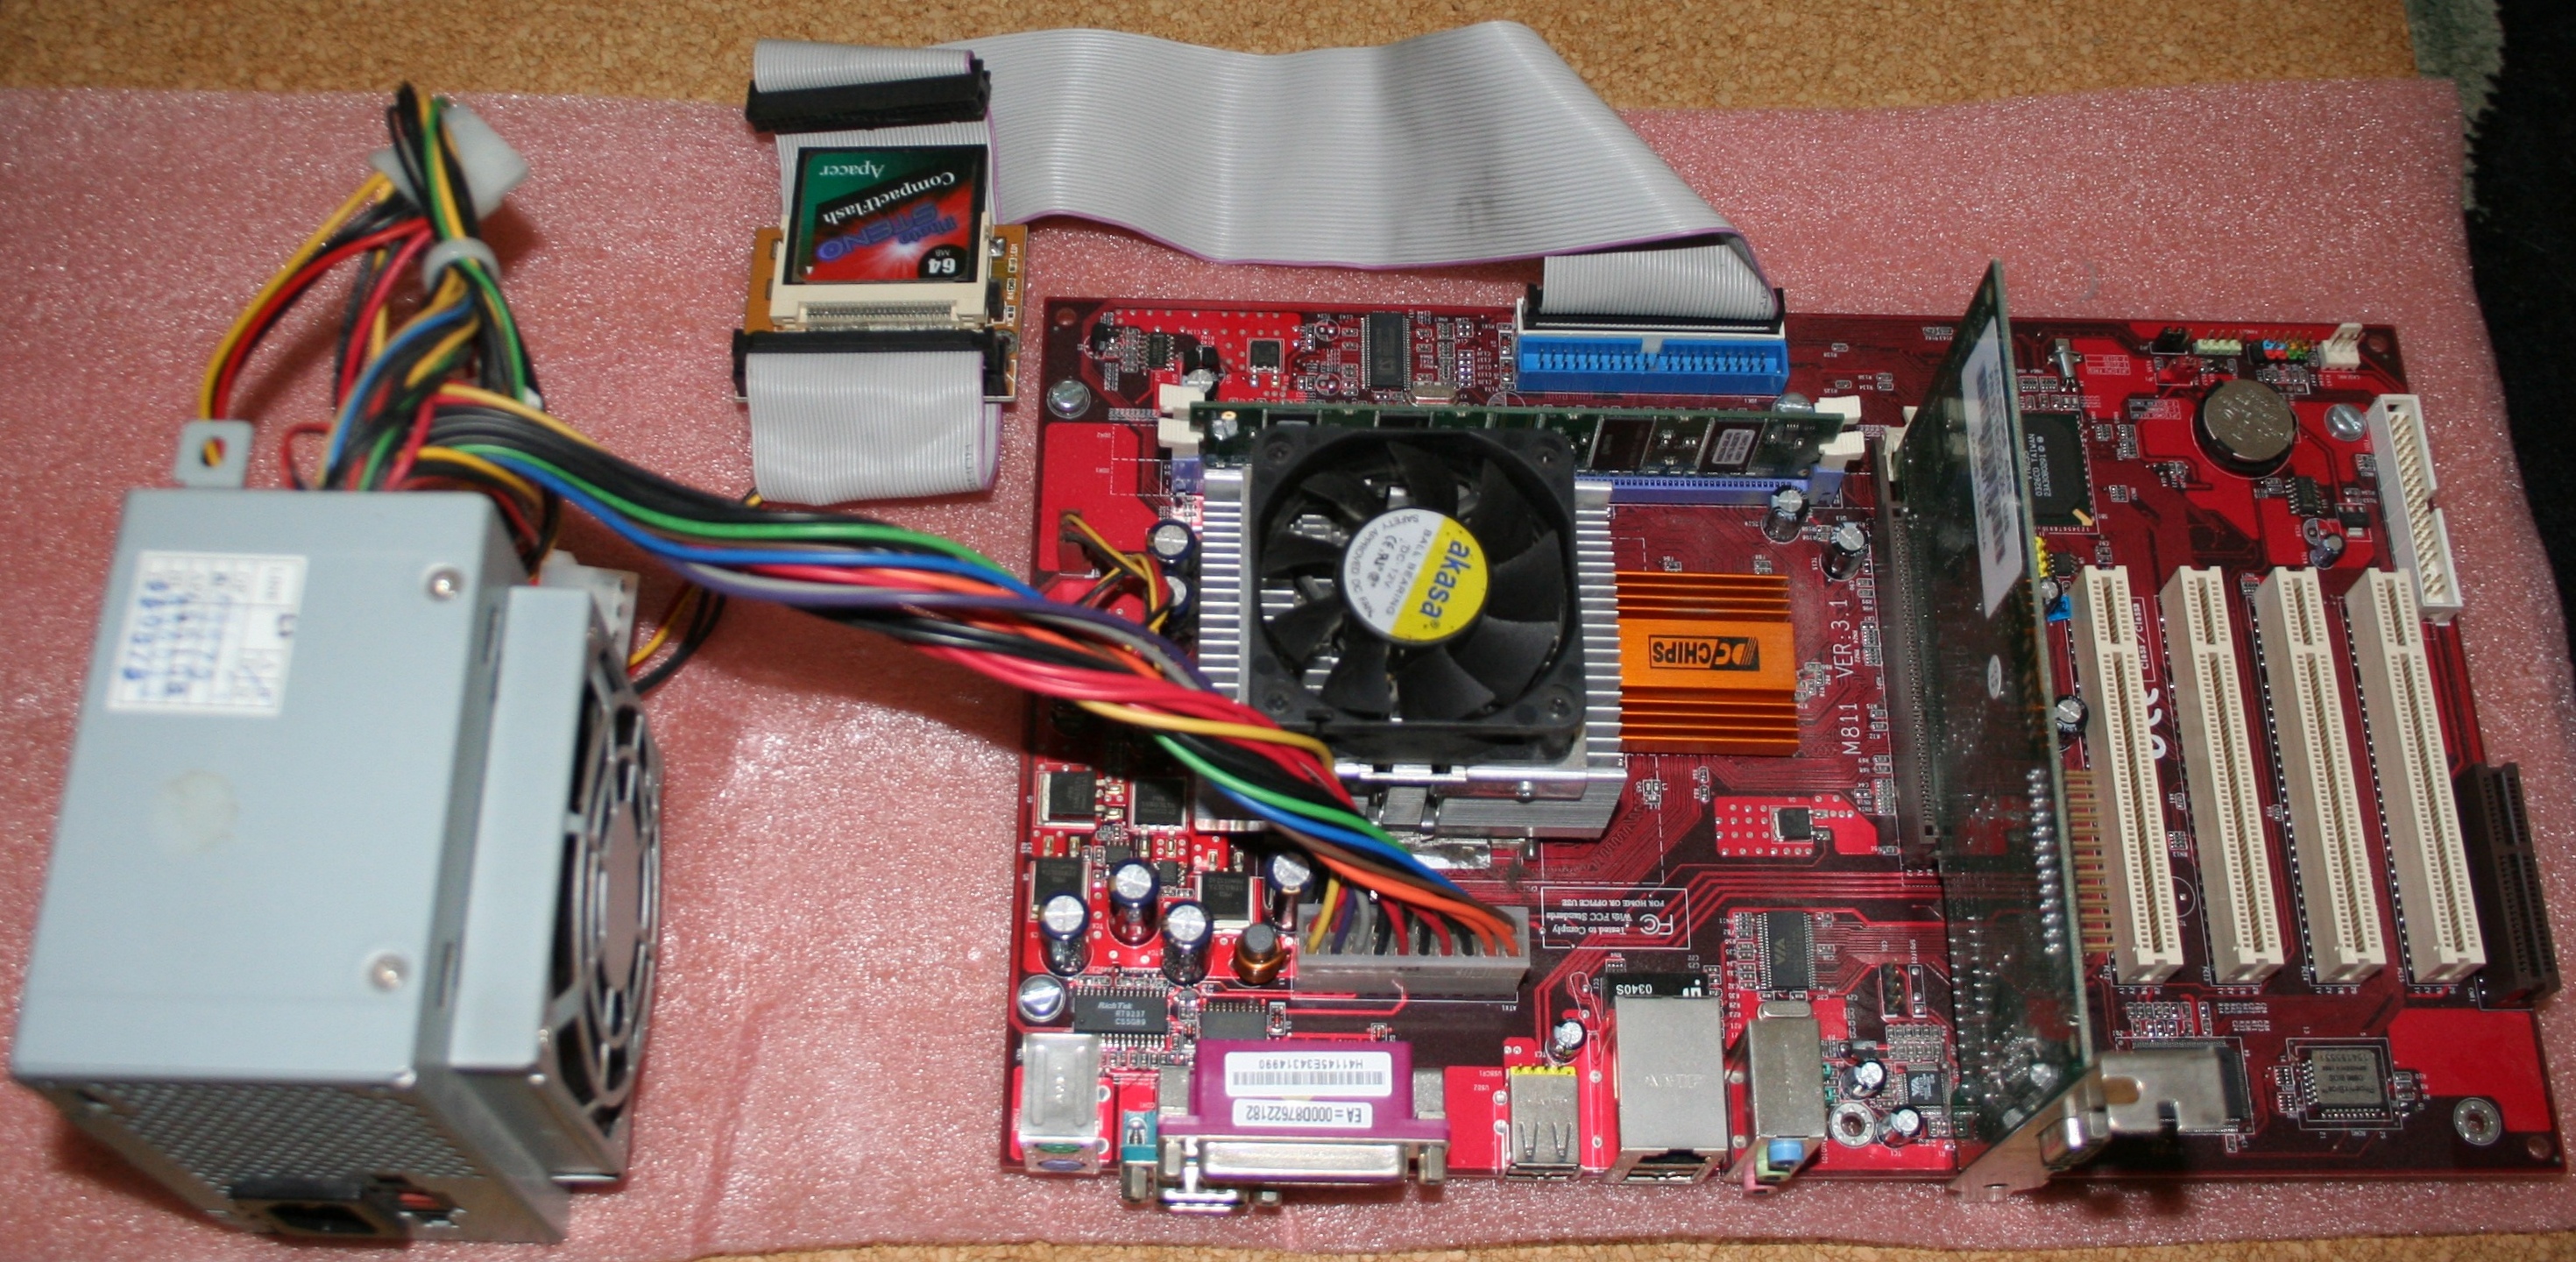
Photo above is a SETI 'node' that boots Windows from a CF card
How easy is it to use a DOM, CF card or USB stick ?
An IDE DOM is designed to plug directly into the motherboard IDE interface socket, which makes it hard to use a second, 'Slave' drive, on the same interface (although SATA DOM's connect using standard SATA cables).
CF card adapters exist for both IDE and SATA and connect using the standard data cables - most CF <> IDE adapters have a 'link' that allows them to be set into Master or Slave mode. 'Double sided' CF <> IDE exist that allow you to plug in 2 CF cards, Master & Slave, at the same time, and 'clone' directly from one to the other. Most adapters use a 'floppy disk' type power connector.
If there are USB ports built into your Motherboard, 'USB boot' is likely an option on the BIOS 'Boot Order' page. If USB is not shown on the Boot page, first check the 'Peripheral setup' or 'USB setup' page in case 'boot' has to be 'enabled' there first. If you still can't find USB Boot support, try updating the Motherboard BIOS to the latest offered by the manufacturer. If you still have no USB Boot option, your motherboard is too old
You may be able to find a PCI 'USB card' that supports an 'external' USB CD/DVD drive. Do NOT assume this means it will allow you to boot from USB - you need one with it's own BIOS and these typically cost more than a new motherboard :-(
How do I use a DOM / CF card / USB boot for my SETI node ?
1a. Format using FAT and make your device bootable
To make a USB device bootable, you can use 'Grub4Dos' (see BOOT_USB (boot_usb_46.exe)).
See also the 'Tutorials', 2 - newcomers, at LiveXP tutorials "Booting PE from Hard Drive or USB Flash Drive" (about half way down the page) & follow the 'Hard Disk' instructions for a CF-card.
1b. Install or load a cut-down Windows XP directly onto the DOM / CF card
If you are preparing a CF / DOM 'off line', you can load the Sys-Prep'd 'image' onto the device and it will self configure when booted on the SETI target motherboard. This is the fastest way to 'build' multiple devices for large number of SETI nodes
If your CF / DOM's are 256Mb, then you will have to first load to hard disk on an 'example' of the target motherboard, cut down the install, Sys-prep it and then copy the Sys-prep'd images onto the 256Mb devices
If you are preparing with the target motherboard, and your DOM / CF is 512 Mb or more, you can install directly from the nLite cut-down Windows XP install CD. This is the easiest and simplest way to prepare a small number of SETI nodes
If your DOM / CF card is only 256Mb, you will have to install to a hard drive, cut down the installation, then clone from hard disk to the CF / DOM
1c. Map network drive and install SETI
During SETI wu processing, you can not avoid the automatic saving of 'work in progress'. However the 'write cycle life time limit' on a DOM / CF card / USB stick means all 'writes' during normal Windows operation will be disabled (see later), so saving of 'work in progress' must be to somewhere 'off C:'
If you have 10 or fewer 'nodes' or are using a 'real' Server with sufficient CAL's to cover all your nodes, you can simply place SETI on a network share (and run it from there) and SETI will automatically save to the share.
However if your server is running Windows 2000 Pro or XP Pro, nodes over the 10 simultaneous count limit will be denied access to a permanent share. One solution to this is to 'save' to a RAM disk on the node instead (although if power-cuts are a common occurrence in your area, you should consider powering any Nodes saving to RAMdisk via a UPS)
The setting up of RAMdisks is covered in my 'BOOTP nodes' page
Other solutions include setting the SETI 'save time' to eg 30 mins and the share 'autodisconnect' time on the server to 1 min or adjusting the 'max simultaneous user' count on the server from 10 to 50 (which is probably illegal in USA and will violate your MS Licence so might be OK on w2k Pro (since you will never get any more MS Updates) but not XP (since a MS Update may reset it at any moment))
2. Obtain the EWF (and 'MinLogon') components from Windows XPe (XP Embedded)
Get the XPe 'evaluation' ISO from Microsoft downloads, open the ISO (eg using 7zip) and extract the XPEFP2007.exe (self-extracting archive) file. Open the XPEFP2007.exe (eg again using 7zip), find the 'rep' folder and extract the five "ewf*.*" component files (& minlogon.exe) to the root of c:
Note - DO NOT be tempted to download the .msi installer 'offering' - this does NOT contain the required components - you MUST get the ISO ( XPeSP2FeaturePack2007.iso )
If you want to save another 12Mb of wasted space, continue with 2a. below, otherwise skip to step A3.
2a. Eliminate the 12Mb of space wasted by the 'oembios' file
During 'log-on', a Windows XP system built from an OEM system CD will compare the contents of oembios.bin against the motherboard BIOS. If they don't match, you are unable to log-on. This is to stop you installing or running an OEM XP System on some other manufacturers motherboard.
Fortunately XP embedded is aimed at 'Your_computer/ on a chip' applications, so has none of the nonsense with 12Mb oembios files. "All" you need to do is replace the normal XP 'WinLogon' shell with the 'MinLogon' from XPe & then you can save 12mb of otherwise wasted space
The following is based on instructions found here.
Be sure to replace the WinLogon BEFORE you use EWF to prevent 'write' operations :-) If you slip up and have already installed EWF, from a CMD window turn off EFW using "ewfmgr c: -commitanddisable -live"
1) Copy the latest minlogon.exe file from XPe (XPeSP2FeaturePack2007.iso, XPEFP2007.exe, Rep folder) into C:\Windows\System32
2) Disable Windows File Protection (see Q at end of this page), then replace \Windows\System32\winlogon.exe with minlogon.exe (i.e. winlogon.exe -> winlogon.exe.old, minlogon.exe -> winlogon.exe)
3) Create a text file called (eg.) minlogon.reg and enter the following:-
Windows Registry Editor Version 5.00
[HKEY_LOCAL_MACHINE\SOFTWARE\Microsoft\Windows NT\CurrentVersion\Winlogon]
"Config"=dword:00000017
4) Save the file & 'double click' it to run & mod. the Registry & Reboot
On reboot, Windows will "set up" a single auto-log-on system level account using the 'default' desktop. All the old desktops, user accounts AND SETTINGS will be lost (you will revert to Windows XP desktop with all the 'default' view options). If all works out OK, you can now delete the oembios.bin file (and restore EWF write protect, see below)
3. Eliminate all Write operations during normal running.
The (non-volatile) memory used in CF cards and USB sticks has a very limited 'write' cycle life. Although this may by 500,000 + write operations (which is fine for photographic use or for file back-up / storage), the Microsoft Operating system is quite capable of performing hundreds of thousands of write operations every hour of every day.
See Wikipedia MS Enhanced Write Filter (EWF) and see here for a detailed explanation
Assuming you extracted the five ewf files to the root of c:
1) Replace your existing 'ntldr' with 'ewfntldr' (i.e. rename ntldr -> ntldr.old, rename ewfntldr -> ntldr)
2) Move 'ewfmgr.exe', 'ewfapi.dll' and 'ewfdll.dll' to c:\Windows\System32\
2a) 'Register' the 2 DLL's (if you added 'Register' to the Right Click context menu, simply R/click & select 'Register')
3) Move 'ewf.sys' to c:\Windows\System32\drivers\
4) RUN, regedit. Find HKEY_LOCAL_MACHINE\SYSTEM\CurrentControlSet\Enum\Root & change the 'root' folder Permissions from 'Read Only' to 'Full Control'
5) Make the following changes (or download ewf.reg.txt, remove the .txt extension and double click to run it
(the ewf.reg file contains a couple of extra 'tweaks', such as 'disable defrag', which Windows sometimes decides to start automatically)
Windows Registry Editor Version 5.00
[HKEY_LOCAL_MACHINE\SYSTEM\CurrentControlSet\Enum\Root\LEGACY_EWF]
"NextInstance"=dword:00000001
[HKEY_LOCAL_MACHINE\SYSTEM\CurrentControlSet\Enum\Root\LEGACY_EWF\0000]
"Service"="EWF"
"Legacy"=dword:00000001
"ConfigFlags"=dword:00000020
"Class"="LegacyDriver"
"ClassGUID"="{8ECC055D-047F-11D1-A537-0000F8753ED1}"
"DeviceDesc"="EWF"
"Capabilities"=dword:00000000
[HKEY_LOCAL_MACHINE\SYSTEM\CurrentControlSet\Enum\Root\LEGACY_EWF\0000\Control]
"ActiveService"="EWF"
6) Back in 'regedit', return HKEY_LOCAL_MACHINE\SYSTEM\CurrentControlSet\Enum\Root Permissions back to 'Read Only' (see 4 above)
7) Reboot
8) Start, RUN, cmd, ewfmgr (to confirm EWF is working)
9) ewgmgr C: -enable (enables EWF for drive letter C)
10) Reboot
If, after installing EWF, boot keeps bringing up the XP 'recovery' options window, delete the "bootstat.dat" file.
How do I disable Windows File Protection (WFP) ?
When using nLite to build a cut-down Windows system install CD, you should set 'WFP = disabled' (i.e. not included). If you left it enabled, you can disable it later by following the instructions here or below
Note - if you modify one of the WFP 'protected' files (i.e. one where a 'back-up' is kept in the \dllcache folder) the 'checksum' of the new version will no longer be valid. If you turn on WFP again (set SFCDisable=0), it will keep 'complaining' and demanding you 'Insert your Windows System disk' so it can replace the now invalid (modified) file with the old version
If you don't mind Windows 'complaining', just delete the entire contents of the \dllcache folder. If you want to do it the 'proper' way, continue below
A1. In Windows 2000 start by setting the Registry Key:
[HKEY_LOCAL_MACHINE\SOFTWARE\Microsoft\Windows NT\CurrentVersion\Winlogon]
Value Name: SFCDisable
Data Type: REG_DWORD (DWORD Value)
Value Data: ffffff9d (= disabled).
If your w2k is sp2 or later, you now have to modify the SFC.DLL (found in the both C:\WINNT\SYSTEM32 & .\dllcache folders). You must modify the one in dllcache first
First copy C:\WINNT\SYSTEM32\dllcache\SFC.DLL to SCF.mod and SFC.bak (just in case)
Open SFC.mod in a hex editor
sp2 = offset 00006211 (i.e. 6211 hex) you should find the values "8BC6", change to "9090" and save
sp4 = offset 0000E3BB (i.e. E3BB hex) you should find the values "8BC6", change to "9090" and save
Boot into the Recovery Console
Copy SFC.new as C:\WINNT\SYSTEM32\SFC.DLL & C:\WINNT\SYSTEM32\dllcache\SFC.DL overwriting the originals
Reboot
A2. In XPsp2, Microsoft made it a bit harder to disable WFP. The first problem is that you need to find version 5.1.2600.1106 of the sfc_os.dll file from XPsp1a (my XPsp2 System CD has ver 5.1.2600.2180). Rather than download it from some virus infected 'krack' site I suggest you go find it on an old XPsp1a System CD = you will have to 'unpack' it from \i386\sfc_os.dl_ using 7-zip or similar. To make it easy to find, I suggest dropping it into the root of your C: drive
Go to HKEY_LOCAL_MACHINE\SOFTWARE\Microsoft\Windows NT\CurrentVersion\Winlogon
Create a new DWORD value named SFCDisable
Double-click SFCDisable and enter FFFFFF9D
Exit the Registry Editor
First COPY C:\sfc_os.dll (ver 5.1.2600.1106) to (eg) sfc_os.1106 and C:\Windows\System32\sfc_os.dll (ver 5.1.2600.2180) to (eg) sfc_os.2180 'just in case'
Open C:\sfc_os.dll (ver 5.1.2600.1106) with a hex editor
At offset 0xECE9 you should find "33 C0 40"**, change this to "90 90 90" and save
Boot into the Recovery Console
Copy the modified C:\sfc_os.dll file to C:\Windows\System32\dllcache\ and to C:\Windows\System32\, overwriting the existing versions
Reboot your PC
** if you don't find 33 C0 40 at location ECE9, YOU ARE TRYING TO MOD. THE WRONG VERSION of sfc_os.dll