

What are the 3100's main limitations ?
The main limitation of all computers from all the major manufacturers is the motherboard.
Dell, HP etc. do not make profits by shipping computers with highly flexible motherboards that come with lots of upgrade opportunities - for example, the motherboard in a Dimension 3100 supports a single core CPU and won't support dual core - and whilst the Dimension 5150 supports Pentium D (dual core) it won't support 'core 2 duo' (let alone any 4 core).
Further, if Dell ships with a 2.8GHz CPU your MIGHT get lucky and find the Intel 3.2GHz from the same family (and power dissipation) 'works' - or, more likely, you will discover that the Dell BIOS refuses to 'recognise' it ..
The reason is, of course, that the major OEM's have their own motherboards 'custom built' using the lowest possible cost components.

So, if you want a Dell that can be 'upgraded', purchase the 'lowest spec' version in any 'range', and, and chances are, it will come with a motherboard that will support** the 'higher spec' computer in that range.

** Of course Dell will have fitted some cheap heatsink to the lower spec unit which is only just adequate & will never support the higher heat dissipation of a faster CPU = but when you come to upgrade there's a good chance you can purchase a better heatsink from China (at a fraction of the cost Dell will charge you for the same as a 'spare part')
Single core CPU
The most powerful CPU supported by the 3100 is the single core "Prescot" range. This goes up to 3.8GHz however the Dell 3100 CPU heat-sink / FAN assembly is only rated at 65 watts !
Prior to motherboard replacement, I switched out the original Dell supplied 2.4GHz CPU for a 3.0GHz CPU which the Dell BIOS clocked at between x14 (2.8GHz) and x15 (3.0GHz), apparently 'on-demand' (to check what your CPU is doing, use the CPU-ID' utility (freeware))
4Gb Memory limit
The Dimension 3100 supports DDR2 RAM (PC2-5300 or PC2-4300) but has only 2 slots. Although Dell states that the maximum supported is 2x 1Gb sticks (so 2Gb total), in fact it is actually capable of supporting 2x 2Gb sticks = so you can fit 4Gb, thus allowing Windows XP to 'see' it's maximum Licence Limit of 4Gb minus the i/o space, so 3.25Gb of actual RAM.
However the 3100's motherboard uses the Intel 915G chip-set which does not support the mapping of RAM above the 4Gb boundary = so the 'unused' .75Gb is totally inaccessible
For those on a budget (like me :-) ), the Dimension 3100 is quite capable of supporting one 1Gb stick plus one 2Gb stick = 3Gb, which is what I used prior to replacing the motherboard
On-board Graphics
The Dimension 3100 ships with 'motherboard graphics' and has one PCIe4 card slot and 2 x PCI slots. There is no support for any 'normal' Graphics card (which requires a PCIe16 slot) nor even support for the older 'AGP' type.
Of course it is possible to purchase a PCIe4 to PCIe16 'converter' or 'riser card'. However, whilst this may allow a PCIe16 Graphics card to be 'plugged in', it's never going to run at 'full PCIe16 speed' ('converting' x4 to x16 means you will be lucky if it even achieves 1/4 speed).

Both this approach and the alternative of using an ancient PCI Graphics card is likely to be slower than the on-board graphics, not to mention the fact that the Dell PSU isn't going to supply enough power to run a 'proper' graphics card anyway.
230w Power supply
The 3100 is fitted with a 230w PSU, which is adequate only because the 3100 can't be fitted with a Graphics card (even low-power cards will specify 300w as the 'minimum recommended PSU' for your computer)
2x SATA Drive limit
The 3100 motherboard supports a pair of SATA '1' drives (plus a pair of IDE drives on a single 'master/slave' cable, typically used only for a CD/DVD drive).
BTX Case limits
The BTX Case chassis supports "Viiv Compatible microBTX" form-factor motherboards. Whilst this limits the upgrades to motherboards with a BTX form-factor, it has the massive advantage of supporting a huge CPU heat-sink and cooling fan (which runs at such a slow speed that it's virtually silent = indeed, you can hardly hear the computer is running at all !)
The case has room for 2 internal SATA drives and two front panel facing 5 1/4" drives plus a 'multi-media' panel, or a floppy disk, or a 3rd 3.5" drive
For some insane reason (perhaps because the power cables are so short) Dell mounts the two internal drives 'upside down' thus allowing dust and bits of rubbish to 'collect' on the drives circuit board, potentially shorting out the electronics. If you throw away the Dell mounting rails, you can mount drives the 'right way up', however you will need to use 90 degree plug SATA data connection cables = a standard 'flat plug' cable can't be bent at a sharp enough angle to allow the side panel to be replaced (and, of course, the dell supplied cables are too short :-) )

On the other hand, with a bit of effort, the mounting 'cage' for the two front facing 5.25" drives can be 'converted' to take 3 x 3.25" drives instead (or 2 3.25" drives plus two slim-line DVD drives) = plus there is room at the bottom of the case to add an additional hard drive 'bolted to the floor' (or even add 2 if you don't need to use the motherboard's second PCI card slot)
The OEM SLIC 2.0 Licence limit
The Dell BIOS contains SLIC 2.0 tables (which supports both XP and Vista). Unless you want to pay Microsoft for a new Windows XP Licence, you must use another 'OEM' motherboard with at least SLIC 1.0 (for Vista you need at least SLIC 2.0, for Windows 7, SLIC 2.1)
Further, the Dell 'OEM' Windows XP Licence is actually stuck to the case (usually on the back). To me this means you can replace anything inside, but if you want to 'stay legal', plainly you have to keep the case :-)
For sure Windows 7 differs. First you need an OEM motherboard with SLIC 2.1, second (unlike XP/Vista where the Licence stays with the case), the Windows 7 Licence 'belongs' to the motherboard (so there is no Licence sticker struck to the case).

This is evident when you download Windows 7 OEM from Microsoft's official download site and find it will install onto any SLIC 2.1 OEM motherboard without needing any sort of Licence code.
For XP, an alternative view would be that the XP licence also 'stays with the motherboard'. If you think Microsoft will accept this interpretation, then you can also replace the case (and when you purchase another OEM motherboard it will come with it's own OEM Licence).
Replacement Motherboard
WARNING. Major vendors ship their computers with an "OEM" Windows Licence that will ONLY actually run on an OEM motherboard. This means you can't replace a Dell OEM motherboard with a 'retail' motherboard unless you want to 'upgrade' to (and pay for) a 'Full Retail' Licence - instead you must stick to another "OEM" motherboard (although it doesn't have to be a Dell = see Licence below)
After a lot of searching for 'the best possible XP motherboard' I finally decided on the Gateway DX420X motherboard "DP965LV" (LV aka 'Love Valley'). This is an OEM version of the Intel DG965MQ "Mequon", the difference being the Gateway SLIC 2.0 BIOS (which means it supports Windows OEM XP and Vista Licences) and lack of on-board Graphics (of which more later)
The DP965LV also supports 6 SATA II drives (so lots of future expansion possibilities) - as well as having an IDE master/slave (allowing me to keep my Dell 5.25" CD & DVD drives).

It also has 6 rear USB sockets, S/PDIF audio output and a Gb Ethernet capability !
New CPU (Core 2 Quad)
The DP965LV motherboard supports Intel LGA775 "Socket T" processors with 1066, 800, or 533 MHz system bus (i.e not 1333 FSB) to a max. CPU Frequency of 3.8GHz and a rated TDP 65 - 130 watts**
Although neither Intel nor Gateway state this motherboard supports anything better than the Core 2 Duo, it will, in fact, support the Core 2 Quad "Kentsfield" Q6600 (rated at) 1066MHz FSB, 2.40 GHz = SL9UM(B3)/105W or the slightly better (due to lower power) SLACR(G0)/95W) which I chose (and cost me a total of £30 on eBay).
**After I replaced the heat-sink/fan, I've had it running (at 2.4GHz) without problems since early May 2014
The most significant feature of the quad-core is the 2x 4Mb = 8Mb of on-board cache (each 4Mb is 'shared' between two cores). It also allows the Gateway motherboard to adjust the 'multiplier' (CPU clock speed) 'on the fly' thus minimising power consumption under light loads.

For those who want to push the limits, these chips are reputed to support over-clocking up to 3.5GHz ! Increasing the motherboard 'Bus Speed' to 333MHz (1333 FSB) would take it from 2.4 to 3.0 without problems (other than the fact that Intel says the motherboard won't go to that speed).

Note that from the Intel specifications, VID is limited to 1.5v.**NB To support over-clocking, you MUST get a higher rated heat-sink/fan - also make sure to get a CPU CoreTemp monitoring utility (nothing kills your CPU faster than overheating)
Heat sink / fan
To support TDP over 65w the Dell Dimension 3100 CPU heat-sink must be replaced (fortunately I was able to find one from an old Dimension 5150 (rated to 115w) which worked fine)
The Dell CPU Fan pin-out differs from the 'industry standard', of course (Dell can only sell it's 'own brand' mega-over-priced spare parts so long as industry standard parts are not a 'drop in replacement'). Fortunately it's quite easy to rewire the Dell fan plug to fit the Gateway motherboard header
Dell 5pin fan connector
[White/
Yellow]     Red   Black     Blue    (key)
Sens/TACH    +12    Gnd      PWM      n/c

Normal 4pin fan (header)
1         2         3         4
Gnd       +12    Sens/TACH    PWM
So, to plug the Dell CPU FAN plug into the Gateway motherboard (which has a standard 4 pin CPU FAN header), all I needed to do was swap wires 1 (White/Yellow) and 3 (Black) on the dell plug
8Gb Memory
The DP965LV motherboard has the Intel G965 Express chip-set which supports PAE mapping over the 4Gb boundary. The 4 RAM slots support DDR2, max 2Gb per socket at DDR2-667 (PC-5300), or DDR2-533 (PC-4200) MHz (which are slightly cheaper and easier to find on eBay = so this is what I used)
Whilst the motherboard also supports DDR2-800 MHz (PC-6400) this is only with SPD timings of 5-5-5 or 6-6-6 (tCL-tRCD-tRP). Further, the Intel documentation states that DDR2-800 RAM is limited to 1Gb per socket (whilst the others are 2Gb per socket)
Since the VSuite Ramdisk free edition supports a maximum of 4Gb Ramdisk for Windows XP (32 bit), I wanted 4 x 2Gb = 8Gb of RAM. I started by re-using two 2Gb & two 1Gb sticks (so initially ran with 6Gb), swapping the 2x 1Gb for 2x 2Gb after winning them on eBay
ROMAX (the owners of VSuite) has replaced the original VSuite Ramdisk with the 'Primo Ramdisk' (aka VSuite Ramdisk II) that has no 'free' version. So I suggest you grab a copy of the VSuite Ramdisk free version now (before they remove it from their web site)
PCIe16 CUDA Graphics
Unlike the Intel DG965MQ, the Gateway DP965LV has no on-board graphics support (the rear panel DVI connector is 'missing'). This leads me to suspect that it is using the initial release Intel G965 chip-set that shipped with faulty on-chip graphics. Of course the Gateway BIOS does not 'expose' the on-board Graphics, so there is no way to check
Since I wanted to keep the noise down, I decided to go for one of the GeForce GT series "Silent" Graphics Cards which operates without a fan (and so consumes significantly less power than a 'typical' Graphics card = which also means a lower power PSU with a slower running (i.e. quieter) fan)
As well as supporting dual monitors (via DVI and VGA connectors) the GeForce GT series also have a HDMI output, plus they all offer 'CUDA' support (which is vital for high speed video encoding or running BOINC / SETI)
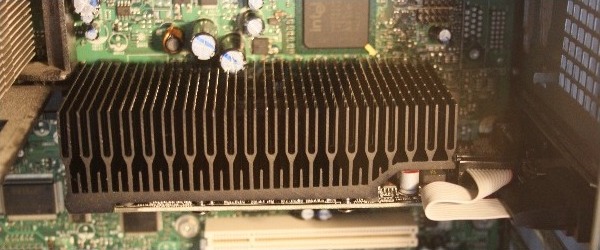
Whilst the Gateway motherboard has a (single) PCIe-16 slot that will take a standard graphics card, there are two 'extra tall' capacitors in the 'free space' above this slot which 'intrude' into what would be the 'second slot' position. At least one of these will get in the way of any graphics card heatsink and this constrained my choice of card to those with 'smallish' heat-sinks (see near centre of heatsink in photo above = the lower part of the vanes had to be clipped to clear one of the capacitors).
Note also in the photo above, top left (beyond the Graphics heat sink), where you can see the CPU heat-sink assembly. This means quite a short Graphics card heatsink = or one that's easy to chop up :-).
USB etc. support
The motherboard has 6 rear USB 2.0 sockets and 4 'on-board' (for a multimedia bay and front panel USB). What it doesn't have is USB 3.0, however a PCIe4 card with 4x USB 3.0 sockets is less than $10 on eBay (with free postage from Hong Kong / China or Singapore)
The motherboard also has a pair of PS2 sockets which means it's possible to avoid using USB sockets for the Keyboard and Mouse
400w+ Power supply
With the greater demands of a 4 core CPU, Graphics card and plans to add a 3 drive RAID, I decided to replace the Dell 230watt unit with one rated for (at least) 400w. To keep the noise down, I chose one with a large (12 cm) 'variable speed' fan
Since a faulty PSU can fry your motherboard and all your hard drives, it's worth paying extra for a reliable unit. The problem is finding one - more and more of the 'well known names' are getting their products made in China these days - and unless they have extremely vigorous quality control the Chinese manufacturers will replace the specified high quality components with the cheapest trash they can find as soon as their customers back is turned.

All I can suggest is do what I did = focus on Amazon customer feedback (don't touch anything with less than 100 customers or under 4 stars) and try to find a unit with a 5 year Warranty (and avoid any manufacturer that requires you to ship the unit (at your own expense) outside the country to make a Warranty claim)

I also recommend you buy direct from Amazon. First, they ship for free (unlike some of their 'affiliates' who offer very low 'head line' prices .. and then slap on another 50% in 'postage and packing') and second, Amazon has a 'no quibble' postage-free returns service .. which is vital for something as heavy as a PSU (but watch out for their 'max return postage allowance' when it comes to very heavy things) .. which will cover you when you receive DOA ('dead on arrival') unit (something that any product can suffer from).
Dell front panel connections
WARNING Dell uses a number of different front panels. This is for the Dimension 3100 / 5150 range and others will be 'similar' HOWEVER I discovered that the +5v and Gnd differ between this and the OptiPlex 745 / Dimension C521 !
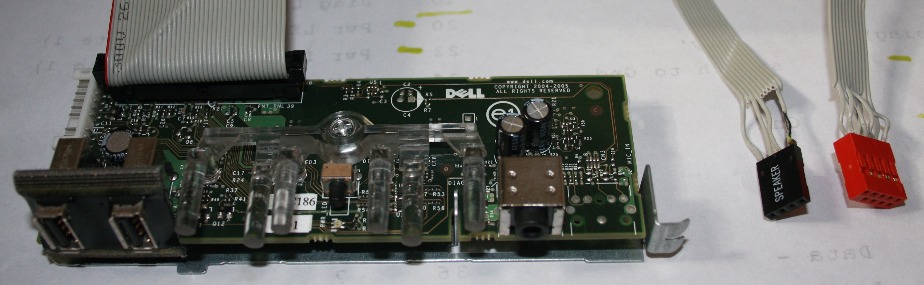
The 'power-on' switch and LED needs to be wired to the new motherboard. It's not a bad idea to wire in the two front facing USB sockets as well, although the 'headphones' socket only needs to be wired in if you need it (I didn't).
If the ribbon cable is 'unwound' it can be split up and it will 'stretch' to the various motherboard header positions (fortunately wires for the USB sockets and the Power ON switch/LED make two separate 'groups')
Of course Dell provides no documentation at all on it's front panel wiring. The following was found from the 'pinouts guide' web site (and confirmed using a multi-meter) :-
Pin   Name         Description              Pin    Name           Description
1     Headphones      Left (out)            2     Headphones      analogue GND
3     Headphones      Right (out)           4      ?
5     [Mic Left - not fitted on 3100]       6      ?
7     [Mic Right- not fitted on 3100]       8     [Mic Gnd - not fitted on 3100]
9      ?                                    10     ?
11     ?                                    12    Ground     GND
13     ?                                    14     ?
15    Diag LED 3                            16     ?
17    Hard Drive LED  (-ve ?)               18    Diag LED 2
19     ?                                    20    Pwr LED Green   (note 1)
21     (missing)        'Key'               22    Pwr LED Orange  (note 1)
23    PWR ON          switch to Gnd         24    LAN LED         +ve
25     ?                                    26    LAN LED         Gnd
27    PWR ON          Gnd                   28     GND
29     +5v                                  30     +5v
31     +5v                                  32     ?
33    GND                                   34    USB 1 p3      Data +
35    USB 1 p2      Data -                  36     ?
37    USB 2 p3      Data +                  38    USB 2 p2      Data -
39    GND                                   40     ?
Note 1. The power/sleep LED is a 'bi-colour' type'. The voltage on the control pair is reversed to switch from one colour to the other (so +5v / 0v is Orange,  0v / +5v is Green)
Chopping off the plug at the Dell motherboard end and splitting the ribbon cable allowed me to connect ribbon pins 30-40 to a Gateway motherboard dual USB header (orange plug in above) and ribbon pins 20/22, 23/27 to the Gateway motherboard 'power on' LED and switch header strip (the Gnd = key end was marked using a black pen)
Dell multi-media 'Flex-bay'
There are (at least) two 'types' of Flex-bay multi-media option 'in use' by Dell, both occupying the 'floppy disc' position. One consists of SD card etc. slots only - the other has both USB and card slots. Both use a 10pin ribbon cable & plug. One requires a single USB connection at the motherboard, the other 2 (standard motherboard 10pin USB headers are 'dual USB' with pins are arranged such that you could connect to each USB 'set' individually (using a pair of 5pin 'strip' sockets))
My Dell Dimension 3100 is of the 'multi-media only' type (i.e. no integrated USB sockets) so requires a single USB connection. Fortunately it's not hard to 'puzzle out' the Dell motherboard / cable pin-out :-
| pin 1 | +5v | 2 | |
| (3) | (missing) | 4 | |
| 5 | 6 | ||
| 7 | D- | 8 | |
| 9 | D+ | Gnd | pin 10 |
Note that the original Dell multi-media flex-bay limited SD cards to 4Gb. To access the larger capacity cards I had to go to the Dell web site and find the updated driver
Multi-media 3.5" bay readers are so cheap on eBay (less than $10) that rather than muck about trying to split up the Dell ribbon cable (to make use of the second USB from the Gateway motherboard dual USB header) I decided to replace it with an 'off the shelf' unit, which not only came with a standard motherboard header connector cable but also supported microSD cards 'direct' and even came with another USB socket (I thus ended up with 3 front USB, one more than the original Dimension 3100)
Licence
Microsoft OEM Windows makes multiple checks to ensure it's running on an OEM Motherboard. Switching from a Dell OEM motherboard to a Gateway OEM requires that the 4 Dell OEM BIOS files (C:\windows\system32\ oembios.bin, oembios.dat and oembios.sig and C:\windows\system32\CatRoot\{F750E6C3-38EE-11D1-85E5-00C04FC295EE}\OEMBIOS.CAT (plus any copies in the C:\Windows\System32\dllcache\) contained within Windows be replaced with the Gateway ones (specifically, the "C86378C7" set)
This is legal because you already paid Microsoft (via Dell) for a Licence to run XP on an OEM motherboard, and, as noted above, the Licence stays with (is stuck to the back of) the CASE not the motherboard. Note that, to stay legal you should NOT run Vista on your upgraded Dell (since you never paid for a Vista OEM Licence).

This differs for Windows 7. For Win 7, the OEM Licence stays with the OEM motherboard. So if you want to run Win 7 instead of XP, you will need to find an OEM motherboard that was shipped with Windows 7 (or 8, assuming MS allows you to upgrade from 8 to 7 :-) ).
OEM 'key'
The Dell specific OEM Licence key in the Registry should be replaced** with the Microsoft XP generic OEM Licence key (key MVF4D-W774K-MC4VM-QY6XY-R38TB is for all versions of XP 32bit) - however it's not just a matter of replacing a string in the Registry - there are two 'licence files' that have to be generated (although Microsoft provides a tool to do this). Since XP ran OK with the Dell OEM key on the Gateway motherboard, I skipped this step
**If you fail to swap out the Dell specific key, it's possible that the 'Genuine licence validity checker' could spot the fact that you are using the Dell specific OEM licence key on the Gateway OEM motherboard, and if it does, no doubt 'Validation' will fail. Of course, now that support for Windows XP has ended (on April 8, 2014, after 12 years of bug fixes) this is no longer a real issue ..
Dumping MSIE
Now that there are no 'MS Updates' to worry about, to secure your XP system I suggest you remove all traces of MSIE (that 'part of the Operating System' which leaves you vulnerable to all forms of web hacking) and remove all those web facing Services that you previously had to leave 'enabled' to support Windows Update.
Needless to say, removing MSIE etc. is not a simple task (although now that the first unofficial SP 4 has been posted we can 'slip-stream' the sp4 files onto a Windows Install CD and re-install XP (without MSIE) using XPLite / nLite (or similar) and end up with all the patches MS ever released)
Click 'Next >>' in the Navigation Bar (left) for my next project