Note - this page focuses on reducing the size of your XP installation on a 'master' hard disk and 'preparing' it for replication. After 'squeezing' XP the next step would be to (1) install a running system to DOM / CF card, (2) install to a USB stick, (3) move to a 'server' for PXE/BOOTP network booting into RAMdisk.
Why does Windows XP System use up so much disk space ?
About 80% of the Windows XP System install disk is 'filler' included to support 'upgrades' from previous versions of Windows, obsolete Hardware, the Internet, 'multimedia', the 'Corporate user' and the non-English speaker. It is intended to be 'fool proof' so won't allow you to 'skip' the Hardware 'discovery' stage (which wastes most of the install time)
Step 1) The installation process starts by 'unpacking' EVERYTHING (including all the garbage) from your install CD and copying all the expanded files onto your hard disk.
This is why 500Mb on the System CD needs 800Mb+ on your hard disk, even before the actual install starts ! The only way to stop this is to completely remove the useless garbage (about 300Mb) from the install CD (see later)
Step 2) Next the install process 'examines' your Hardware and makes a 'note' of what it needs to 'build' the 'Operating System'. Once it has tried to find all the (obsolete) Hardware on the 'install list' (i386\Txtsetup.sif), it then starts installing those bits it needs from the expanded copy. You are offered a few options that allow you to 'leave behind' some of the garbage during this step, but the majority can not be avoided.
'Examining the Hardware' means 'addressing' each of the hundreds of possible ISA / PCI cards that you MIGHT have in your computer and waiting for a 'time out'. Sometimes the addresses used can cause your real Hardware to 'lock up' - and some Hardware only responds correctly after it's been 'reset' (which is why 'examining Hardware' requires reboots). Once all the 'required' drivers have been installed, all other the drivers are copied into the system just in case you decide to fit some ancient obsolete modem etc. at a later date
Step 3) To make sure you don't 'accidentally delete' any of the garbage that has just been installed, about 300Mb of the 'important' bits are copied again into a 'hidden' folder [ C:\WINDOWS\system32\dllcache ] and 'Windows File Protection' enabled.
At this point the Windows install has reached maximum disk wastage of about 1.5Gb - but it's not finished yet !
Step 4) Just when you think the install process has stopped wasting your hard drive space, it creates another hidden file, 'pagefile.sys', equal in size to your RAM !
So if you have 2Gb or RAM, disk usage will reach 3.5Gb before dropping back to under 3Gb when the 'temp' install files are deleted at the end
Why is this such a problem ?
If you want to build a SETI processing node without a hard drive, you will want to use the cheapest (i.e. smallest) CF card or USB possible. Of course, if you want to dispense with local storage completely, you will want a Windows that is small enough to run from a RAM Disk.
Finally, who wants to spend half a day installing XP on each and every single node ??
Can't I just install on one 'master' node and copy (clone) to all the others ?
Almost, however during the install process your Windows XP system is given a unique ID number (GUID = 'Globally Unique Identifier') and SID (Security ID). No two computers can exist (on the same network) with the same GUID/SID.
Corporates who install on a 'master' computer and then 'roll out' the installed system to the rest of the company use the Microsoft 'Sysprep' utility. This modifies the 'master' system so that it will generate a new GUID & SID when it's next run - so they can now 'clone' the master to any other PC.
So how do I cut out the crap ?
Note - whilst it is possible to delete the garbage manually, to get some idea of what's involved, visit manually removing the trash.
By far the best way to 'remove the crap' is not to install it in the first place ! ... and the best way to do this is to build yourself a new Windows XP System install CD
The problem with trying to 'cut out the crap later' is that many components of Windows XP (DLL's) are used by more than one function - thus 'function removal' tools (such as XPLite) have to err on the side of safety and end up leaving in a lot of garbage that could have been taken out.
A 'minimalist' system CD (nLite) will install a system that uses less than 300Mb, whilst a full system install that has been 'stripped' by XPLite is still 550Mb. XPLite has had to 'leave alone' about 250Mb of 'shared' DLL's 'just in case' they are still needed whilst the nLite System CD only installs those that are actually needed
Using Winbuilder to build a new System CD ?
Starting with a 'full retail' System CD, you can use WinBuilder, however Winbuilder does not like OEM System CD's & it 'choked' on my Dell "pre-licensed" System CD, so I abandoned this approach.
The Winbuilder 'LiveXP' CD is essentially a pre-expanded 'pre-install' file set containing only those components you want to install (plus an 'answer file' that permits the install to complete 'unattended'). This 'pre-install' file set is equivalent to the 'expanded' set that would normally have been copied to your hard disk (so cuts out 'Step 1'), however the rest of the install still has to be completed when the cut-down CD is used.
It is possible to place the 'pre-install' files onto a Network Share and install from there to a local RAM Disk, however this is a lot harder than it sounds - Windows XP always needs somewhere to write (& modify) the Registry ('Hive'), even during an install. Since a LiveXP system is expected to be 'run' from CD, Winbuilder includes RAM Disk Driver, but this does NOT mean XP 'runs from RAM Disk' (since, by default, only the Registry is written to RAM Disk). So, whilst it is actually possible to 'install to RAM Disk' from a LiveXP CD this is not an easy task
Using nLite to build a new System CD ?
Starting with an OEM System CD (eg Dell XP Pro+sp2), you can use nLite.

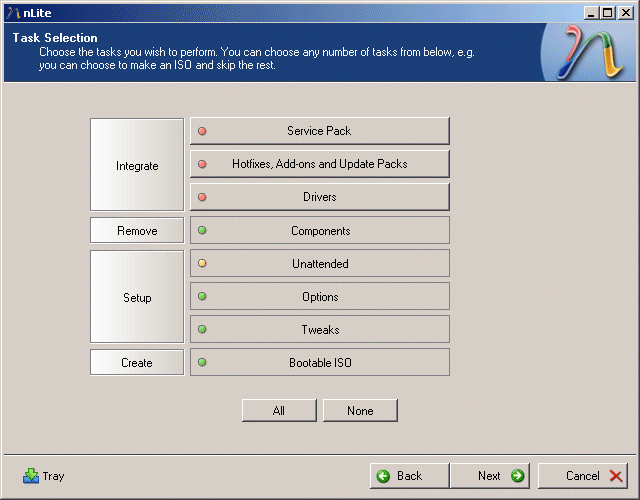
The 'wizard' is more or less self-explanatory, however in the Tasks window at the start, be sure to set 'Create / Bootable ISO', otherwise you won't get the chance to make a bootable ISO / burn a CD at the end !
One minor annoyance of nLite is that it insists on 'starting' with your System CD, copies that to a 'working folder' and then modifies the folder contents ! = so if your 'build' fails for any reason, you have to go back & recopy your source CD. If it succeeds, you can go back and re-modify the cut-down version but you can only REMOVE additional components, not add them back (except by starting again with the System CD). nLite does remember your settings between 'runs', so at least you can cut stuff out gradually.
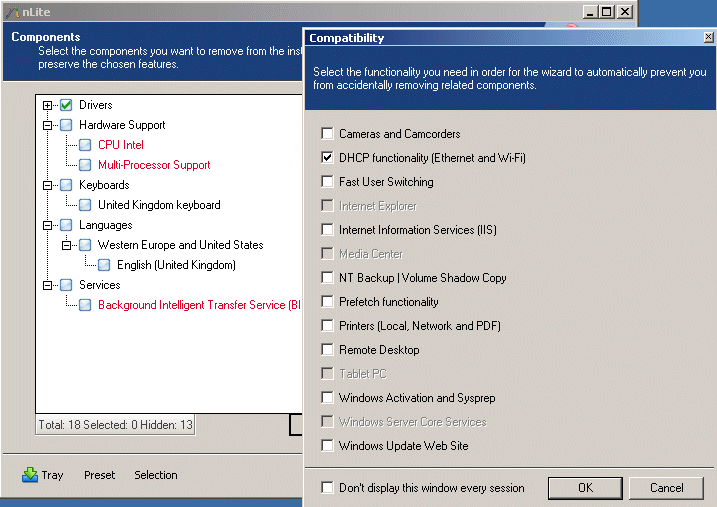
Another annoyance is that in Components, a 'tick' means 'remove' whilst a 'blank' means 'include' (default), whilst in other windows (Compatibility, Unattended) a 'tick' generally means 'include' (and blank leave as default)

The 'best' way to 'drive' nLite is to 'select' (tick) the 'top level' Components sets (all items) for removal, then click the '+' to expand the set contents and deselect the lower level components you want to include.
Note that ALL the 'Drivers' are selected for removal - any included with XP sp2 are AT LEAST 10 years old. Unless your motherboard is more then 10 years old, you will never, ever, need any of these drivers.
Note in Hardware Support that all my nodes use Intel CPU's with HT. If you have a mixed set, don't remove AMD support :-)
The 'default' install is US Keyboard & US Language (these are not offered for removal) - if you want UK Keyboard and UK English you need to keep Keyboard = United Kingdom Keyboard and Language = Western Europe / English (UK). All the rest should be marked for deletion
Finally, in Compatibility, make sure to set DHCP (Ethernet) which will then force you to keep the 'BITS' Service (only)

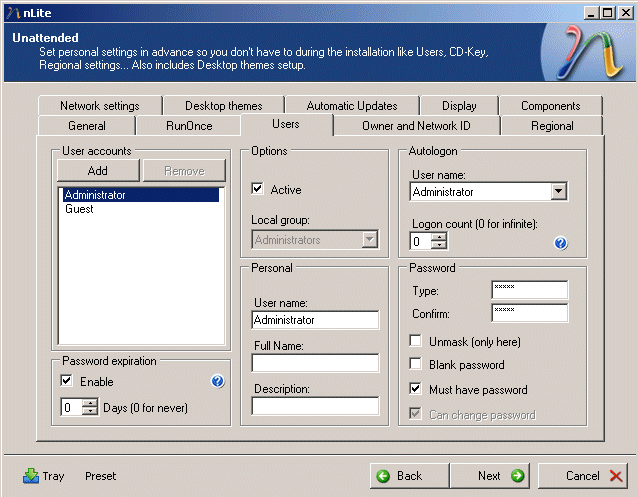
To set 'Autologon' = Administrator (and thus avoid the need to add TWEAKUI to the install), you will have set 'Unattended' in the Task Selection list (above).
Note, however, that this will replace the OEM (Dell) install 'instructions' (answer file), although (if you started with the Dell OEM Windows XP System CD), nLite will 'pick up' the Dell OEM License key. If not, you will have to provide a 'dummy' Microsoft issued OEM License key.

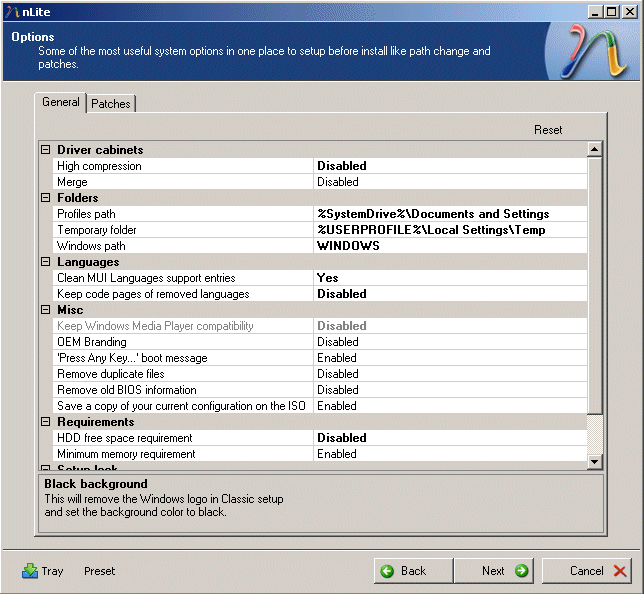
Just before the 'build', in the Options window, General tab, in Requirements, make sure to set 'HDD free space requirement' = Disabled (if you intend to install to a 512Mb or 1Gb partition (as recommended) - if you don't set this, the (Microsoft) installer will refuse to start if there is less than 1.2Gb free hard disk space (which will force you into a 32kb FAT cluster size = see below)
Using the settings shown, nLite will generate a CD that will installs onto a 512Mb / 1Gb FAT partition. After you disable the useless 48Mb Virtual Memory paging file, the installed system will occupy no more than 251Mb** on a 1Gb partition, or 232Mb on a 512Mb partition = which means it will fit OK on a '256Mb'*** CF card !!
**The 1Gb FAT partition uses 16kb clusters whilst a 512Mb partition uses 8k clusters. The difference in installed sizes is due to the space wasted when a file has to occupy complete clusters (so, for example, the 800+ files that are 8kb or less each occupies 16k on the 1Gb partition but only 8k on the 512Mb partition).
A 256Mb CF card uses 4kb clusters (which is the same as the NTFS cluster size). The 472 files smaller than 4kb are wasting 1.8 Mb of disk space on the 512Mb partition. If you reduce the 512Mb partition to a 256Mb partition (using GParted or similar), the 232Mb install will be reduced to less than 230Mb
***Since CF cards (and DOMS's) use the 'disk capacity' convention, '256Mb' is ACTUALLY only 256,000,000 bytes i.e. 244Mb !
Once installed, if the 'generic' drivers won't work with your Network device, it's a good idea to go back and 'add' them to the build - however if the 'generic' Windows drivers will allow a full colour 600x800 display, it's not worth adding graphics drivers (they will just waste space)
What should I do after installing from my new nLite System CD ?
Tidy up, of course :-)
A1. Disable Virtual memory. Go into My computer / Properties, Advanced, Performance Settings, Advanced, Virtual memory Change, and set 'No paging file'. When you reboot you will save at least 48Mb of space when pagefile.sys is removed
A2. Delete the dllcache. You may have set Windows File Protection = disabled, however nLite fails to eliminate the C:\windows\system32\dllcache folder. Since \dllcache contains 20 .cat files, deleting this folder saves you another 6Mb
To see what else can be deleted, continue 'Next >>' to my Beyond nLite page
What should I do with my new nLite System ?
A1. If you have only a few SETI 'nodes' and are using 512Mb or larger DOM / CF cards, then the simplest approach is to install direct onto each individual node.
You may wish to skip further space saving (Beyond nLite) and my 'Using Sysprep' page and go direct to my CF and USB Booting page
A2. If you have more than half a dozen nodes or are using 256Mb DOM / CF Cards or USB sticks or a RAMdisk + 'network boot' etc. then I recommend you use MS Sysprep with an 'install to master' / 'clone to slave' approach (as used by the large Corporations to 'roll out' a fully configured system to large numbers of PC's = see later)
The main advantage of this is that you can see everything working on the 'master' before 'rolling it out' to the 'slaves'. The main disadvantage is that the node Hardware has to be 'similar' to the master (eg all Dell Optiplex or all Dimensions) - even so, this is still my preferred approach
To skip further space saving, go direct to my Using Sysprep page
Click 'Next >>' for what else can be deleted, described in my 'Beyond nLite' page