

WARNING - you may find yourself tempted by Magazine 'reviews' and Google 'ad-word' searches that will point you toward 'Free Download' (but 'Pay to Use') Screen Saver software. DON'T BE CONNED into parting with your money = there are plenty of free and Open Source choices !
Why bother ?
Whilst there are plenty of sub-£100 digital photo-frames in the sub-10" sizes, when you get above 10" the prices seems to become a bit unreal - Amazon, for example, offers a 17" digital photo frame at approx £300 (Q1/2012 prices). Whilst these will have WiFi and maybe even Ethernet capability, none are 'programmable'. However, chances are, you have an old laptop computer (cost approx zero) or maybe an old desktop, plus a (3:4 aspect ratio) 'square' style LCD/TFT display in the loft or garage just waiting to be pressed into service 'for free' !
What's required for a digital photo-frame ?
A1. Hardware. Well, as usual, 'it depends' :-). If you want to build a 'stand-alone' device, it's a good idea to start with an old laptop ... however if all you want is a 'digital display' that can be hung on your wall, then you could simply use an old LCD/TFT monitor & drive it from a 'remote' computer, running the cables (power, vga) into the wall cavity behind it.
Since building my first photoframe, the 'Raspberry Pi' single board computer has become available. Whilst this only runs versions of Linux (and not any flavour of Windows) which limits your software choices somewhat, it does allow a highly functional and cheap Photo Frame to be built. To see how I did it, visit my Raspberry Pi photoframe page
If you want to keep the costs down, do what I did and visit your loft your 'previous generation' desktop, dust it off and start building !
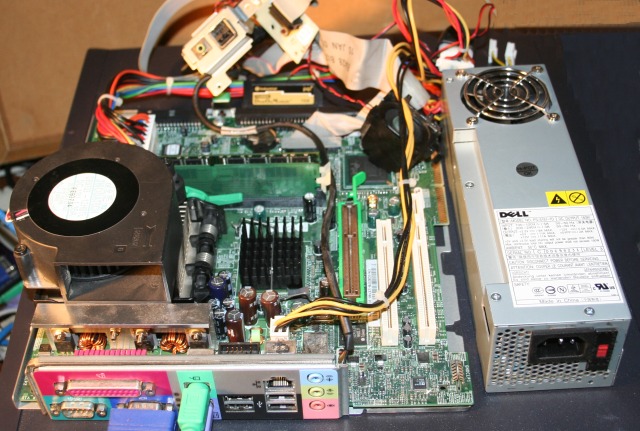
It's (just about) possible to 'package up' an old 17"+ LCD/TFT display & an old SFF (Small Form GFactor) motherboard (see right), although an old laptop motherboard is more ideal since laptop powerblocks are usually very small (unlike a standard PC power supply which comes in a standard 'cube').
The 'SFF' (Small Form Factor) PSU and a low profile CPU Heat-sink / fan assembly (with a CF card / DOM 'boot device') adds 80mm to the 'depth' of the screen (before removing the existing screen housing and adding a new one)
In my actual build, the PSU is rotated 90 degrees to the right (so it's fan exhausts away from the motherboard, instead of up into the monitor). The CPU fan was rotated by 180 degrees (so it exhausts over the motherboard power socket at the back rather than being blocked by the connector plate in the front of the photos).
Note. Whilst 'any' speed CPU should be OK, you will need a motherboard that supports a 'reasonable' amount of RAM (1 to 2 Gb is ideal) since that is where the Photo Frame is going to store (cache) images for display (rather than use a noisy hard disk). Older Laptops tend to be limited to 1Gb, whilst most desktops will go to at least 2Gb. If your computer is really ancient, you can 'get away' with a lot less RAM (256 Mb - or even 128Mb if using Windows 2000) and use an IDE CF card** for the 'cache' (using a USB stick for the 'cache', especially on an old motherboard, is 'a bit more complicated' :-) )
**The drawback of using a DOM / CF card / USB stick as the 'cache' is the limited number of 'writes' you get before wearing out the device. The advantage is that a non-volatile cache avoids the Giga-bytes of network traffic needed to load a RAM disk cache each time you turn on the Photo Frame
In the side view (left), the motherboard CPU fan 'tucks under' the bottom of a Dell 17" monitor. The overall height is 11 cm (4.3") plus whatever is added by the rear of the new case. The 'gap' seen between the I/O panel and PSU will be filled with a 'blanking plate' that mounts the loudspeaker (seen above the very top of the motherboard in first photo above, just above the DOM (component with the gold label plugged into the black IDE connector)) plus a CF card <> IDE adaptor wired to the second motherboard IDE socket. The side of the fan protrudes below the bottom of the monitor (left in pix) by about 2cm however the PSU protrudes too far above the top (right).
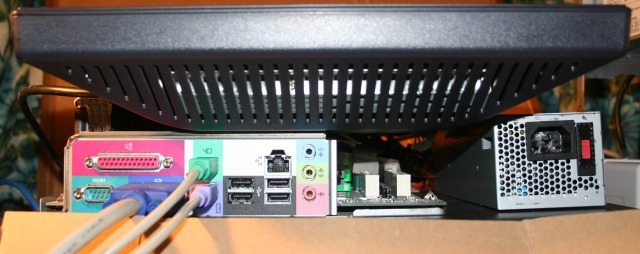
Removing the existing monitor housing allowed the PSU to be moved from the top of the photoframe to the side (by the IDE sockets). This kept the overall 'depth' of the unit down and allowed a more pleasing 'sloping top' design. With the PSU power plug now at the bottom, a cut down power cable is connected from inside the PSU case and run to the monitor power socket. A VGA cable is run from the motherboard socket ('outside' the new housing) down past the serial & parallel ports & back in to connect with the monitor VGA input.
Considering the complexity involved in building a nice new plywood casing to support all the components, I did start to wonder if it might have been easier to build the display into the side of the SFF computer chassis instead !
The advantage of using a standard PC (+ display)
Using a Windows PC means you have total control over the source of the photo's and the 'update frequency'. Using 'scripts' you can set your PhotoFrame to run totally automatically. Whilst my script checks on a daily basis for new archived photo's, it's relatively easy to modify the code to step through your entire photo collection - or skip through the last 10 years fetching half a dozen random photo's from each month to display each day
You can also use it for 'other things' - for example, with the addition of a 'wireless' keyboard / mouse you have a 'real' computer that can be used by visitors to browse the web or play games etc. - and if EFW is installed, nothing they do will 'survive' the next power-cycle
What about the software ?
All you need to display photo's is a suitable 'screen saver'. Whilst Microsoft has offered Screen Savers (.scr) since Windows 95 you might well want a more flexible alternative (see bottom of this page). It is even possible for some screen savers to be set up so they display photo's from a network share (such as your Server Photo archive share).
Of course fetching full resolution photo's across the network will impact network performance to some extent. Further, every time a photo is shown it will have to be resized (consuming CPU power). A better solution would be to resize the photo's 'once' and 'cache' them on the PhotoFrame itself.
Note = if the 'My Pictures Slideshow' does not appear in your Display Properties window (in the Screen Saver tab pull down list), go find ssmypics.scr and copy it to your C:\WINDOWS\system32 folder. The 'My Pictures Slideshow' will also run on Windows 2000, however you will most likely need the Microsoft "GDI+ update" from the Microsoft website.
NB. Instead of a 'screen saver', you can use desktop 'wallpaper' software, however the big disadvantage here is that you have to maintain an 'empty' desktop :-)
Why Windows 2000 or above ?
To prevent recovery of user passwords from the LM Hash, your Server will have been setup so that it does not support 'DOS' (LAN Manager) log-ons. This means your PhotoFrame has to 'log-on' to your Server 'photo$' share using Windows 2000 or later
If you don't have kids (so no 'script kiddies' walking in the door armed with their 'wannabee hacker' Password 'recovery' software on USB stick or 'Live' CD's), by all means leave LANMAN enabled and install Windows 98se on your PhotoFrame
How do I minimise the noise generated by my Photo Frame ?
One approach is to simply run the display from a 'remote' computer using a (very) long VGA cable :-) However if you want a more 'portable' Photo Frame you will likely build you TFT display & 'Your_computer/' (eg using the guts of an old laptop, sourced, perhaps, from eBay, as 'spares or repairs' with a broken display) into a new case.
A1. The first source of noise is the CPU fan. You are better off with a large fan, since it can be run at lower speed (& thus generate less noise) rather than a small one, which will have to run a lot faster to achieve the same degree of cooling. Whatever you choose it must be of the 'heat controlled' type (so it will slow down when the CPU is running cool)
How do I cut down CPU fan noise ?
a1. Generally, the higher the GHz of your CPU the more heat it generates. Your photo-frame CPU will be doing almost nothing, so the lower the CPU GHz the better
If you can run a high rated speed CPU at a lower speed, so much the better - a 3GHz run at 1GHz will typically generate less heat than a 1GHz 'native' speed chip (the same often applies to RAM chips). Some 'generic' motherboards allow you to adjust the CPU speed in the BIOS (although there will be some 'minimum' below which the CPU won't function) but few of the major manufacturers (such as Dell) allow this

One 'cunning trick' you can pull with a Dell Optiplex GX260 SFF motherboard is to use a Pentium 4 'Northwood' 800 FSB CPU. Because the 260 motherboard only supports P4 Northwood CPU's at 400 (or 533) FSB, it will run a 800 at 400 FSB = half speed ! For example, a 3.06 GHz 800 FSB CPU chip will run at 1.53 GHz 400 FSB at half speed and less than half power :-)
a2. Laptop CPU's are special low-power versions. If you are starting with a laptop, the tiny built in fan is likely 'low noise' and will always be 'heat controlled'. Taking a laptop motherboard out of it's case is likely to improve cooling so the fan may never have to start up at all
It may be possible to fit it with a 'P4-M' (low power = low heat) mobile CPU to a P4 desktop motherboard. Fit a big enough heatsink & you may not need a fan at all !
a3. Laptop CPU chips (such as the Pentium 4-M) and more modern CPU's support 'SpeedStep technology'. You can use the POWERCFG command line tool to adjust the processor-throttle-ac throttle setting ('constant' = CPU operates at the lowest speed state at all times, whilst 'adaptive' means the speed is dynamically adjusted based on the demand put on the CPU) e.g.
POWERCFG /CHANGE /processor-throttle-ac adaptive
The Dell GX260 standard Northwood P4 / Celeron CPU is not SpeedStep capable, however it's Socket 478 should be compatible with a P4-M

Whilst the standard Northwood P4 is not 'speed step', the GX260 BIOS can set it into 'low power mode'. This seems to slow down the CPU clock by about 10x (the only problem being that changing the setting back to 'normal' has no effect (on BIOS ver. A09) and you have to remove the BIOS battery in order to restore 'full speed' !
a4. Finally, if your CPU is capable of HyperThreading, make sure to 'turn off' HT in the BIOS (and whilst you are at it, 'turn off' all the other peripheries, such as Parallel & Serial ports and even the PCI Bus, that you are never going to use
A2. The next source of noise is the hard disk. The only way to avoid using your hard drive (so it will stay 'powered down') is to set-up** a RAM disk and use that to 'cache' the (re-sized) copies of the images being displayed
**Windows own RAMdisk.sys seems to be limited to 32Mb (Windows XP) or 512Mb (XP Server 2003). Whilst 512Mb is OK (if you copy ramdisk.sys off the 2003 Server CD), to avoid any Licence concerns, just stick with the Open Source ImDisk.

If your PhotoFrame has a hard disk, I suggest you use VSuite Ramdisk (Free Edition) instead. It can 'save' the RAM disk contents during a normal shut-down (and restore it at power on) thereby saving you up to 16Gb of network traffic every time the PhotoFrame is turned on (when fetching hi-res photo's to load into a 1Gb 'thumbnail' RAM disk) !
A2-1. You can eliminate the need for a hard disk by using a minimalist Windows XP running from a DOM / CF card or USB stick, see my Booting from USB page and installing EWF drivers** for a detailed explanation
**Unfortunately, this does not mean you can avoid the need for a RAM disk, because whilst Microsoft EWF 'writes' everything to RAM (instead of C:) it is unable to 'recover' the space released by 'deleting' eg old photos (see Wikipedia.)
Even if your Photo Frame has a hard disk, using MS EWF (and a RAM disk cache) is a 'good idea', since not only does it guarantee your hard drive can stay powered-down but it also means you don't have to worry (too much) about 'protecting' your Photo-Frame from viruses etc.
A3. The final source of noise is the Power Supply fan. Whilst removing the PSU case may improve the cooling to the pint where the fan 'never'** comes on, this is not a good idea since it exposes some rather lethal high voltages.
** All modern power supplies have built in temperature sensors that vary the fan speed as needed. On my SFF power supply the fan never spins very fast but I found that the metal case acted as a 'sounding board' ! Replacing the metal screws with plastic ones and adding rubber washers led to a significant improvement in sound levels
Can I 're-use' a nLite 'mini XP' system I built for SETI ?
Yes, however, in addition to a 'slideshow' type screen saver, you may need to a 'add back' some of the Services you may have removed
a1. Unless you power-cycle the PhotoFrame each day** (so can simply rely on the power-up to fetch any new photo's), it's a good idea to use an alternative Task Scheduler to schedule the 'fetch new photos' script to run every couple of days
** To set a specific time to power on, go into your Motherboard BIOS & find the 'Automatic Power Up' feature (it should let you set a time for daily power-on)
You should set the script to run at power-on (and fetch any new photo's). Ideally, the cache was saved to hard disk or CF card etc. & restored at power-on. You then use shutdown.exe to set a power-off after 12 hours (add "shutdown -s -t 43200" to the end of the script). Note that shutdown.exe has to be run by an account with 'remote shut down' rights (i.e. at Administrator or System account level with a non-blank password)
a2. It you want to automatically fetch photo's from a newly inserted USB stick or CF/SDHC card etc. you will need 'auto-insert support'
On 'new device insert detected', the Photo Frame should automatically run a "fetch photo's" script, adding any jpg's found to the 'cache' for 'immediate' display
How do I configure the Screen Saver (photo display) software ?
The display software will need to be 'pointed' at where it can find the images you want to display (eg the RAM Disk cache). Most Screen Savers will support multiple (specific) folders, most will also search sub-folders starting at the one you specify
It is possible to 'point' the Screen Saver at your Server / NAS photo 'store' and fetch photo's 'live' across your network.

The main drawback is that constant photo fetching will prevent your Server / NAS 'going to sleep' (and will also prevent it's hard drives ever spinning down). Further, unless your Server holds 'thumbnails', the photoframe will be fetching full resolution photos making network loading another concern.

Showing my 'archived' photos was such an attractive goal that I decided to address all these issues in detail (see below)
Since a Photo Frame is likely 'turned on' in the morning and 'forgotten' you should set it to 'power down' after 12 hours or so. Many motherboards now have a 'wake up at time' option which can be used to start it up again the following morning
If the PhotoFrame has a hard disk drive, you can allow the Photo Frame to 'hibernate' overnight (a RAM disk using 'normal' RAM will be 'saved' to the hard disk along with the rest of the RAM contents) or use vsuite-ramdisk to 'save' the RAM disk at power off (and restore at power on)
The script can use shutdown.exe to set 'power off after N hours' and the Motherboard BIOS set to 'Automatic Power On' (@ specific time of each day)
How do I display my 'archived' images (without forcing the Server disks to run all the time) ?
The Photo Frame should 'fetch' (new) images at (in)frequent intervals (eg once every day or two) and store them locally. This can be achieved using a 'script' similar to that used for 'file synchronisation' or 'live back-up' (as in my Data Preservation / Using Scripts page)
For more details see 'How do I write a photo caching 'script' ?' below
How do I discover how much RAM I can use for the photos 'cache' ?
First build your cut-down Windows, turn off 'paging' (virtual memory), install all the Photo Frame tools (don't forget Image Magick) & enable EWF = then Alt-Ctrl-Del, Task Manager, Performance tab & look in 'Physical memory' for what's 'Available'. Subtract about 100Mb for Windows / EWF** & use the rest for the RAM disk. Reboot and check it runs OK
EWF 'consumes' RAM every time a disk write is required and, no doubt, when the script runs Windows will insist on writing something to the disk (even if it's only your mistakes :-) ). So leave a 'decent' bit of RAM for EWF to 'eat' & you won't have to reboot too often
NB. When making changes to the script, don't forget to 'turn off' EWF :-)
It IS possible to store the script on a Network Share SO LONG AS the share is set to auto-restore at log-on :-) [to make sure the script runs as soon as the share is restored, place an 'auto-run.inf' file in the root of the share]
How many images can I store on the Photo Frame ?
Photo's should be 'pre-sized' (for the display) and held as JPEG's = both to minimise the space needed and to avoid the CPU having to re-size every image whilst running the Screen Saver, heating up & causing excessive fan noise. On average, you can store 4 to 5 high quality 1024x1280 .jpg's per Mb which is 4 to 5 thousand per Gb of RAM.
Assuming each photo is shown for 3 seconds, you will get through 1,200 images (about 350Mb) per hour, so a 1Gb 'cache' means the display will loop and 'repeat' an image every 3 hours or so, meaning 4 repeats per 12hr day. Even if the complete cache has to be reloaded every day, caching will be 4 times 'more efficient' than fetching each photo directly from the archive (and will consume about 50x less bandwidth)
If you write your script correctly, it will replace 'old' photo's with more recent ones automatically. If you want the Frame to 'import' images from a visitors USB stick etc. you will need a second script (that is set up to 'run' when a USB stick is inserted - and runs under a strictly limited User Account) - which is another reason why using a USB stick as a 'cache' makes things complicated
The 'de facto' standard for image manipulation from the 'command line' is Image Magick (use the 8bit dll version). This will re-size originals to 'best fit' your monitor (eg 1280x1024) without distorting (so you don't need to know anything about 'aspect ratios' etc.)
How do I write a photo caching 'script' ?
The simplest approach is to just replace the entire 'cache' contents every couple of days with (re-sized copies of) as many 'latest dated' photo's as possible. The drawback to such an approach is the large data transfers that become necessary
A typical digital photo (.jpg) will be at least 4Mb, whilst the re-sized display image copy might be 256kb i.e. 16x smaller = so filling a 1Gb 'cache' with display images means transferring 16 Gb of original photos !
Further, unless you typically take 4,000+ new photo's every couple of days, most of the 16Gb you fetch will have already been fetched (and re-sized into the cache) last time. This suggests a rather more clever approach is needed :-)
To avoid frequent 16Gb transfers, the cache should be 'saved' (to hard disk etc) prior to a power down and restored at power on. The script would then only have to fetch photo's that are 'newer' than those already in the 'cache'
To make space for a newer image, you just delete the 'oldest' one (then the next oldest, and so on) until there are no more 'newer' images
If you use the standard MS RAMDISK.SYS (or imdisk) it will not 'auto-save' at power off. This is not a problem since the 'load new images' script (which will be set to auto-run at power on) can be written to start by loading any 'saved' cache from hard disk, then fetch any new photo's and finally 'save' the updated cache to hard disk (replacing any previous version)
NOTE - always avoid multiple scripts - it's much too easy for them to get 'out of step'
Clever people will adopt different approaches - for example grabbing 'random' photo's from their archive or 'reserving' part of the cache for older images or for 'favorites' etc.
Most Screen Saver software will let you specify more than one image 'source' allowing you to add e.g. a 'Favourites' folder on your local hard drive / USB stick to the display. NOTE, however, that you should avoid linking to a 'mapped' drive if you expect the 'source' computer to ever 'go to sleep' :-)
To step through a list of files or folders, a .cmd script has to use code of the form :-
For /F "tokens=1*" %%i in (list.txt) do call :do_step "%%i"
You thus have to build the script in a way that uses 'lists' and sub-routines (call :do_step). It is also 'good practice'** to 'unwind' any nested 'calls' (using goto:eof to 'return' back up the calling 'tree') - rather then simply 'exit' from deep within the 'call tree' - so each sub-routine needs to check if 'end' has been set before doing anything.
** In the 'old days', 'aborting' the script without 'unstacking' the 'calls' could result in 'memory leaks' that would effect performance and could even crash Windows
Essentially you have to create a CMD 'script' & set it to run at intervals 'looking' for 'new' photos on your archive Server. It then grabs a copy, 'resizes' it to your exact display size and places it into the local (RAM disk) cache. The script should also be set to run when the Photo-frame is turned on so it can fill an empty 'cache' as soon as possible
My 'Next >>@ page details the various screen savers I used, and this is followed by a detailed description of the script I used