

Astronomy applications using low end PICs
Since the low-end 16F5x range is suitable for most 'counting' type applications, I looked at using it as a motor controller for EQ tracking on my 'Barn Door' (Haig mount) - and even as an 'upgrade' controller to a basic EQ mount. The main hurdle is that the 16F5x has no internal DAC or PWM circuit, so (typically) multiple pins have to be assigned to drive an external (R-2R) DAC.
The 16F54 can perform basic EQ mount control, however to control a dual-axis (Alt/Az) mount it's likely a higher spec. device will be needed (not so much due to the i/o pin count but because you won't be able to fit dual axis capable software code into 512 or even 2k bytes (although it might be possible to 'off load' the drive calculations to a PC and just have the PIC act as a dumb motor driver - the 16F57/9, with 2k program space, should have no problem achieving serial link communication with a PC so could even be used as a 'goto' controller !)
For stand-alone 'GoTo' use, a (lot) more memory is required (for the names and positions of Stars), however I2C based Flash chips exist that can provide significant (256Mb+) 'off PIC' storage for not a lot of cost
The PIC is best suited to the low end tasks - such as motor control and position sensing.

Things like actual 'goto' calculations are best left to (much) higher end devices - such as the Pi Zero - unless you like a 'challenge' (see below) :-)
'Push To' control using a PIC
Retro-fitting a Dobsonian with a PIC based 'push-to' controller makes a nice challenging project.
The Dobsonian 'pointing position' has to be detected**. This means things like magnetic field sensors (digital compass) chips, GPS chips and (for small movements) axis positions sensors (e.g. using multi-turn potentiometers = so a ADC is required, or a DAC + comparator to support 'successive approximation' conversion))

Next the star/planet has to be selected, so that requires a 'user interface'. You could use a simple N-line by X-character display with push buttons (like most GoTo hand controllers) or your smart-phone/tablet/laptop (+ 'control input' = Bluetooth, WiFi, IrDA, USB or even RS232 (serial link))

Then a while series of calculations will be needed to work out how to get from the Dobson current 'pointing' position tot he selected position. This means a 'real time clock (RTC) or GPS so the system can continually re-calculate positions (as the Earth turns).

Finally the user has to be provided with 'real time feed back', so he/she can 'push' the Dob to the correct location
**One immediate difficulty is that the position of the stars depends on the exact date/time and location of the observer. Simple GoTo controllers with no (battery backed) real-time-clock must ask the user (or the users PC) for the time/date (and 'scope location - unless fixed and pre-programmed) every time they are turned on (only those with some sort of EEPROM etc. can 'remember' their 'last used' location and just ask for the time)
However with GPS receivers now available for less than £10 (from China, via eBay), there really is no need for the 'clever controller' to ask the user anything ...
Auto-guiding
Many GoTo mounts have a 'auto-guide' input 'port' which is actually just 4 wires linked to the hand-set 'slow motion control' buttons :-)
The is designed to allow tracking 'corrections' to be applied by an 'external' system, typically based around an optical sensor that 'tracks' a chosen 'guide star' (picked off optically from the main light path using an 'off axis guider' or 'seen' through the 'finder' scope or other auxiliary scope mounted on the OTA)

Actual 'star sensing' and position processing would need something like a Raspberry Pi (and Pi camera), however the PIC can be used to interface the Pi (3v3) to the telescope mount controller  input 'port' (often 'open collector' 5v - 12v).
Using a PIC16F54 to control a basic star-tracking 'Barn Door' (Haig mount)
The PIC16F54 is essentially a 'digital only' device that naturally lends itself to 'counting' type applications. This makes it a 'natural' for any Telescope mount motor control and thus for my 'Barn-door' (Haig mount), which requires the motion of the drive wheel be 'matched' to an accurate (crystal controlled) 'clock' in order to maintain accurate star tracking
The original, manual/electro-mechanical driven design had a 1 minute 'sync' period with no more than +10% accuracy over that time (it was actually designed to 'naturally' run 'too fast', accumulating an error of up to +6s after one minute, at which point it would 'stop and wait' and re-sync with the clock - and then run fast again until the next minute sync).
We would hope to do at least 10x better than this with a PIC16F54 controller design (i.e. a 6s sync period with no more than +/- .3s non-accumulating error)
To minimise the component count, the PIC16F54 will need to count clock 'ticks', 'sense' the wheel position (count wheel ticks) and 'drive' the motor.
One thing the F5x range lacks is any sort of 'PWM' output, HOWEVER if the PIC is using a 32kHz OSC (to get it's 1s reference) an 'on-board' PWM couldn't be used anyway
The (1s) Reference clock
To avoid the need for an external clock, we can drive the PIC16F54 from a 32,768 Hz resonator and use the PIC itself to 'count' the time. Since the CPU cycle is (OSC/4), this allows 8192 instructions to be executed per second (which should be more than enough).
Whilst we could manually work out the time (by 'adding up' the number of CPU CLK's required for each instruction executed), it's much easier to just let the internal Timer Counter 'free run' on the CPU CLK and 'snoop' the value every so often.

Note that the internal counter is only 8 bit, so it's likely the pre-scaler will need to be used, however the chosen 'powers of 2' divide will need to be selected carefully to avoid loss of accuracy

The 'obvious' trick is to choose a pre-scaler value that allows us to 'match' the count to the wheel sensor 'tick'. During 'normal' running all the PIC then needs to do is 'wait' for the wheel 'tick' and check the count value. If the value is 'lower than expected', the wheel is running too fast - and if the count is too high, then the wheel is running too slow.

If we set up the wheel so it's 'tick' is 1 per second, then this needs to be in the middle of the timer count (so we can cope with equal amounts of too fast or too slow). This gives us a 'count of 128' == 1s' goal, and since 1s = 8192 cycles, this means a pre-scaler setting of 'divide by 64' (1:64).
The timer will be left 'running' all the time (in fact any attempt to 'write' the counter will destroy our clock accuracy as the pre-scaler 'count' will also will be reset).
Since the counter is always running, after detecting 'too slow' (or 'too fast') the PIC code will naturally run the motor 'a bit too fast' (or a 'bit too slow') in order to 'adjust' the time back to the count 128 'mid point'.

With a 'count 128=1s', in theory we can achieve an accuracy of 1/128s i.e. better than .01s ! It is, however, to be noted that one counter 'tick' is only 64 instructions, which means we need to be a bit careful when coding (we can't just ignore the software execution time )
The motor drive
Again, we wish to minimise the component count. Ideally we would like to drive the motor using a PWM (pulse width modulation) approach. To avoid audible noise, the typical servo motor PWM frequency has to be above 4KHz (the typical motor winding induction eliminates frequencies above this), although many PWM designs operate above 20KHz to 'guarantee' inaudible operation.
Since we have a 32,768 Hz OSC 'source' this is the 'obvious' frequency to choose.

The 'problem' is that the PIC16F54 (with it's CPU running at 8kHz) can't possibly generate a mark/space ratio at this speed. Instead, the PIC16F54 will have to use it's i/o pins to set the 'ratio' and some external circuitry will have to generate the actual mark/space drive.

One thing to note is that if the motor current demand is low enough, it might be possible to drive it direct from the PIC - one PORT will support 100mA which is 5 pins 'wired together' (at 20mA each)
Motor drive ADC circuit
The only 'simple' way to control the motor from the PIC is to have the PIC set a 'drive demand' (count value).
The demand value is then fed to an external PWM generator and used to control the mark/space ratio.

One way to do this is to convert the digital 'count' into an analogue voltage (which is then used to control the 'cut off' point of a ramp generator)

Another way (see later) is to use a second PIC running at much higher frequency (using a simple resistor/capacitor to set the OSC frequency (RC mode), the PIC can achieve 4MHz)
Analogue PWM
To generate an analogue voltage from the PIC 'demand count', we need a DAC (Digital to Analogue Converter). The 'easy' approach is a simple R/2R 'ladder' converter, which, together with a NE555 based 32kHz ramp wave generator will set the mark/space ratio.
So, how many pins do we need for the 'count' ?

Well, there is a 'trade-off' between the count value, the number of resistors needed for the R-2R, the accuracy of the resistors required and the PWM step 'accuracy'.

Further, whilst some sort of 'dead stop' control is useful, the PWM mark/space count need not 'start' from '0' (nor does the count have to be 'linear', however that's another story).

To maximise the utility of the PWM accuracy, we start by assuming that we only need to run the motor between 50% and 100% of it's rated speed.

To achieve 1% accuracy between 50% and 100% we only need 50 steps - so 6 bits (= 64 steps) will do the job. This means an 18 resistor R-2R 'ladder' that only requires resistors to be 'matched' to somewhat better than 1%.

Assigning an extra PIC pin for 'start/stop' + 6 for M/S ratio this means we need 7 i/o pins for motor control
R-2R accuracy
The resistor values in the R-2R 'network' do not require high absolute accuracy - rather they must maintain 'relative' accuracy. In a 6 bit circuit, the resisters at the 'top end' (MSB) of the network are contributing 32x as much as LSB ones. So if the MSB resistor accuracy is only 'out' by '1%', it will cause an error of 32x1 = 32% of the LSB !
There is no point in 'paying through the nose' for '1%' resistors (which still won't be good enough) == far better is to purchase a hundred or so dirt cheap 5% resistors at a couple pence each from China (rather than pay 35p each from Maplins), measure them all and select the 'best matching' set of 18

When I did this with 100 '1k' 5% resistors (so nominally 950-1050 ohms), I was amazed to discover that the vast majority were 986 +/- 1 ohm (according to my 4 digit multimeter) i.e. they all matched to within 0.1% of one another !!

NB. Since each '2R' in the chain can be made up of any two resistors that 'add' to the required value, we only really need 6 'matching' for 'R' (so long as we can select another 6 pairs that each add up to '2R' - for example, if R = 1,000 ohms, then '2R' can be made from any individually 'out of spec' pair that add up to 2,000 ohms = for example, 990+1010).
It seems that Resistors are another one of those 'sting the sucker' hobbyist items. They can be had for pennies from eBay (China) whilst UK retail outlets (such as Maplins) will try to hit you for 10-20 times the cost
Timing accuracy
If 'full speed' is 1 second (128 timer ticks) then 'half speed' corresponds to timer count 64 and 1.5x speed is count 192. The motor control has 64 steps between 'half speed' and '1.5' speed so one 1 motor control step is 'worth' 2 clock counts. Since a count 128 = 1s, then 1 motor step = 2/128 = 16.5mS speed adjustment
Of course it's not a 'happy co-incidence' that 1 motor value = 2 clock ticks. In fact, the motor drive bit count was chosen deliberately

There is no point in having motor control accuracy that exceeds what you can measure with the timer - and little point in having 'super accurate' timer if you can't control the motor to a similar accuracy.

Of course we also need to consider the accuracy of the wheel 'drive' (mechanical system) and the accuracy of the 'sensor grid marks' (generated by a 300dpi laser printer), of which more later
Aside - the Tri-state Trinary / Ternary DAC
At one stage whilst putting together the design, I wanted to provide a full Rx/Tx serial 'comms' channel (so I could have the PIC save values over a power cycle) but had insufficient PIC pins. With 6 pins used for the motor control, the obvious place to 'save' a pin or two would be here. Since I still wanted at least 64 steps, I looked into the use of ternary (rather than binary) encoding (the i/o pins are tri-state - i.e. they can output a '0' or a '1' or can be turned off to output 'nothing' thus giving us 3 states to play with)
A binary system has 2^n states (hence 64 steps = 2^5). A ternary system has 3^n states, which means the step count 'multiplies up' much faster, 2 binary bits 2^2 is 4 steps but 2 ternary bits (3^2) gives us 9 steps. In ternary, 3 bits (3^3) is 27 steps and 4 bits (3^4) 81 steps !
So 4 ternary bits allows more steps than 6 binary bits !
However, before looking into constructing the DAC ("R-2R-3R" ??) ladder, I realised that 'turning off' i/o pins can't be done at the same time as setting a new o/p value. This would mean at least 1 PIC CPU cycle = 4 PWM cycles between setting the tri-state (ternary) value and setting the 'binary' value - which would lead to at least a 4 PWM cycle 'glitch' in the motor drive output.
Whilst the 'glitches' might be minimised by 'stepping gradually' to a new value everything becomes so much more complex (although using LTSpice to simulate ternary resistor ladder proved most interesting)
I then considered switching from the basic 16F54 (18pin DIP, 12 i/o) to the 16F57 (28pin DIP, 20 i/o), however when I discovered that the PIC could 'preserve' it's register values over a 'sleep' cycle I decided to have it 'sleep' instead of turning it off.
NB. Later, to get the 'drive characterisation' values out of the PIC, I hit on the trick of 'double using' the 'on' LED to send the values using a simple code (see Morse :-) )
PWM using a second PIC 16F54
To minimise construction complexity (as well as avoiding all sorts of issues with power voltage variations, temperature effects etc) a second PIC could be used as the PWM driver
We can wire up the second PIC in 'RC' OSC mode (which avoids the cost of crystals etc) and get the OSC up to 4MHz - which gives us a CPU CLK of 1MHz.

Whilst it's tempting to drive the motor direct from the PIC pins (wiring up 5 will get us 100mA), I actually use a separate 'drive transistor' (to avoid any possibility of 'back-emf' etc blowing the PIC)

All this second PIC has to do is 'sense' the 'demand' count and switch the 'PWM' pin on/off at the required position.

Assuming the mark/space ratio can be controlled to 1 CPU CLK, the 'obvious' PWM 'cycle' is 256 CLK's. This gives us a PWM frequency of CPU CLK frequency/256, so a 1MHz CLK only gets us a 3.9kHz PWM cycle.

So what accuracy do we actually require ?

Well, whilst we are only looking for 64 steps, this will be +/- 32 steps from some 'nominal' speed. If we assume the 3/4 drive is 'normal, then 64 steps is only a speed variation of 50%, and the 'cycle' length is 128 steps. If an R-C OSC is used, the PWM frequency will be 7.8kHz (to get 15.6kHz requires a 'half step' circuit)
The wheel sensor
For a 1 second 'tick' the wheel has to generate 60 'ticks' per revolution. Whilst this could be achieved (just) by using a slotted grid with a mechanical micro-switch, it makes sense to eliminate any audible noise. A quick dig through my 'bits box' turned up an old 'wheel mouse' which contained a pair of optical sensors, one of which will be used.
It's quite possible to drive the mouse sensor 'directly' from the PIC - one pin can provide power to the 'emitter' and a second pin used to monitor the detector - means the sensor can be 'turned off' between 'ticks' (to keep down power consumption)

Using the PIC to directly sense the wheel 'tick' means there is no need for any fancy 'glitch removal' circuit. A soon as the 'tick' is seen (sensor 'Lo') the software can turn off the sensor the next .5 seconds (when the motor is running at 100% speed, this is 25%/75% of 'nominal', so the wheel can't be driven faster than 133% speed, and thus the next wheel 'tick' can't physically occur for at least .66s after the first)
The wheel 'grid' will consist of a 'black band' with 'holes' that allow light from the emitter to reach the detector, which in turn pulls the sense pin Lo against a 10k pull-up resistor
Using a PIC means that almost any wheel tick count could be used (i.e. it doesn't have to be 1 a second / 60 per rev), however using a mouse optical sensor means all we need to do is fit a 60 hole black card 'disk' to the wheel hub / screw 'nut' to get a 1s wheel tick<

NOTE. Whilst it's tempting to set the PIC to 'sleep' between wheel ticks (and wire the wheel tick to the MCLR as a sort of 'interrupt'), this won't work - during 'sleep' mode the CPU clock is stopped and thus our Timer stops counting :-)
Building the wheel sensor optical grid 'band'
The sensor 'grid' would need to be a circular black 'band' with 60 'holes' arranged around the circumference. Maximum accuracy is achieved by making the circumference as large as possible - i.e. a diameter of 210mm (which was the maximum possible with the A4 laser printer used to print the grid). The 'grid' was generated as a pure B&W file using a simple drawing package at a resolution of 300dpi
The mouse optical sensor consisted of an emitter and receiver together in a 'U' shaped package. The 'depth' of the 'U' was no more than 5mm (so the 'band' need be no wider than 5mm). A4 paper is 210mm wide allowing a maximum radius 'band' of 105mm (assuming 'edge to edge' printing). The black band is thus printed in from 105mm and extends in by 5mm from the edge (to position 100mm), with the 'holes' at a radius of 102.5mm
The circumference (2 Pi R) is thus 644mm which means the distance between each of the 60 'holes' (printed at 6 degree intervals) will be approx 10.73mm.
A 300dpi laser printer has a resolution of at least 12d/mm , so the accuracy of each 'hole' position is within (12 * 10.73) = 1 part in 120 (which is just sufficient to maintain the desired 1/100 accuracy).
Of course a single 'hole' in a sea of black toner would just disappear - and trying to mount the grid exactly 'centrally' (to within 1/300th of an inch) is virtually impossible. So the 'holes' are actually 'slots' cut across the entire width of the black band.
Of course a 1 dot wide slot would also 'disappear'. Making the slots 1.5 degrees (about 2mm) wide worked well (the software code (later) expects the 'length' of the tick mark to be less than 'half the distance at max motor speed' i.e no more than 1/3rd the 10.73mm distance).
We thus arrive at the final design - a black band between a radius of 100 and 105mm, 'cut' by 60 2mm (approx 1 degree) wide 'segments' spaced at 6 degree intervals.
This is generated using a photo edit package (I started with a canvas 2480 pixels square with a white background - a single black segment was then created (as a transparent 'overlay') with an angular width of 5 degrees. The overlay was copied 59 times, each copy being rotated by a multiple of 6 degrees from the previous (i.e. 6, 16, 24 etc). All 60 layers were then 'merged down'. Finally, the center of the segment pattern was erased with a 100mm diameter white circle leaving just the 5mm wide outer black 'band' with the 60x 2mm wide gaps).
The grid was printed onto 'transparency slide' A4 media (of the type commonly used for ancient 'overhead projectors'). To avoid the printer 'interpolating' the data, we have to ensure the grid matches the laser printer native resolution - 300dpi for a cheap laser printer with 1200dpi 'effective resolution'**. The printed transparency was then laminated for stiffness and cut-out to make a circle. The 'only' problem then was fixing it 'exactly central' to the drive wheel, however this was helped by a number of 'guide marks' I added to before printing.
** Low end laser printers are able to 'fill in' the 'step' between two 300dpi 'dots' with a smaller (half or quarter sized) toner 'dot' to make a smoother 'edge'. This produces an 'edge quality' of 1200dpi, however the POSITION of the edge is still 'fixed' at 300dpi 'grid' (the printer just takes out the 'jaggies')
'Characterising' the drive system
In the 'old days', high end telescope mounts would support 'periodic error' adjustments (discovered by measuring the actual movement of the drive system, which is, in effect, the error caused by each imperfect gear wheel tooth 'step'), often using some clever laser based equipment. Knowing the errors means you can 'compensate in advance' (if you know a 'short' tooth is coming up you can drive a bit faster - a 'long' tooth means driving slower). Much the same can be done with our 'barn door' drive
Unless you are prepared to spend time using your collimation alignment laser as some sort of 'optical measuring instrument', the only easy way to 'measure' distances in the 1/1000th of an inch range (i.e. better than 300 dpi) is to actually run the system 'uncompensated' (at constant speed) and use the PIC counter.
All 3 main mechanical components (motor, belt, wheel) of the drive system can contribute to errors. Both the motor shaft and drive wheel can exhibit eccentric error (i.e. be mounted off center or be of variable diameter) and (as already noted) the drive belt is elastic (so will delay the effect of motor speed changes - which also should reduce the immediate effect of motor shaft errors, unless, of course, it starts to 'resonate' :-) ).
Of course the sensor grid itself can also be a source of errors, although these should be minor = there will be no 'variable diameter' error, as the sensing distance is fixed by the position of the single sensor, the radial tick marks should reduce the effect of mounting the grid slightly 'off center' and using a laser printer with 'solid' toner particles that bind to the paper (rather than ink that soaks in) should mean the 'mark' position are 'spot on' (at least to within 300dpi)
To 'detect' periodic errors some method of finding the 'start' of the grid is required. Whilst a second sensor (and single additional mark on the very edge of the grid) could be used, a simpler way is to cover over one of the tick mark 'holes' to produce a single 'double' width 'tick' once per revolution (and have the software 'watch out' for it)
To 'measure' errors the drive system must be run at constant speed. Running at the '1 rev / minute' target speed would be ideal, although 'any' speed would do, so long as it was constant
Drive system characterisation will take time - we first have to wait until the elastic belt recovers from 'getting up to speed' and then have to measure all the tick marks times over multiple revolutions (at least two).
Whilst it is tempting to run at the fastest speed (to reduce the time) better accuracy will be achieved by running at the slowest speed. However since it's possible that the drive system behaves differently at different speeds, we really need to run at the 'normal' (one rev per minute) speed.
The next issue to be addressed is the lack of storage within the PIC. We only have 25 registers, and some of these will be needed by the software to store 'real' variables. However, even if we could store all N x 60 (at least 120) timings, analysing the data for periodic errors really is best left to a PC (and MS Excel with it's graph plotting capabilities). So need some way to get the timing data off the PIC
The answer is to use a serial link. The PIC has no UART, however we can just assign one pin as 'TXD' and 'toggle' it using software (we don't need very high speed as the timings are only generated once a second) and wire this to a PC serial port to send one character at a time.
The fantastic thing about serial links is that so long as the PIC maintains the 'correct' timing between bits during the transmission of a single character, the 'gaps' between characters are ignored.
So we can write a carefully coded 'send one character' subroutine and just ignore the serial link between chars.
This leads us onto the issue of 'baud rates'. The PC serial link expects one of a limited set of speeds, so what can the PIC achieve ?
The PIC will generate one timing per second. This will consist of no more than 1 byte, however serial links expect characters, not bytes, so the PIC will convert the value to a 3 digit decimal number before sending it. No 'special flags' need be defined, not even for the 'index' tick mark (we will just send the 'raw' value = it will be approx double any of the others, so should be easy to 'detect' at the PC).
Serial protocol consists of 8 data bits, one 'start bit' (Lo) and one 'stop bit' (Hi) for a total of 10 bits (any 'inter character gaps' should be 'filled' with additional Hi stop bits). The PC serial port will accept bit rates of (at least) 75, 110, 300, 1200, 2400, 4800, 9600 and 19200 bits per second. Fortunately the PIC only needs to send 3 characters i.e. 30 bits each second :-)
Of course during transmission the PIC software can't be doing anything else = so the 'obvious' thing to do is to perform serial transmission whilst the software is doing nothing but 'waiting for the tick mark to pass the sensor'. This will be at least .5s, which means we only need a baud rate of 60 so we only need to run at 110 baud (almost the minimum our PC expects).
Next we need to check if the PIC can achieve the required baud rate timing accuracy - most serial UARTs will 'sync' on the start bit and then 'chop' each of the next bits into 16 'samples' and accept the mid-sample value. So we must achieve better than 1/16 = 6.25% accuracy at every point in the character transmission to avoid bit errors.
With a PIC CPU running at 8196 ips (instructions per second) each 'bit' at 110 baud should take 8196/110 = 74.47 instructions to transmit. If we transmit a bit fast (i.e. in 74 instructions) the 'bit timing error' is .47/74.47 which is less than 1% (actually, about 0.7%). By sending the next bit 'too slow' (using 75 instructions) we 'average out' the error for a pair of bits to (.47 - .53) = -.06, so by the end of the 10 bit transmission we will have an 'accumulated' error of only (5x -0.06) = -0.3 (less than the single bit error) for a total error of less than 2% at any bit position. This should be fine.
Choosing 300 baud instead gives us a required instructions per bit rate of 8196/300 = 27.32. Again, we send a bit fast resulting in an an error of .32/27.32 of just over 1% (1.17%). This time we have to group the bits into sets of 3 (2x too fast at 27, one too slow at 26) to minimise the accumulated error (which is +.32, +.32, -.67 = -.03 per triad, -.1 after 9 bits). The resulting overall error will be less than 1.5% (which is better than the 110 baud case) however we have to 'watch out' for the '2x too fast' .. the second bit will be 'out' by 2.34% (before the 3rd pulls us back in to -0.8%) .. however this should still be fine
Can we achieve 1200 baud ? Well this is 8196/1200, 6.83 (7) instructions per bit with an error of .17/6.83 = 2.5%. The problem here is that this error will accumulate over 4 bits (at 7 'too slow' instructions per bit) until we can 'catch up' with a 'too fast' 6 instruction bit. By the 4th bit we are out by 10% .. which exceeds the UART tolerance of 6.25% .. (if we stick to sending ASCII characters from 0x30-0x39 (i.e. decimal char 0-9), it may be possible to arrange the timing such that the bottom 4 bits 'get through OK' (the top 4 will be '0011', the bottom 4 between 0000-1001
Rather than play about with 1200 baud, I just decided to go for 300 baud (since it produced the minimum error over each character transmission bit stream).
Finally we get down to the transmission subroutine. With 27 (or 26) instructions per bit we should have no shortage of instructions - our 'only' concern is to make sure the correct number of CPU cycles are actually 'used' per bit
The i/o pins are arranged in 2 PORT sets - one of 4, the other of 8. Fortunately the PIC supports single bit 'set' and 'clear' instructions (so we can just ignore all the other bits on the same PORT).
When the subroutine is called with an 8 bit value (0-255), this needs to be converted into a 3 digit decimal value. The 'problem' is that values over 127 (i.e. with the MSB set) are consider to be 'negative' by the ALU - so the conversion is a bit more complex than it should be
We arrive here with the count 0-255. We wish to extract 3 digits (as ASCII character codes, 0x30 - 0x39).
The first step is to remove the 'negative' flag and extract the 'hundreds' value (2,1 or 0). This reduces the remainder to 99 or less.
Set hundreds=0
Skip next if count bit7 is set
set hundreds = 28
Clear count bit7
// Now we have a 'positive' value in the count (i.e. 0-127) so can start doing some maths
// start by adding back any 'residual' 28
Add hundreds to count
// cope with the possibility that this causes an 'overflow'
Skip next if count bit7 is set
goto label1: // not set, go do tens
// here we have exceeded the 0-127 by adding 28 (the hundreds residual)
// so hundreds = 2, and we need to clear bit7 and add another residual
set hundreds = 2
clear count b7
// we started with 200-255, removed 100 then 128, so need to add back 28 (and will end up with 28-55)
add 28 to the count
label:
// here the hundreds contains 0, 2 or 28 - if it's 28 change it to 1
skip next if hundreds bit3 is clear
set hundreds =1
// OK now do the tens (count is 0-99 and we are going to use simple successive subtraction
set tens = -1
loop1:
increment the tens
subtract 10 from count
if count bit7 is set, skip next
goto loop:
// here we have the tens value, but count has overflowed
add 10 to count
// OK, thats it - decimal result is hundreds, tens, count
Storing periodic error values
With only 512 instructions, storing 60 or more values could 'eat up' quite a lot of space
data storage is achieved by 'calling' the value location which contains a 'return with literal' instruction (i.e. place the value in the W register) and takes 2 CPU clock cycles).
Whilst some values may need to be stored, if the aim is to compensate for 'periodic' errors, by far the best approach is to perform calculations with 'constants' derived from the error graphs
Until we actually 'see' the error graphs, it's not possible to develop actual calculations.
Note that if we do end up storing 60+ values, we can double the efficiency by holding only the error value (i.e. by subtracting the 'correct' count of 128) and then restrict the value to 4 bits (which allows an error of +/-7 'ticks', which is 15/128 = 12%, +/- 6%). For 60 ticks this would only consume 30 locations.
If the error exceeds +/- 7 ticks, we can double the range by switching from count ticks to motor M/S values (2 ticks = 1 M/S value), the rational being that we only care if the error is large enough to effect the M/S value
One final note is the observation that one (or a few) miss-positioned tick marks in a grid of correctly positioned ones will be responsible for two successive errors (one too short, the other too long) which add up to 0 - so we would only need to 'save' one error (the other is the negative of the first)
Actually, to ensure single incorrect ticks don't upset the processing, on seeing a timing error the control code should take no action before checking the next tick time. Adding the two values will show up a real error (whilst an error due to a 'miss-positioned' tick will result in one positive and the other negative, which will cancel out)
LED activity indicator
As with almost all designs, I used one PIC i/o pin is used to drive a LED to indicate that the system is running. Since the PIC i/o pins can source or sink at least 20mA, the LED can be driven more or less directly from the 'activity' pin. Using two pins allows a bi-colour LED to be driven (one pin could do the job if the 'other end' of the LED is 'biased' at Vdd/2, HOWEVER this would result in constant power drain on the battery = so not a good idea :-) )
The 'classical' approach is to turn on the LED at power on, then 'blink' the LED to indicate that the PIC code is running 'OK'. Since I wanted the LED to blink 'once per second' during normal operation, I decided that a 'high speed' blink would be used to indicate the 'start up sync' process was running NB. When I needed to discover the actual 'step delay' value being calculated by the PIC, I added software to 'blink' the LED in a Morse code sequence :-)
i/o pin count
With 7 assigned to motor control, 2 for the wheel sensor (9), 1 for the LED (10), 1 for a 'sleep' button (11) and 1 for Serial link transmit (12), we have none left for a 'calibration mode' switch.
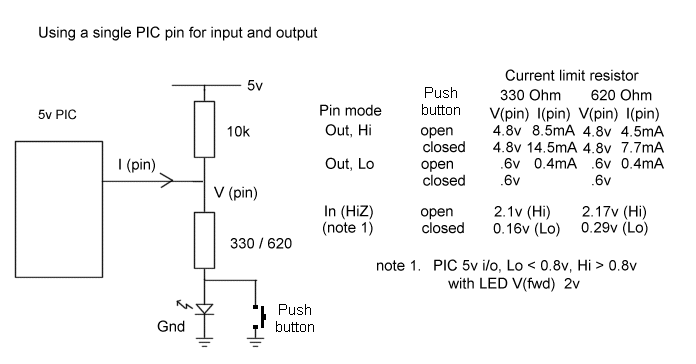 The answer is to make the LED drive pin 'dual use' i.e. use the same PIC pin for both input and output 'at the same time'. To drive the LED we wire the pin to a current limiting resistor and thence to the LED and from there to ground. To use the pin as an input, we add a 10k 'pull up' resistor from the pin to Vdd and add a switch across the LED.
When the pin is used as an output, setting it Lo will sink current (.5mA) from the 10k pull-up and the LED will be off. When set Hi, the pin will source current via the limit resistor to the LED.
If the switch is open the LED will be 'on'. If the switch is closed, the LED will remain off and the pin will sink current to Gnd via the limit resistor. If we wish to limit the pin output Hi (Vdd-.7v so 4.8v at max 5.5 Vdd) current to 15mA, then the current limiting resistor value will be 4.8/.015 = approx 330 ohms. If the LED V(fwd) is 2v, the LED current will be 3/330 = 10mA (if a high efficiency LED needing only 5mA is used, we can up the current limit resistor to 620 ohms and the pin output during 'switch sink' will be less than 10mA)
When the PIC changes the pin to input mode, if the switch is open, the 10k will 'pull up' the pin to at least the LED V(fwd) of 2v and a Hi will be seen. If the switch is closed, the 330 resistor will pull down Vdd from the 10k to approx 0.16v and, since this is less than 0.8v, a 'Lo' will be seen.
Note that PORTA consist of 4 bits and PORTB 8 bits. Software code is simplified if we avoid mixing outputs and inputs on the same PORT, so we assign PORTB to the 0-6 (7 bits) motor control and bit7 to Serial Transmit (outputs). PORTA is thus Sleep in, Wheel sense in, Wheel emitter out and LED out/mode in
The code
Power-on
At power on, the i/o pin functions are set, the M/S (mark/space) value set to '0' (the 'lowest speed'), the pre-scaler set to 64:1 and the count cleared. The 'motor start' pin is then driven Lo (when the PIC is not running, this pin will by pulled hi by an external resistor). The software then gets the motor to speed
Due to the elastic drive band (which was specifically 'designed in' to avoid any 'jitter' reaching the camera due to speed changes), when the motor is first started there will be some delay before the wheel responds. To reduce stress on the band, the motor is started at it's lowest speed and then ramped up over 4 s to maximum speed. The pseudo-code follows :-
If the value on the PORTB M/S is > 0, save it as the M/S midpoint, otherwise set M/S midpoint = 32
Set PORT B to M/S value 0 (lowest speed)
Set i/o pins to output
Load motor start bit, set LED 'on' bit
Set pre-scaler mode 64:1, set count 0
Wait for count 255 (2s) (blink the LED during this time)
Set M/S value 32 ('normal' speed), reset the counter to 0 (whilst it will 'roll over' from 255 to 0, that takes 64 instruction cycles)
Wait for count 255 (2s) (blink the LED during this time)
Set M/S value 63 (max speed)
Once the wheel gets 'up to speed', we can drop the M/S value to the 'mid point' speed and wait for it to settle down.
Wait for wheel tick 'Hi' (so we are 'between ticks')
Wait for wheel tick Lo (= tick position), set the counter to 0
Loop:
Wait until count 64 (.5s, at which point the wheel tick Lo should have passed by)
Wait for wheel tick (Lo), at which point we read the count (save it as 'speed1') and reset it to 0.
If the count was greater than 128
goto Loop: (we have not yet reached the required speed)
Set the M/S value to the M/S mid point (default 32)
(drop through to the Speed Sync code)
Note that the motor speed is controlled by the 6 bit mark/space ratio value. A value of 32 is the 'mid point', so if we 'only' adjusted the value by 1 on each second/wheel 'tick' it would take (at least) 32s to reach 'operating speed'. Instead we start at 50% speed (M/S 0), and after 2s move to 75% speed (M/S 32) and then after another 2s move to 100% speed (M/S 63). The idea is to 'kick start' the wheel - only when the wheel passes 75% speed do we 'drop back' to 75% M/S
Speed sync
The 'goal' is to set a speed that produces a 1 second wheel tick. However (despite all our careful calculations) a Mark/Space value of 32 might not actually deliver the 'exact' 1s wheel tick (it might be 31 or 33). So we actually need to discover what the 'mid point value' is
Since we are running from batteries the 'mid point' is likely to change anyway (as the battery voltage drops). Of course the PIC code will 'spot' the fact that the motor is running too slow and adjust the M/S value accordingly
Next, the method used by the main loop code (compare the wheel tick against the internal timer and adjust the motor speed) is a classical 'closed loop' feedback system - and with any such system there will be a delay between the 'demand' (set a new motor speed) and the 'response' (new wheel speed). This delay has to be taken into account if we are to avoid 'overcompensating' i.e. over- and under-shooting the required speed which can lead to 'hunting' about the correct sped, or (even worse) 'running away' into bigger and bigger changes.
The main source of 'feedback delay' is the time taken to measure the wheel tick (1s) plus the software time needed to process that measurement (< 1s). There will be some additional delay caused by the motor response time (a fraction of a second) plus the response of the elastic drive belt, which could result in a 'bounce' but which hopefully settles down within a few seconds.
Finally, it is noted that a long 'start up' delay during 'normal operation' would be rather 'annoying', especially as the barn-door has to be 'reset' (motor disconnected and the wheel wound backward) every hour or so.
Whilst it would be 'nice' to have the PIC 'save' it's own calculated response delay times (and use them as the new 'start up defaults' for the next start up sequence), unlike the more complex PIC devices (which that have some EEPROM registers) the PIC16F54 has no way to store data across a 'raw' power-cycle.
Fortunately, all the i/o PORT values are preserved over a 'sleep' operation, which means the (current) M/S value is 'automatically' saved (as are the values in the W, TMR0 and INDF registers, although INDF can't be directly read, as it's the 'indirect addressing pointer').
So we will fit a 'sleep' button, which, when detected, causes the code to place the 2 basic response delay values (speedup and speed-down) into the top and bottom 'nibbles' of the W register (the values are likely to be single digit seconds) before the 'sleep' instruction is executed.
During 'power on', if the Status bits indicate a 'wake up from sleep', the data in the PORT B and the W registers will be used as the starting M/S 'mid point' value and the speedup /speed-down values (if it's a 'raw' power-on, then all 3 values will be set to their default values).
So, on arrival at this loop, the wheel has reached a count speed of 127 (or faster i.e. lower) and the M/S value will have been reduced from max. speed to the M/S 'mid-point'. Before we can check the actual speed, we have to wait for the wheel to 'settle down'.
Loop1:
Wait until count 64 (.5s, at which point the wheel tick Lo should have passed by)
Wait for wheel tick (Lo), at which point we read the count (save it as 'speed1') and reset it to 0.
Calculate the absolute speed change, = ABS (speed1-speed2) i.e. current speed minus previous speed
If less than the accuracy limit (3),
goto code2: (we assume that the speed has stabilised)
Save speed1 as speed2
goto loop1:
At this point a check needs to be made to see if the system is in 'characterisation' mode or 'normal running' mode. If 'characterisation' mode, then the system is run at constant speed 'for ever' whilst the tick count values are transmitted via serial link to a PC
At this point you will note that we have run out of i/o pins. Fortunately, 'reading' an i/o pin reveals the actual voltage on the pin, not the value being 'output'. So the we can 'double use' the LED pin (the pin drives the LED via a current limiting resistor - if we set the pin to Hi' and
The speed has now stabilised, however it may be too fast (or too slow). So we now measure the actual speed. Note when we reach here, the current measured count speed is in speed1
This section of code is quite complex because not only will the 'error adjustments' need to be taken into account (see 'characterisation' above) before deciding on a speed change, but also if the speed does need to be changed, the speedup / speed-down delay has to be allowed for (i.e. measured)
Why not simply sample the speed every time we make a change and wait for it to 'settle down' ? Well first if you know in advance that it takes N seconds to 'settle down' you don't have to wait for N+1 seconds (to discover the speed at N+1 is the same as that at N) and, more to the point, instead of constantly 'over shooting' the target we can make an accurate 'prediction' of the error.
code2:
copy speed1 to speed2 (remember - the previous code set speed1)
Wait until count 64 (.5s, at which point the previous wheel tick Lo should have passed by)
Wait for wheel tick (Lo), at which point we read the count and reset it to 0.
Save the count as speed1
// check the speed is still stable
If ABS (speed1-speed2) > accuracy limit (3),
goto code2: (speed is not stable, keep waiting)
// speed stable, work out how close we are to the target - if > +/- 1 step adjust mid point now
count diff = speed1 - 128
step = count diff / 2
If the ABS (step) < 2, (if within 1 step, check if we need to discover the speed change delays)
goto PowerOn check:
// 2 or more steps required, take the larger step
set M/S midpoint = M/S midpoint + step
goto code2:
// here we are within 1 step .. do we need to check delays ?
PowerOn check:
// and then check for a hard power-on (else it's soft wake up from sleep)
If hard power on,
goto hard:
// not hard, exit to main loop unless we need to take one more step
If the ABS (count diff) < midpoint accuracy (default 2),
goto main loop: (we are within 1 step and stable and will re-use the previous speed change delays)
set M/S midpoint = M/S midpoint + step
goto code2:
hard:
// within +/- 1 step and need to discover both the speedup and speed-down delay count
set speedup delay = 0
set speeddown delay = 0
// start by taking 1 step to the mid point
If the count is too low (= wheel too fast), call the slowdown subroutine (which uses an existing delay, if any, or sets the delay if none)
slowdown: set speedmode = slower, decrement the M/S (reduce the motor power), wait for delay (if any) else wait for stable and set delay, return
If the count is too high (= wheel too slow), call the speedup subroutine
speedup: set speedmode = faster, increment M/S (increase motor power), wait for delay (if any) else wait for stable and set delay, return
// OK we are now on M/S midpoint, however only one delay has been found .. do the other now
Call speedup // moves up 1 count, sets delay (if not already set)
Call slowdown // moves back to midpoint, sets delay (if not already set)
// from here we can fall through to the main loop
The main loop
The difference between the 'main loop' and the 'speed sync' code is that the counter is no longer reset between wheel ticks. This means any timing errors are automatically 'carried forward' to the next 'adjust' cycle. As a result, after of X minutes operation, the wheel will have turned exactly X times +/- 1/100th of a turn (rather than +/- X/100ths)
The counter is now running 'all the time'. Since 128 counts == 1 second, a wheel 'tick' should fall on either a 'count 128' or a 'count 0'. Whilst any error will now 'accumulate', the disadvantage is that simple sync will be lost if the error ever reaches 64 counts (due to making the assumption that the 'target' (0 or 128) is whatever is closest to the actual count - which works so long as the error doesn't exceed 63).
Don't forget that the counter will (only) change value after 64 instructions (and 'waiting for count 64' (0.5s) means a 4096 instruction consuming loop)
main loop:
// arrive here after starting the count from 0, so the target will be count 128
Wait until count target-64 (.5s, at which point the wheel tick Lo should have passed by)
Wait for wheel tick (Lo), at which point we read the count.
If the count > target+2,
call speedup: (the wheel is running too slow and we need to speed up)
on return, goto main loop:
If the count < target-2,
call slowdown: (the wheel is running too fast and we need to slowdown)
on return, goto main loop:
Flip the target bit 7 (so next target is 128+128=256, i.e. 0)
goto main loop:
Finally, the speedup and slowdown subroutines. These need to 'predict' the M/S value(s) that need to be set to 'get back on track'. Remember - whilst the speed change delay is being 'counted out', the wheel tick will be getting further away from the 'target'. We thus need to take into account the 'rate of error' as well as the 'absolute value' when deciding what M/S value(s) to set
Note - remember to flip the 'target' bit 7 each time a delay cycle has to be performed (and don't forget that the PIC ALU is 8bits and all actual addition and subtraction (rather than simple bit flips) uses '2's complement' binary representation (i.e. bit 7 is the 'sign' bit, so 0xFF (255) = "-1" )
... and that's it !