

Whilst aimed at PhotoStory 3 users, the section "Getting 5.1 from your PC to your Home Cinema" via S/PDIF will be of interest to those with older Home Cinema systems lacking HDMI inputs (it took me ages to 'puzzle this out'). Also of interest should be 'up-mixing' from stereo source to 'pseudo' 5.1 and down-mixing from 5.1 to Dolby ProLogic II (again, it took me ages to find the Foobar2000 and Audacity 'plug-ins')
Narration (and 'auto-ducking')
PhotoStory 3 can play two .wav tracks simultaneously - a 'narration track' and a music track. There is no 'auto-volume' control, although you can adjust the Narration volume during recording, and set a music volume at the point where playback starts. Since you will need to 'get the narration timing right', it's plainly best to use PhotoStory to add the narration 'photo by photo'
You can't import the Narration track directly from an external file (but see 'Hacking the Project file' later), PhotoStory expects you to dictate it via a microphone !
It's best to plan your narration 'in advance'. If your narration runs over from one photo to another, be warned that the narration will be 'attached' to the first photo (i.e. where you start) - if you delete (or move) that photo, the 'attached' narration goes with it
PhotoStory generates a simple .wav file for Narration when you 'Save Project'. This means it can be extracted from the .wp3 Project file using 7-zip (and then 'merged' with the music track using Audacity etc. and re-imported = see 'auto-ducking' below)
Narration is a lot harder than it seems. You may well find it's easier to create & edit your narration with some other software (or even use a Text to Speech app like balabolka), saving it as .wav 'clips' and then 'import' your speech into PhotoStory 3 (either as a music track**, or by 'hacking'** the .wp3 Project File to add the track as a narration file)
** If you 'import' your narration as (i.e. instead of) a music track, you can add your background music (by hacking the project file) later (i.e. insert the music .wav as a 'narration track'). Alternatively, you can add a .wav track using Windows Movie Maker at the same time as 'converting' from wmv-i (Windows Movie Image) format into DV-AVI (or 'real' wmv).
However once again, this will be a 'fixed volume' merge .. if you want to 'auto adjust' the music volume 'up and down' i.e. so the background volume is reduced during speech, you will need to 'export' your completed speech track from PS3 output and then use Audacity (and it's 'Auto Duck' Effect) to merge the speech into the background music to produce a single track.
The 'Effects > Auto Duck' function in Audacity will 'merge' a Narration ('control') track and a music track with 'auto volume reduction' (alternatively, follow this Audacity tutorial that explains 'how to do it' by hand)
In Audacity, import your 6 channel (5.1 surround sound) music track first, then import the narration track 'below' this. If the narration is stereo, merge it to produce a mono track. Next use 'Auto Duck' with all 6 channels selected to 'auto reduce' their volume only (Audacity will automatically use the (unselected) channel below the selected ones as the 'volume control'). Finally, 'merge' your (mono) narration track into the 5.1 'CENTER' track (only) before Exporting as AC-3 etc.
Using sub-titles instead (or 'as well')
PhotoStory 3 supports a basic form of text sub-title, however they are 'burnt' into the photo when it is first displayed ! This means the sub-title text will be 'left behind' as you pan and zoom away from the start point, which makes PS3 subtitle rather useless (for anything much more than a 'static title' frame).
However this does mean you can pan (and zoom) across (and into) the static 'sub-title' text, thus allowing effects such as text that 'flows across the display' or 'zooms up' (or down)). Indeed, the 'static burn in' actually lets you create some quite clever 'effects' with titles ... but one thing it can't do is 'stick' to the bottom of the screen as the photo moves 'behind' it.
Of course if you are aiming at DVD (or BD) playback, you can always use 'real' sub-titles (even instead of narration). These are 'fixed to the screen' (so don't move with the pan and zoom) and can be selected (or not) by the user at play-back time
One drawback is that DVD subtitles are stored as '4 colour' bitmap images (although that can include 'transparent' as one of the 4 "colors") and, since the subtitle BMPs are contained within the VOB file of the DVD, it's up to your DVD 'author' software to 'merge' them at 'build' time This means you get a single 'sub title' playback choice (on or off), unlike DVD audio where you cab embed multiple tracks (and choose one as the 'language' at playback time)
Since most simple subtitle 'preparation' software utilities 'work' by asking you to specify the 'display times' (i.e. the start and end time to 'playback' the sub-title, as measured from the beginning of the movie) 'by hand', it can be quite a hit and miss affair to 'position' a sequence of subtitles at the corresponding photo display time (especially if your photo display times are short)
For more on DVD subtitles, see my Making a movie DVD pages
Adding music to your Story
Microsoft Photo Story 3 will correctly import .wav and .wma music (if you have difficulties importing .wma, try renaming the file as '.wav' first). It also supports mp3's but this can be a bit 'hit and miss' because the wmv-i output format does not correctly support any variable bit-rate music files
I found that occasionally PS3 would 'truncate' a music (.wav) track, both in Preview and the .wmv-i playback. However when the wmv-i was 'converted' in Windows Music Maker, the music track ran to the end as it should. Examining the wmv-i showed an incorrect 'total time' setting = most odd
Note that if you intend to replace the PhotoStory3 music track later (eg with a 5.1 .ac3), you should make sure that the total playing length of the replacement is at least as long as the 'original' (if necessary, pad the end with silence using Audacity)
DVD Flick (DVD authoring software) allows you to replace the 'original' sound track embedded in an imported .avi, however if the replacement is 'too short' it has the annoying habit of 'reusing' the final few seconds of the track again and again in order to 'pad out' to the end of the movie !
Using mp3's
When you 'Select Music', PhotoStory 3 will 'offer' to import .mp3's, however this only 'works' with 'some 'types**' of .mp3. Even if it imports and plays (Previews) OK, you will almost certainly have timing problems (music ending early) after building the story
**all my .mp3's (384kbps, created using 'Blade' mp3 Encoder) are played back by PhotoStory with no bass and a background 'whistle' ! (so, at a guess, only Microsoft Media Player created mp3's are 'guaranteed' to be supported)
To avoid timing problems with mp3, simply 'convert' all your mp3's into 'constant bit rate' .wma (or .wav) before using them with PS3.
You can convert mp3's using the open source Audacity. Those who find Audacity a bit too complex, can first use the free utility MP3GAIN.exe to 'equalise' the sound levels and then convert to .WMA files using the free FREE-MP3-WMA Converter">
WARNING. If you download software from almost any large .com repository, it will 'wrap' the app in an advertising 'spam' down-loader that may take over your browser home page (or even replace your browser), redirect all your 'searches' to another place and otherwise mess up your on-line experience. Many such sites do this WITHOUT WARNING (unlike soft32.com, who have the decency to warn you)
In some cases you can 'unpack' the installer (using 7-zip) and extract the 'cheese' (wanted app.) without tripping the 'mouse trap' (spam load), however the worst of the ad-ware spammers now encrypt the installer contents to prevent this
PS3 supports 2CH (Stereo or DolbyProLogic II) only
Stick to importing 2 channel 'stereo' = PhotoStory can only build a Story with a 2CH sound track (if you manage to import (and sometimes even preview) 5.1, PhotoStory will always fail at 'output' time).
Sometimes I found Photo Story 3 allowed me to import 5.1 (6CH) PCM .wav, and even play the wav in 'surround sound' during 'Preview', however I have never managed to actually 'build' such a Story (the output always fails with a 'memory error', even when using a Profile that specifies PCM 5.1 Audio).
Dolby Pro Logic II, which is 5.1 reprocessed into 2CH stereo PCM .wav works just fine. If you then build the Story using a Profile with 'Audio = unchanged/raw PCM', the data will be 'passed through' OK
The DTS (ac3) PCM 'hack'
There is a (quite) well known 'trick' that can be used to 'cheat' a Stereo (S/PDIF) PCM audio data path by renaming your DTS (AC3) 5.1 data as a .wav file. The encoded data stream will then 'impersonate' a normal PCM (unencoded) stream and (at least in theory) should be 'passed along' to the output audio system.
This ONLY works if 'everything' in the 'chain' passes the PCM data along totally 'unchanged' (which means ALL audio software is set 100% volume and no 'clever' things like 'bass boost' or 'fade out' are applied). Plus (of course) at the end of the 'chain' your DTS capable audio payers needs to correctly detect and decode the .ac3 5.1 compressed data stream 'hidden' in the PCM (most will, even if you have to 'force' them manually)
Needless to say, this trick doesn't work with PhotoStory 3. Whilst the AC3 .wav plays OK "on it's own", when added to PhotoStory it's reduced to silence. PS3 even 'builds' OK (with PCM Profile), however whilst something appears to be present you get no audio during wmv playback at all (not even in Movie Maker)
Note. Even if it 'worked' via PS3, I would expect the timing to be 'shot'. To maintain timing, you would need to encode the AC3 at 1411.2 kbps - unfortunately, the maximum supported by Audacity (built in) is 640kbps ('Custom ffmpeg export' allows you to set 1411200, however it only actually outputs 640kbps :-) )
Fading at Story end
MS PhotoStory will 'taper off' the volume of any audio still playing as it reaches the end of your Story. If you don't want this, add a 'blank' frame after the last photo (set to no pan/zoom, no transition) to 'pad' your story by the 'fade' time (15seconds), and 'crop it off' in WMV later
Switching the audio track later
Whilst there is nothing to prevent you switching from 2CH to 5.1 before (or at the same time as ) building your DVD, this only woks SO LONG AS the ac3 is EXACTLY the same length as the 2CH track it is replacing
This means you MUST start the 2CH with the first photo (or pad out the ac3 with silence using eg. Audacity) and the .ac3 must be as long as the complete story (if not, some DVD author packages - such as DVD Flack - may 'repeat' parts of the ac3 untill the end of the movie) = again, add silence to the end using Audacity as necessary
Is your music 'Legal' ?
If you intend to 'play' your Story to others, or 'publish' or sell your PhotoStory, any included music must be 'legal' i.e. your own composition, Royalty Free (eg 'random' generated) music, music for which you have paid the appropriate Licence fee (see Performing Rights in UK or direct licence purchase in USA) or music that the copyright holder has allowed you to use (see, for example, FMA archive)
Of course you don't have to pay a fee if some-one else has already paid for a Licence that covers your use.
For example, most 'halls for hire' will have paid a 'generic' fee to the Performing Rights Society (in UK) so if you playback your Story at a party, or club / society meeting / function you will almost certainly already be covered.
Also, many 'web hosting' sites (such as YouTube) have 'global' agreements with many Music copyright holders (usually the publisher) - however this won't cover all published music, so you could still find your 'masterpiece' being removed, especially if you use modern (rather than classical) music, which will still be within the (50 year) length of normal copyright protection
If you only play back your Story in your own home i.e. for friends and family, you might expect that this is covered in the price you paid when you purchased the original CD.
However the Music Industry will disagree. The only 'right' you get is the right to play back the music directly from the original media (and from no other 'source') and only for your own personal enjoyment (and for no other person) !
So, if you allow anyone else to hear the music - even in your own home - and have not paid for an appropriate licence, you are breaking the Copyright. The same applies the instance you copy it from the original media and add it to 'My Music' folder on a computer and especially if you 're-use' it or 'convert' in any way (eg. add to a photo Story or 'convert' it into .wmv, .mp3 etc)
To avoid being a 'Music Pirate', before playing back any CD / DVD, you need to make sure no-one else is in the house who might 'listen in'. You would also need to close all your windows and keep down the volume, just in case a neighbour (or, horror of horrors, some member of the public) manages to overhear the music (playing back 'in public' without a Licence is regarded as a 'serious violation' of the copyright - and whilst (at least in UK) the question of 'intent' still applies, leaving your door or window open knowing that members of the public are within hearing distance may be enough to show deliberate intent)
Of course, as already mentioned, 'copying' or 'importing' and 'storing' the music in any digital format or other way (except as analogue (stereo) to audio cassette tape, for which you have paid a 'copying levy' when you purchased the tape) also makes you a 'Pirate'.
If you think all of the above is a load ludicrously over-restrictive unenforceable nonsense that does nothing but bring the entire Copyright law into disrepute, take it up with your MP, not me.
Random music
PhotoStory 3 can generate (Royalty free) 'random' music (by Genre, Style etc.) using your sound-cards MIDI support function. Random music replaces any other Music (wav) that might otherwise be 'playing' (to stop Random, set the photo where you want it to stop to 'none'). Note that 'random' music is still 'in addition to' the Narration 'track' (which is merged at output time, using the volume setting of the music)
Imported ('Selected') Music (or random 'Created' Music) is 'attached' to the photo where it starts. If you move (or delete) the photo, the Music goes with it !
How do I generate .wav files from my music CD's ?
To become a music 'pirate', all you need to do is extract a music track from your CD as .wav. Incitement laws mean I am not allowed to recommend EAC (Exact Audio Copy) - so don't visit the German authors site and don't download it .. and never, ever, use it on a commercial music CD.
The only thing to note about EAC is that the 'destination' folder should be created before launching the app. (and, of course, you should only ever extract the full quality .wav (which your lawyer can argue was intended only to allow the CD to be 'backed-up'), and not anything else (remember, any format conversion is Copyright violation)
NB. If you use Windows Media Player to extract tracks from your CD you will get low quality .mp3 or (DRM infected) WMA.
Of course, it is possible to extract 5.1 Surround Sound tracks from movie DVD's (which is slightly more difficult - and would make you a 'Movie Pirate' as well as an 'Audio Pirate'). However if you only have CD (stereo) music and really want 'surround sound' it is possible to 'up convert' into 'a sort of surround sound' = see below
Note that extracting 5.1 from a SACD is virtually impossible, SACD being about the only 'DRM protected' format that has survived 'intact' (perhaps because no-one can be bothered to waste money on the hardware required to play this non-standard disc format)
How do I extract Surround Sound (5.1) music from a DVD ?
If you think the music industry has some insane views about copyright, I bet you really love the garbage the movie industry forces you to view at the start of most DVDs .. yes, the FBI will track you down and you will be sentenced to 5 years in jail and fined $200,000 if you try to 'pirate' (i.e. copy) any part of the DVD you just 'purchased'
If you are a US citizen, you are subject to the DMCA law which DOES make it a crime to circumvent (or attempt to circumvent) the DRM (encoding) used to 'protect' DVD's from being 'copied' by the customer - so, under no circumstances should any US citizen even read what follows (unless you want to become a criminal) - instead, just skip to my next chapter, Audio timing, below).
To extract music from a movie DVD you first need to get direct access to the DVD, bypassing both Windows 'refusal' to 'browse' the contents as well as the actual file encryption (DRM). You should not do this by using Google to find the 'DVD43' plug-in / driver (which works fine with Windows XP and later).
Multiple Audio tracks (different languages) are actually 'embedded' in the movie '.vob' files found in the VIDEO_TS folder (the 'pure audio' folder, AUDIO_TS, will always be empty). After installing DVD43, Explorer can be used to browse the DVD allowing those wishing to commit 'video Piracy' to 'drag and drop' the .vob's 'somewhere' (eg /temp) as a 'back-up'.
Then, to really infringe Copyright law, you could use Audacity to 'open' the .vob to extract a music track (Audacity will ask you which 'language track' you want) and then 'save' just the bits you want (typically, you will want just the opening or closing 'theme' track since the rest will be merged with the dialogue)
Audio timing
Your narration (and music track, or the random music) will start playing at the beginning of the photo where you 'add' the track. It will then continue to play until the end of the track is reached or it is 'replaced'. To 'crop off' the end of a music track at a specific photo, just add 'silence' (using the 'random' music generator) at that photo
To 'stop' music part way through a photo, just import that photo a second time (with 'no transition'). You can then adjust the first and second photo timing so the music stops when the second is set to 'silence'. Careful use of the 'start crop at previous end' will allow seamless pan/zoom over the photo pair as if they were a single image
Note PS3 does not 'cross fade' tracks .. if you want cross fading, you will have to join the tracks in Audacity first (or replace the tracks using another app. later)
Extracting (or replacing) the music (or narration) within a project file
Music tracks that you 'import' (or Narration you create) are simply placed into the .wp3 project file (a Microsoft archive cabinet .cab file) and 'linked' to the photo where the music / narration starts (by reference in the Project.xml file).
You can 'unpack' a PhotoStory project .wp3 cabinet archive using the Open Source 7-zip utility.
The sound track files are (re)named 'SoundTrack0.wav', 'SoundTrack1.wav' etc. - the original music track name can be found in the 'Soundtrack comment' field of the photo where the track starts playing) inside the 'project.xml' file. The size (and 'modified' date) of imported music tracks are preserved.
For more on replacing the audio track (and repacking the .wp3 archive) see my Hacking the .wp3 file page
Is it possible to obtain a copy of the 'random' music generated by PhotoStory ?
Yes, but only by 'outputting' the Story. You can then 'open' the WMV-Image in Audacity and it will correctly extract the WMA / PCM audio from PhotoStory WVP2 format file
The 'random music' is 'saved' in the Project file as a set of MIDI 'instructions', rather than as any sort of soundtrack .wav file, so it 'does not exist' until your sound card generates it !
Once you have it in Audacity, you can Export it as WAV (and process it into 5.1 surround sound, should you wish)
What to watch out for when adding music
1) PhotoStory has no soundtrack editing capability, other than replacing a track before it ends with another (or with silence from 'Create Music'). So if you want to 'crop off' the start of a track or 'cross-fade' (join) two tracks (or reduce the volume during Narration), you must modify the .wav files by using an audio edit package (and then re-import).
I recommend you use Audacity. This Open Source package is the de-facto standard for all audio manipulation, with ONE EXCEPTION - as of early 2014 it really doesn't handle Microsoft AAC surround sound very well (see below for Using Audacity)
2) Maintaining 'sync' between your music and the photo transitions can be difficult if you replace the track later (eg with a 5.1 surround sound original) and especially if you don't start your music at the first photo
The ideal approach is to generate your 5.1 surround sound track first, then 'down-mix' it to stereo (Dolby ProLogic II) for use in your Story. If you really want to start your Story with silence, just add however many seconds you need to the 'original' 5.1 track before down-mixing
3) You should avoid importing multiple music tracks into your Story
It is very hard to replace multiple tracks later and keep the timing the same. If you must have multiple tracks, it's far better to join the tracks in Audacity first (especially as this lets you add 'cross fade' effects etc.)Again, this should be done using the 5.1 tracks (after which a 2CH down-mix should be used when building your Story)
4) At the end of the Story, MS PhotoStory 3 will 'fade out' any music that is still playing during the last 10 seconds of your Story. This makes it very hard to build up a story in 'segments' if you want a 'continuous' music flow.
Getting a 'continuous' music flow across multiple components of a Story involves building the 'whole track' in Audacity and then 'chopping it up' into segments.
You then build your Story in segments and, after joining the video segments together (eg in Movie Maker), replace the multiple segmented tracks with the original. Of course maintaining synchronisation can be a real problem - one approach is to 'pad' the end of each segment with two 'static' copies of the photo that the next segment will start with.
The last static photo is set to 15 seconds (i.e. longer than the fade out time). You then adjust all the other photo display times to 'use up' all of the music (i.e. so that the last photo starts just as the music segment stops). Photo Story will 'fade out' the (no longer playing) music during the last photo display time (instead of fading out whilst it is playing)When you come to convert your output Story segments in Windows Movie Maker, you clip off all the 15s of 'silence' before joining the segments together. So long as one segment ends with the exact same photo as the next starts, you will 'get away with' small errors in joining the video - but not the audio.
So you will then have to replace all the 'joined' audio with the original single track before burning to DVD (of course too many errors will result in successive de-sync'ing of the music in later segments)Note that, by default, PhotoStory will 'fade in' your first photo. You must put a stop to that when you need a 'static' first photo to join with a previous segment. To do this, open the 'Customize Motion' window for the first photo, and in the 'Transition' tab, clear the 'Start current picture using a transition' option
5) PhotoStory will only accept 44.1kHz audio .wav - whilst you need 48kHz for DVD / AVCHD use.
This is not a problem if you replace the audio before burning the DVD, however it is something to 'watch out for' when preparing a Dolby Pro Logic II 'stereo' track for PhotoStory 3 (you have to convert the 5.1 into 44.1kHz BEFORE down-mixing :-) )
5.1 surround sound
Ideally, you will always start with the 5.1 and generate a 2CH 'stereo' DPLII 'down-mix' to build your Story (and then replace the 2CH with the original 5.1 before burning to DVD). However, if all you have is a stereo (CD) version, you will have to start by 'up-mixing' instead.
You can 'source' 5.1 from any movie DVD or from a 'SACD' (Super Audio CD). Use 'DVD43' to get access to the DVD .VOB files and Audacity to extract the 5.1 AC-3 from the .VOB. Note that whilst Audacity will 'do the job', it's not going to be very fast when it has to handle 1Gb VOB files. So I recommend 'just save the extracted as 6Ch wav' before trying to do any sort of 'edit' :-)
Note - before 'playing around' with 5.1 surround sound, it's not a bad idea to make sure your system speakers are actually 'connected' correctly :-) This can be done by using eg. the www_lynnemusic speaker test AC-3 file
Getting 5.1 from your PC to your Home Cinema
If you try to use your Home Cinema system to 'preview' your audio before 'burning' the DVD, you may discover that all you are getting is 'down-mixed' stereo, despite the fact that you are connecting from your computer via S/PDIF and thus expect either full Dolby Digital (encoded 5.1) or 'Dolby Pro Logic II' 2CH PCM.
Of course many Home Cinema systems that 'spot' you are sending stereo will 'assume' it's DPLII and thus try to 'up-mix' it, ending up with 'a sort of 5.1'. So all 5 speakers are 'active', which can be really confusing when you make changes to the 5.1 on your PC but don't hear any difference from the Center, Rear or LFE channels of your Home Cinema system
For more on Dolby, see Sony explanation here
What's the problem ?
The 'Music Industry' and it's (doomed) attempts at 'enforcing DRM', of course. This is the main reason that many 'audiophiles' refuse to touch Windows with a barge pole and run pure (i.e. non-DRM infected) Linux based systems.
Since music is not my entire life, I have to use Windows and 'work around' all the annoying DRM imposed restrictions
Since music is not my entire life, I have to use Windows and 'work around' all the annoying DRM imposed restrictions
Getting Dolby Digital 5.1 AC-3 (as opposed to Dolby Pro Logic II stereo or PCM 'bit-stream') out of a PC has been a real pain ever since the Music Industry convinced Microsoft to impose 'DRM' on Windows XP (and forced just about every PCI sound card manufacturer to 'downgrade' 5.1 to 'Stereo only' (i.e. not even DPLII) when outputting via S/PDIF)
S/PDIF supports .ac3 encoded 5.1 (or 7.1) or streaming 2CH PCM Dolby Pro Logic II only.It's bandwidth is limited to 3.1MHz, which is insufficient to support 6 channel PCM (odd, really, when you consider it uses RCA co-ax or TOSLink optical cable that could, in theory, support bandwidths in the multi-GHz region - conspiracy theorists please note :-) )
Your Windows XP computer (and your sound card) will insist on decoding .ac3 5.1 and outputting it as streamed 6 CH PCM (on a set of 3 stereo pair cables to circuits inside your 'computer speaker' system LFE ('sub-woofer') box, which then converts each of the PCM data streams into analogue which is then amplified to drive each of the speakers).
This is all done 'to prevent copying' = remember, Windows DRM will 'not allow' you 'direct' access to a Movie DVD at all (all you can do is 'play' it), so the enforced audio (AC-3) 'decoding' is all part of the DRM "preventing you from copying the Movie"NB. When I do manage to extract the AC3, I often find that the LFE channel (in Audacity) is so low a volume as to be almost non-existent. Since the DVD plays OK in my Home Cinema system (with lots of low end bass), I can only assume the majority of the bass is in the other channels
All this DRM nonsense means you have to 'jump through hoops' when using Audio Edit software (such as Audacity), because you are "not allowed" to play 5.1 (to pre-view changes) on your Home Cinema system, only on your computer speakers (which, of course, will have different characteristics and a different frequency response).
This means you have to build your DVD (or AVCHD) music 'blind' and will only know if it plays back as intended when you pop the DVD into the player ...... until, after burning dozens of DVD's (and wasting weeks of time) trying to adjust the LFE, balance the centre / sides and generally boost (or reduce) the overall 'surround' effect, you decide to join the ranks of those determined to tear out the DRM ... rather than waste any more time tearing out your own hair :-)
What's needed to get 5.1 ac3 out of a computer ?
Those with newer Home Cinema systems may have HDMI inputs - and if your Graphics card has HDMI output, in theory, you should have no problems sending AC3 down HDMI. It's only those with Home Cinema systems limited to S/PDIF that are forced to "jump through the (anti)DRM hoops"
First, you need a motherboard (or a plug-in sound-card) with a S/PDIF (co-ax RCA or TOSLink optical) output socket
(1) Many 'Media centre' type motherboards have S/PDIF 'built in' to the motherboard itself, although sometimes it's only available from 'header pins' (in which case you will need the 'optional extra' PCI connector 'plate' with the actual S/PDIF socket)
Needless to say, even if your motherboard has a S/PDIF pins inside or a socket on the back, you shouldn't assume it will be 'enabled by default' (in fact, unless you have 'Windows XP Media Centre', it's more likely to be 'disabled by default')If it's one of the major box vendors own 'customised' motherboard (eg Dell, HP etc), you may even have to find the 'media centre' BIOS (as well as the 'XP Media Centre' specific drivers).
(2) A number of manufacturers of older PCI sound cards supported 5.1 via S/PDIF output (before they were 'got at' by the music industry)
Again, it's likely that only the 'XP Media Centre' drivers will 'enable' S/PDIF, although, if you are lucky you may be able to find the cards original XP Pro drivers** (i.e. before they were 'upgraded' and 'restricted to Stereo' in response to threats by the Music Industry)
** If you have a C-Media 8738 / 8768 based card (with S/PDIF), you are in luck = see the C-Media driver project for an "unrestricted" driver (yes, real drivers are only about 100kb = that's because they lack all the 'add ons' such as 'phone hone' update Services and 'Control dashboards' etc. that the commercial manufacturers like to 'pack in' to 'differentiate' their crippled product from the others)
Note that, to get the C-Media driver to run on 64bit Windows 7 (or 64bit Vista) you must enable "Driver Test Mode" and the cmipci.sys driver must be 'signed' (see Driver Signature Enforcement Overrider 1.3b)
(3) If you have deep pockets, you can buy a 'professional' (i.e. mega-overpriced) sound card from a manufacturer who has paid for a "DTS Digital Out" 'licence'. These cards will have the 'DTS' logo printed on them.
Yep - that's right - to 'pass through' your music files untouched (without processing them into something else, such as PCM bit-stream), the manufacturers are 'required' to pay for a 'licence'. Fortunately there's a good chance that manufacturers outside the reach of the Music Industry will offer "Chinese copies" that can be purchased direct via eBay for a fraction of the price (and which might or might not 'work' as expected). These cards will also have the 'DTS' logo printed on them
What software do I need ?
You will need "Media Player Classic - Home Cinema"> i.e. the Open Source version built on the 'original' Windows Media Player that 'recognises' the existence of S/PDIF (rather than any of the more 'modern' versions of Windows Media Player that have all been 'got at' and will either ignore S/PDIF or down-mix to stereo) and set the output as '5.1 via S/PDIF'
In Media Player Classic, from the 'View' pull-down menu, open the 'Options' window and select the 'Internal Filters' node from the tree on the left and double click the 'AC3' entry in the 'Transform Filters' list. Choose "SPDIF" in the window and click "OK".
You will need to restart Media Player Classic in order for the new settings to work, after which MP Classic won't send anything out to your computers PCM 5.1 speakers set, since you just told WMP Classic not to decode 5.1 to PCM (although with a bit of fiddling it is possible to install MP Classic twice (to different folders) and set one install to S/PDIF and the second to PC Speakers).
If you are using Windows 7, you (always) have to run Media Player Classic as 'administrator' to get any output via S/PDIF
Why is the S/PDIF on my (major vendor) motherboard not 'visible' to Windows ?
Major manufacturers (such as Dell) ship 'customised' drivers, presumably both to remove features they haven't paid the chip manufacturer for and to avoid 'support calls' on 'unnecessary' features
Many older motherboards will have been shipped with both 'standard' XP and the Media Centre Edition of XP.For these, all you will need to do is find the 'XP Media Centre' versions of the audio drivers - Media Centres were designed to drive Home Cinema Systems, and, before the advent of HDMI (found on modern graphics cards), the only way for '5.1 Surround Sound' to be output was via the S/PDIF on the motherboard. However that's of little use to those running 64bit Windows 7
If the motherboard was never shipped with Media Centre, or you need 64 bit drivers, you will have to discover the name of the audio 'chip-set' and check the manufacturers' web site e.g. for a Realtek HD chip-set get the drivers from Realtek's site
Finding 'functional' drivers for some chip-sets (eg the SigmaTel STAC9200) can be more difficult as the manufacturer may only sell to the OEM motherboard manufacturer market and thus has no reason to make drivers available for download to the general public.Fortunately, there's a good chance that one of the smaller OEM system builders will be shipping fully functional drivers (they don't have the resources to re-write the drivers and remove features) = so, for example, if you have a Dell with the SigmaTel Audio chip-set, look here
You should also take a look at 'Spdifer', a Direct Show 'filter' that can be used to 'pass through' DPLII / AC3 without it being decoded (in MPC (Home Cinema) you must deselect the AC3/DTS 'Transform Filters' in the Options, Internal Filters window in order to force it to output the audio via Spdifer without local decode)
Does my Laptop have S/PDIF ?
Quite possibly. Many Dell laptops that have a (non-standard) 7pin S-Video 'DIN' socket (it's the one with a row of 3 pins above a row of 4, marked with a 'TV' icon) that can actually output S/PDIF on pin 7 (to enable S/PDIF on pin 7, pin 5 must be tied to Gnd (i.e. pin 1, 2 or 'shield')).
If your laptop's Docking Station (such as the Dell "D/DOCK") has a S/PDIF RCA socket then chances are your laptop has an Audio chip-set with S/PDIF functionality.
Note that the D/DOCK 'splits off' the S/PDIF (i.e. it isn't also output on the D/DOCK 7-pin S-video socket) For those without a D/DOCK, Dell sell a S-Video 'break-out' cable for the usual small fortune (the 'Dell S-PDIF Cable Kit' 044CTV, sku 310-7837, is compatible with: Inspiron (6400, 640m, 9400, E1405, E1505, E1705, XPS M1710), Precision Workstation M90 and XPS (M1210, M1710 M1730))
If you can find somewhere to buy** the non-standard 7 pin DIN plug, you can wire up your own S/PDIF out for a few $$'s (don't forget to Gnd pin 5)**Quite a few Graphics Cards use the same style*** of non-standard 7pin DIN for S-Video out. Thus 7pin DIN to composite cables are easy to find on eBay - but these don't connect to pins 5 & 7. Whilst you can always cut up the plug to 'get at' the pins, be aware that the better quality ones will be 'encapsulated' in epoxy (so getting access to the pins will require a lot of digging - and expect a lot of pain when your knife slips :-) )
***There are at least 3 different '7 pin DIN' pin layouts in common use - so check your actual socket layout before buying :-) Of course, almost all 'home cinema' systems that accept S/PDIF will have an optical (TOSLink) input socket, not a co-ax RCA cable socket. If yours is one such, expect to pay another £10 or so for a RCA<>TOSLink adapter (eBay)
What is Dolby Pro Logic II ?
Dolby Pro Logic II is real 5.1 that has been 'squeezed' into 2CH stereo. It was developed for cinema film where a stereo (analogue) sound track is 'burnt into' the actual film itself. The 2CH stereo is 'decoded' using a Dolby Pro Logic II sound system into front left, right, centre, 'LFE' (Low Frequency Effects) and 'surround' (rear) left and right.
The 5.1 'information' is present in the 'phase differences' between the stereo Left and Right channels.Even changing the 'sampling frequency' of a DPLII data stream may be enough to 'upset' the 5.1 content, so, if your need 44.1kHz DPLII (eg for PhotoStory), start by converting the 5.1 from 48kHz to 44.1kHz, and only then perform the DPLII 'packing'.To 'unpack' DPLII stereo 44.1kHz, start by creating 5.1 at 44.1 and only then convert to 48k.
Because it was developed for analogue stereo, the 'decode' is (relatively) 'robust' i.e. immune to small errors, so if you change the sampling frequency of the DPLII data stream you will always get 'something' back, however DPLII will NOT 'survive' the sort of massive 'errors' that would be introduced by any sort of 'compression' (such as mp3).So, to preserve Dolby Pro Logic II you must always stick to PCM (or some other lossless approach).
DPLII will play back just fine on a 'stereo only' system, so 'as a rule', if you have 5.1 then build your PhotoStory with DPLII
First, it does no harm, and second, years later when you want to modify your Story and can't find the original 5.1 sound track you can always extract the DPLII and generate an 'approximation' of 5.1 (which may be worse than the original 5.1 but will still be better than 'pure stereo')
NB. PhotoStory 3 won't import 48kHz .wav, so your DPLII will always have to be 44.1kHz
What is DTS / SRS WOW '6.1' ?
The SRS system is '6.1' (5.1 with an extra 'rear centre') packed into the usual 2CH stereo data stream. Aimed at 'gamers', you have to pay for a licence for 'full' playback functionality, although the 'free trial' (srsaudioessentials_1_2_3_12.exe) 'plug in' to Windows Media player does allow direct playback on your PC (as 6CH or 7CH PCM), just not the 'saving' or 'transmission' of 6.1 encoded data
Since SRS is relatively 'new', it is not yet supported very well by Open Source, so I would recommend avoiding SRS if you can = it's just one more complication waiting to 'trip you up' when you try to make a playable DVD
If you do install SRS Audio Essentials, make sure to get it from the SRS site (yes, it asks you to 'register', but it will accept any name and eMail, like 'Mr. No One' of 'junkfolder@gmail.com' :-) ) and not some 'spam' download site that will infect you with ad-ware.
Note also that some users have reported it 'takes over' all your audio hardware, including your microphone, which may be a bit of a pain if you want to use that for Narration (or keep on using Skype :-) )
Needless to say, to 'play' 6.1 'correctly', you need a speaker set with an extra channel ...
Stereo CD .wav to 5.1 'up-mixing'
Ideally, use Foobar2000 (see later) to do the actual 'up-mix' (to 6 Channel wav) and then use Audacity to generate the AC3 from the 6 CH wav
If all you have is the CD .wav (2CH, 1411kbps, 44.1kHz) track, you will need to 'up-mix' it to 5.1 (48kHz) if you want to generate a DVD with surround sound from your Photo Story
As already hinted, once you have 5.1, you should use that to create a Dolby Pro Logic II 'version' for PhotoStory use (rather than going back to the CD .wav)
Using Audacity
Using the Open Source Audacity (with the ffmpeg library) you can 'convert' the 6CH wav (from Foobar) into .ac3 or .m4a (aac) 5.1, as needed for building your DVD
If you don't want to use Foobar, you can also use Audacity to manually create 5.1 (see below = essentially, you 'duplicate' the stereo to the rear speakers and generate mono versions for the center and 'woofer') or you can 'unwrap / up-mix' the stereo 'ambiance' to get 'synthesised' 5.1 using a VST 'plug-in' tool (also see below)
Note. Before processing anything in Audacity, in Edit, Preferences, Quality, set Sampling 'Default Sample Rate' = 48000 (and 'Real-time conversion' = 'Best Quality (Slowest)'). If you don't do this, you may discover tracks 'reverting' to 44.1kHz every time you process them :-)
Limiting the output frequencies
Driving speakers with frequencies beyond their rated limits can lead to massive distortion, especially at the low end - and 'up scaling' using using Foobar2000 or the VST plug-in could be creating anything - so before Exporting, always apply Filters to each channel
The Dolby 'standard' for the LFE is 20Hz-120Hz, other speakers 120Hz-20kHz (the THX standard differs - LFE is 20Hz-80Hz, other speakers 80Hz-20kHz).
I suggest you select your own cut-off frequencies based on the frequency specifications of your own system speakers (if your system doesn't come with individual speaker specifications, you need a better system :-) )
The older 'side throw' LFE 'woofers' seem very a prone to low frequency distortion, so a low end 24db cut-off at 20 Hz (or whatever your LFE is rated at) is almost a 'must' for these types. For the other channels, I suggest a 6db low end roll-off at 100Hz (at least for the L and R 'sides' speakers - you might get away with a lower roll-off frequency - perhaps 80Hz - for higher quality centre speakers)Whilst it seems that high frequencies are less likely to cause distortion from the LFE, there is no point in over-heating it (or the amplifier circuits) with frequencies that won't be audible.
Modern systems incorporate digital filters that cuts the LFE off at 120Hz (or 80Hz for THX), however I suggest a 24db roll off above 120Hz 'just in case'
The older single cone 'mid range' L and R side speakers will have limited high frequency capability and should be rolled-off at 6db from 15 or 16kHz (the limit of most peoples hearing) or even lower (in older systems, often the centre speaker is the only one that supports the full 20kHz = so roll-off that at 24db from 20kHz).
Exporting 5.1 from Audacity
Before you can 'export' anything in 5.1, you must 'enable' multi-channel output (otherwise Audacity will only output a 2CH, even if you choose AAC / AC3). Click the 'Edit' menu tab, select 'Preferences' and, from the list, Import / Export. In the 'Preferences: Import / Export' window, then in 'When exporting tracks to an audio file', set the 'Use custom mix (for example to export a 5.1 multichannel file)' option
Since AVCHD needs 48kHz, in Edit, Preferences, Quality, set Sampling 'Default Sample Rate' = 48000, 'Real-time conversion' = 'Best Quality (Slowest)'. When you 'import' 44.1kHz tracks, you will still have to 'up convert' manually (select all channels and in Tracks, Re-sample, select 48000), however setting the 'default' to 48k should stop Audacity randomly auto-converting back to 44.1
Note, if you only created Center and LFE from your original stereo pair, when you come to Export as 5.1, the 'Advanced mixing options' window will only show 4 channels. Move the 'slider' to the right to get 6 channel output and 'feed' the 'front' stereo pair to both the front (channels 2 & 3) and rear channels (4 & 5) - do this by clicking on (selecting) the front left and click on channel 2 then 4 (lines will connect them together). Then click 'anywhere' (to deselect that set), and click front right and connect it to channels 3 & 5.
How to get 48kHz .ac3
Always check the sampling frequency of the AC3 Exported from Audacity - on a number of occasions I discovered that 'AC3' Export option from the pull-down list was 'converting' my 6 channel 48kHz to 44.1kHz
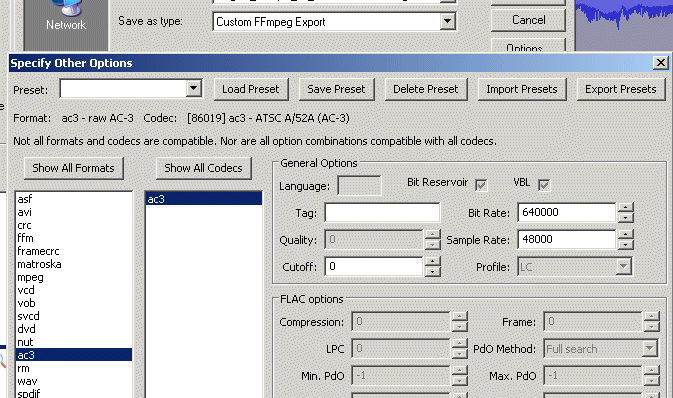
The only way guarantee you are getting 48kHz .ac3 out of Audacity is to select 'Custom FFmpeg Export' in the 'Save as type' pull down. In the 'Options' window, select the ac3 Format and Codec and then enter a 'Sample Rate' of 48000 (after this, the pull-down list AC3 may also generate 48kHz, however I've had it 'reverting' back to 44.1kHz occasionally for some unknown reason)
For AVCHD, the max. Bit Rate allowed is 640k = so you need to enter 640000 (the 'hover help' may suggest you can enter '640k' - but if you do, what you will get is 640 :-) )
AAC bit rate and channel order
Whilst Audacity will generate 48kHz AAC, the 'default' bit rate is only about 200kbps

To get a decent AAC Bit Rate, in the Export window, click 'Options' and move the 'Quality' slider to the right i.e. toward '500'
This part of the GUI was plainly written by a Mac. programmer who thinks that '500% Quality' makes sense (and that things like 'VBR' and 'kbps' do not). Settings from 480-500 generate about 745 kbps (VBR). To get the output down to 640kbps (i.e. within the AVCHD spec. limit) will require some 'trial and error'.

Anyone who has tried to generate Microsoft AAC 5.1 using Audacity (v2.0.5) will have run into the 'channel order' issue.
The 'normal' channel order is Front Left, Front Right, Center, LFE, Rear Left, Rear Right (and this is what you get when you open 6CH wav or 5.1 AC-3 or 5.1 AAC in Audacity)
If you Export this as wav or AC-3 everything sounds as it should - but if you Export as AAC the channels become 'swapped' !
This is because Microsoft (as usual) 'do their own thing' and AAC stores channels in the order Center, Front Left, Front Right, Rear Left, Rear Right, LFE. So, when you come to Export as AAC, you need to 'remap' the channels 'manually' (see Audacity output channel map, right)
Since Audacity 'knows' to switch the channels when opening AAC (.m4a) files (into the 'standard' FL,FR,C,LFE,RL,RR order), failing to 'swap back' on Export must be regarded as a 'bug' = so expect some future versions of Audacity to do something different :-)
Up-mixing to 5.1 manually with Audacity
You can create 'a sort of' 5.1 from a stereo 'source' by 'duplicating' the stereo channels, 'tweaking' the duplicates and Exporting as ac3 (so sound comes out of all 6 surround sound speakers). If your audio from PhotoStory 3 contains 'narration', this should be added to the Centre channel only (Audacity can be used to mix in some background music at the same time - eg generated by Foobar)
DVD Author software that allows you to build a multi-lingual DVD will also allow you to 'name' the audio channels - so you could create one channel with music only and a second with the 'narration' (+ background music), although I recommend 'on/off' selectable sub-titles as a better approach
My 'quick and dirty' manual approach is detailed below, however there's nothing to stop you making more 'precise' adjustments to individual 5.1 channels in Audacity - for example, one well known 'trick' you can pull to improve the sound is to delay the rear channels by 10 - 30ms
1) Start by Import the PCM stereo and re-sample to 48kHz
2) 'Duplicate' it to get a second pair.
Select the second pair and use 'Tracks', 'Stereo track to Mono'
then duplicate the just generated mono track.
(These 2 mono tracks are your Centre speaker and LFE 'sub-woofer')
3) Reduce the volume of the centre by at least 10db (to stop it 'overpowering' the stereo).
4) 'Filter out' all the higher frequencies for the LFE (apply a Low Pass Filter at 180 Hz) - and filter out below 20Hz** (apply High Pass)
5) If you want to 'tailor' the rear channels (rather than just 'copy' the front to the rear at Export), Duplicate the first stereo pair again.The 'standard' channel order is front left, front right, centre, LFE (sub-woofer), rear left, rear right.
So select the 'duplicate' and drag that pair to the end of the display list to form the rear channels (and avoid confusion at output time)6) Drop the volume of the rear channels by at least 3db (select the tracks and in Effect menu, 'Amplify' by '-3db')
** it's a good idea to filter the LFE channel to remove low frequencies below your LFE speakers 'cut-off' limit as many LFE speaker units will distort horribly when fed with frequencies below their 'cut-off' limit (typically 20 Hz).
The Acoustic Solutions DS range (DS333-DS855), and, I suspect, all the old 'side projecting' LFE speakers sound so bad that you might think they are coming loose from their mountings if you drive them below 20 Hz ...
Up-mixing to 5.1 with Audacity and the V.I v1.1 VST effect plug-in
V.I. is a 'VST effect' plug-in aimed at 'up-mixing' real Stereo to 5.1 (it's approach is apparently similar to, but not the same as, Dolby Pro Logic II - so actual DPLII 'stereo' won't 'decode' in exactly the same way as your Home Cinema would do it). Download the V.I. plug-in and 'install' everything into the "C:\Program Files\Audacity\Plug-Ins" folder. Audacity users will already know that Audacity then has to be 'told' to look for the new plug-in.
To get Audacity to 'look for' the V.I. plug-in, launch Audacity, go into the Edit menu, select 'Preferences' and, in 'VST Effects' tick the 'Rescan VST effects next time Audacity is started' option. Then restart Audacity = it should then discover the V.I. plug-in (you should see 4 new 'Steve Thompson ..' entries in the Effects menu)Using V.I. to up-scale Stereo to 5.1 is a simple multi-step process :-
1) Open the extracted PCM .wma (or original audio file). If it is not already 48,000 kHz, in 'Tracks', 'Resample...', select '48000' from the pull-down menu
2) With the stereo pair selected, in 'Edit' select 'Duplicate' to get a second stereo pair
3) Select one pair only (i.e. click one pair so the second (duplicate) is not selected) then use 'Edit', 'Duplicate' again (so you end up with 3 pairs)
4) Select the top pair only, and from the 'Effect' menu, choose 'fLfR'
5) Select the middle pair, and from the 'Effect' menu, choose 'CLFE'
6) Select the bottom pair and from the 'Effect' menu, choose 'sLsR'
7) Hold 'shift' & click to select all 3 pairs, then from Edit, choose 'Export', 'AC3 Files (FFmpeg)'. In @options', make sure you select a 'decent' bit-rate (i.e. at least 448kbs). When the 'Advanced Mixing Options' window opens, just click OK (if you want AAC instead, see channel order, above)
LFE is 'Low Frequency Effects' (and not 'sub-woofer') = 'surround sound' was 'invented' for Cinema and LFE used to simulate earthquakes etc.Why are the rear channels known as 'sLsR' ? Well it's all part of the Cinema origins = the 's' means 'surround' (the front Left and Right and Centre speakers would all be 'at the front' of the auditorium, whilst multiple 's' speakers would be positioned along the left and right side (and rear 'quarters')
NB. I found the default settings in V.I. worked just fine for 'disco' type music (especially if you 'boost' the LFE a bit) but gave some really odd effects with classical music :-)
Stereo to 5.1 up-mixing using Foobar2000
You need the Foobar2000 player itself and the 3rd party FreeSurround (2CH to 5.1) plug-in .dll (put the 'foo_dsp_fsurround.dll' into the C:\Program Files\foobar2000\components\ folder).
NB. FreeSurround was apparently aimed at 'decoding' 2CH DPLII and SRS, however it also does a really good job of 'up-mixing' straight stereo !
It does not do such a good job on Classical music, and is especially poor on tracks that have been 're-mastered' from analogue tape recordings.No doubt it also has problems with .wav's generated from mp3's (you will just have to try it and see)
To up-mix stereo CD 44.1k into 5.1 48k, proceed as follows :
Launch Foobar and use 'File', 'Open' to 'import' your stereo 2CH PCM .wav'
Right click' the just imported track (in the default play-list) and select 'Convert' and the '...' option (if you select one of the other options, conversion will start immediately with whatever the settings were set to last)
In the 'Converter setup' window:
    in 'Output format' select WAV
    in 'Destination' decide where to save the output
    in 'Processing', select 'Resample', then 'FreeSurround' ('Re-sample' must be 'above' FreeSurround in the left hand pane)
In 'Resample', set 48000
In 'FreeSurround', set the 'Redirect bass to LFE' tick-box. Then adjust the sliders to your preferences (the Default settings do a reasonable job, although the Centre is a bit over-blown for me so I turn this down later in Audacity).
Set the LFE limits to those given in your systems' LFE speaker Specification - or set high end to 120Hz, 'low cut-off' to 20Hz (many LFE amps will distort horribly at frequencies below 20Hz, so don't be tempted to set the 'low cut-off' to zero :-) )

Click 'Convert' to start the conversion (it will generate a 6CH PCM .wav file)
Note that you can't 'save as' ac3 directly (and can only 'save as' aac if you happen to have the Nero AAC dll). So you will need to use Audacity to pack the 6CH .wav into ac3 or aac (see below) - at the same time you can adjust the cut-off frequencies for the LFE channel if you intend to play back on different Home Cinema systems with different response limits (eg THX top end is is 80Hz)
Down-mixing using Foobar2000
Foobar has a built-in 'Downmix channels to stereo' filter, however this can not be 'configured', so should be avoided. I use the ATSurround for foobar2000 plug-in, obtained from the author Andrewlabs website before it stopped responding sometime in 2014 (this plug-in can still be found on many 'spam' download sites if you want the ad-ware infected version). Always 'unpack' any 'installer' you are sent (using 7-zip) and move only the plug-in .dll file to C:\Program Files\foobar2000\components\ folder (and delete anything else found)
You can down-mix any 6CH PCM (.wav) or AC3 5.1. To 'Convert' the (usually 48kHz) 6 CH PCM into (44.1kHz) Dolby Pro Logic II (for use in PhotoStory 3) proceed as follows :-
In 'Converter setup' window, 'Processing', select 'Resampler (PPHS)' then 'AndrewLabs ATSurround'
(make sure 'Resampler (PPHS)' is positioned 'top' in the left-hand pane)
1) Select and Configure the 'Resampler (PPHS)'
    set the output to 44100
2) Select and Configure 'AndrewLabs ATSurround'
    in Main, Processing Mode, Select 'AT Surround Encoder (2/00) = L,R'
    in Room, Bass management, set 'Enable Bass redirection'
The output 2 CH PCM .wav is what you need for PhotoStory 3 (if your Home Cinema System supports DPLII, it's not a bad idea to 'preview' the track before Importing it into PhotoStory - remember, one day this may be all you have to recreate the 5.1)
If your system does not support DPLII playback, you can 'check' how it worked by 'unpacking' the DPLII using the 'Stereo to 5.1 up-mixing' process detailed above
Click 'Next >>' (left, in the navigation bar) for How to convert from PhotoStory 3 wmv-i output into DVD standard mpg format.