

Headless Pi Zero development
'Headless' means the Pi has no GUI (no monitor screen, no keyboard, no mouse). Development is requires control from your PC, via your network (or by plugging it into a PC USB socket)
Raspbian 'Lite' system images (Jessie / Stretch) contain 2 partitions, one FAT32 (0.fat), the other Linux (1.img). After you 'burn' the .img to a SD card, Windows should 'see' the FAT32 partition so you can copy files to the Pi. Older versions of Jessie had a 63Mb FAT32 partition, later versions (and all Stretch versions) only have 42 Mb.
Since you will always have to make changes to files in the FAT32 partition (before first booting the Pi) anyway, you might as well 'pre-load' any project script files you have written on your PC (it's always easier to develop scripts on your PC = see later)

You can even use the FAT32 partition as a 'staging area' to trasnfer files from the PC, so long as no file exceeds 32Mb or so = the 'trick' is to use a script that will move files from the FAT32 partition into their 'proper' place (in the Linux partition) on each power-on. You can then power-off, move the SDHC to a PC, add up to 32Mb of files, move the SDHC back to the Pi, power-on and 'repeat from start'

Whilst it's possible to copy lots of photos (or even small 'advert' type movies) etc. from your PC, for larger files I suggest installing SAMBA on the Pi (see below = it's easier than trying to get the Pi Zero to read a USB Memory stick :-) )
Programming your Pi
Many people will choose a 'high level' compiled programming language (such as C++) or a simpler 'interpreted' language (such as Python), however I preefer to use simple commnad-line .sh (or 'shell') scripts that are run by the 'BASH' comand line interpreter.
The advantage of shell scripts is that you can start work immediatly without needing to download reams of additional software (compilers, debuggers, development systems etc). There are also many forums where you can get sample code and help.

The BIG disadvantage is that the BASH shell script syntax is almost totally obscure, with much 'sample code' being so opaque as to be impossible understand. let alone adapt and re-use.

BASH does have excellent 'plug in' components for text processing (such as 'sed' and 'awk') but virtually no support for anything but basic integer arithmetic.

Essentially, 'arithmetic' operations are achieved by processing a series of 'commands' (such as ' + ', ' - ', ' / ' and ' \* ') each of which will be followed by an (integer) 'parameter', so ' / 2' means "now divide, by 2" (whilst '/2' will result in 'unrecognised command'). To multiply by 2 it's ' \* 2'. Since only integer operations are supported, you have to 'cheat' (eg to multiply by 2.5, code ' \* 5 / 2')

Note that '\*' (the 'multiply' command) requires the leading '\' to 'escape' the '*' (which is otherwise processed as a 'wildcard')

However shell scripts run 10x (if not 100x) faster than Python (but not as fast as a compiled .exe file).
Preparing code
You can write and debug your scripts 'in advance' (whilst awaiting delivers of USB adpaters etc. from China :-) ) you can use QEMU "emulation" of the Pi on your PC (see my using QEMU page)
Download the Raspbian system image
I recommend you start with 2017-07-05-raspbian-jessie-lite ("297M"), the 'last' version of Jessie Lite. After downloading, it's a 'good idea' to set the file as 'read only' = this is to 'set it in stone' since (in Linux) "every time you change something you break something".
The full (approx 1.4Gb) system downloads can be found on the Pi Foundation system archive

The lite system (approx 300Mb) system downloads can be found on this Foundation page. The last version of Jessie Lite is 2017-07-05 (41Mb FAT32).

Be warned that the 'update' / 'upgrade' is often not fully supported on older images (more than once I've had 'update' freeze when starting with on an older 'image') and the same applies to 'apps' (get-app often fails when startung with an older system), all of which reinforces the message, "make your own 'full sd card' backup" (see my Backing-up your Pi page) !

For a list of Linux 'kernal' releases and which Pi version is supported by each, see Wikipedia Raspbian
Preparing your system
Before booting the Pi for the first time, there are a number of changes that have to be made to the FAT32 partition files. You can do this to the .img file (using ) or after 'burning' the .img to the SDHC card (using Win32 Disk Imager).
I always modify the .img (befor 'burning') by 'mounting' the .img as a drive letter using OSFmount from PassMark. This avoids and chance of an 'unmodified' SDHC being used on any Pi.
1) Add a file 'ssh' (so you can access the Pi from PuTTY on your PC)

2) Stop the stupid 'auto-expansion' trick that will prevents you backing-up
(remove " init=/usr/lib/raspi-config/init_resize.sh" from cmdline.txt)

3) If your project is using the HDMI output, stop auto-blanking :-
(add "consoleblank=0 " to cmdline.txt)

4) If your project is using a non-720 HD display, set the display resolution :-
(edit 'config.txt' = see list of display settings eg add "hdmi_group=2" and "hdmi_mode=51" to get 4:3 1600x1200 at 60Hz output)
After first boot, you need to edit /usr/lib/raspi-config/init_resize.sh' for 95% (rater thAn 100%) 'auto-expand', add the "init= " comamnd back to cmdline.txt and then reboot again. When the auto-0expand completes, you should "shutdown", move the SDHC to your PC and make a backup. This will be your 'starting point' for your Project (which, chances are, you will need to reload many times before you manage to get a working system :-) )
1) Load Pi foundation Raspbian 'Lite' .img onto a 4Gb SD card
In Windows, open the FAT32 partition and edit cmdline.txt :-
a) remove the resize (init=..) command
b) add a fixed IP address (eg ip=169.254.1.1 (direct cable connection) or ip=192.168.1.201 (LAN connection) = see below)
Create a file 'ssh' in the FAT32 partition (required as a 'flag' to enable access from PuTTY across the LAN)
Copy the replacement 'init_resize.sh' file to the FAT32 partition
Copy the 'move_files.sh' to FAT32 partition

2) Insert SD card and boot the Pi
On first boot, there will be no 'resize'
Use PuTTY to ssh into the Pi (user pi, password raspberry) and :-
Move the modified 'init_resize.sh' from /boot/ to /usr/lib/raspi-config/
Add execute permissions (sudo chmod +x /usr/lib/raspi-config/init_resize.sh)
Modify cmdline.txt to add back the resize command (" init=/usr/lib/raspi-config/init_resize.sh")
Reboot the Pi, so it runs the new init_resize.sh
(this will expands to 95%, remove it's own 'init=' and reboot)
Move 'move_files.sh' to /usr/
Add execute permissions (sudo chmod +x /usr/move_files.sh)
Modify cmdline.txt to add invoke the move_files command (" init=/usr/move_files.sh")

3) Make a back-up on the PC
Shutdown, move S card to PC, make a back-up

4) Start Project development
Use Windows to copy whatever new/modified files you need to the FAT32 partition (max. space is about 10Mb)
Move SD card back to Pi and boot.
Note that this approach can be used on a Pi without Internet access (you can download modules from the Pi 'repositories' to the PC, copy them to the FAT32 partition and let the Pi 'install' from there)
The detail
Almost any Project you can think of can be built with a Pi Zero, and almost any Project requirement can be met using 'off the shelf' software modules and utilities controlled by your own custom 'scripts'. It is highly unlikely you will ever need to write a single line of C / C++ or Python code to achieve your goal. Further, very few Pi Zero projects will actually hve any need for a Pi 'desktop' Graphical User Interface (GUI) = indeed many won't even have a display !
For the vast majority of Projects, you DON'T need a 'GUI' = Graphical User Interface aka 'windows style desktop'. If a CLI = Command Line Interface (aka 'Command window' or 'DOS Box') is all you need then the Pi Zero will be your first choice.

A Pi Zero with a USB hub plus Ethernet, modified for PoE, is a far better 'solution' than a Pi Zero-W with a USB power-block. If you really need WiFi a Pi Zero with USB hub + WiFi dongle is about half the cost of a Pi Zero-W and a quarter of the overpriced Pi B+. As for the A+, with half the RAM for 3x the price, just forget it.

If your Project really can't be built with the Pi Zero, and you are considering the astronomically over-priced B3, you should probably be using a small ('USFF style) PC instead (these can be found on eBay as low as £16 .. half the price of a Pi B3)
The 'secret' to almost any Project is to find existing (Open Source) software that will actually do (most) of what you want - and then write your own 'scripts' to control it.
Projects such as a music player, CCTV camera etc. have no need for a GUI or attached display, so why waste time (and processor cycles) on running one ?

Even Projects that do need a local display - for example a Photo-frame - will have no need for a GUI (the display can be used to show both images and video files under control from the Command Line (i.e. using a script) without the need for any sort of GUI)

Running your Pi Zero 'headless' leaves more CPU cycles for your application (but does make debugging harder)
Before building the PI Zero into your final 'project' box, chances are you will need to set up and edit various utilities and scripts. This means controlling it from your PC, typically using PuTTY (a command line interface (CLI) 'terminal window' utility).
However, developing on a CLI (Command Line Interface) system using the primitive text edit tools 'built in' to the Pi operating system is a real pain. The 'easy way' is to use a PC (and an edit tool such as Notepad++).
However whilst this makes it easy to write and edit your script, in order to 'debug' the script you will need to run it on the Pi - and that's a bit more difficult.
It's easy enough to copy your script file from PC to Pi, but to 'run' it you have to obtain access to the Pi file system and change the script file permissions to add 'execute' permissions - and that can be a right pain
Once you get your scripts working, BACKUP THE ENTIRE SYETEM SD card. This is because chances are almost 100% that scripts which run with some specific Raspbain system won't work with a newer system release.
If you do have to 'start again', you will discover that the Pi Foundation only 'promotes' the 'latest and greatest' Raspbian system release on it's 'public' web pages.

When you do an 'update' / 'upgrade', you get the CURRENT LIST OF CHANGES. This means it's impossible to 'start from the same place twice'.

Even worse, if you start with an 'old' system and perform an 'update' / 'upgrade', what you end up with is NOT THE SAME as a 'brand new' system download !

In essence, there is just no way to 'guarantee' system 'repeatability', other than by making your own compete backups OR by NOT performing any update/upgrade ("if it's not broke, don't fix it").
Auto-running scripts
What we need is some simple way to run the script (after 'auto setting' the execute permissions), and to do that after a reboot (i.e. have the Pi find the file at boot time, add the permission and then run the file)
Why on 'reboot' ?

Well, it's a 'reasonable' bet that whilst you are debugging your script, the Pi will 'lock up' every time you run it until you get it right :-)the Pi
To set up the Pi to automatically run scripts means making changes to the boot sequence
Lucky, current distributions of the basic Pi operating system allow you access to the FAT32 'boot' partition from your PC. This lets you add your own 'bootstrap' script that will do all the clever bits for you.

All your 'bootstrap' script needs to do is  check for the existence of a 'project.src' (or similar) file, and, if found, make it executable and then run it.

Once this is installed and 'enabled', to debug a script written on your PC all you need to do is 'write' the new 'project.src' file to the Pi and reboot it !

Of course, first you need to write the 'bootstrap' script to the Pi, set it's 'permissions' (so it will 'run') and then add this to the end of the 'startup' script
But wait = cmdline.txt already invokes a script = it's the 'resize' command !
So 'all' we need to do is modify the resize.sh to do what we want as well !
1) Burning the SD card
You only need to format the SD card (to FAT32, not exFAT) if you are using NOOBS. If Windows fails to format it - and it often will - you will need the 'SDFormstter' tool (and make sure the 'change size' option is set). For 'Lite' (all flavours), Win32DiskImager will do the job without the need for a pre-format.
If you stick with the CLI (Jessie 'Lite'), then almost any old SDHC card of 4Gb or more will be fine.
You don't need anything faster than a 'Class 4' card - unless you are running the Pi camera (eg. for a CCTV project) or for some other 'high speed' video / multiple high-resolution images based project - and even then Class 4 will be fine unless you intend to use the SDHC card to store your video/still images (in which case, a larger, but especially faster, card might be a 'good idea')
If you intend to use the GUI, you might s well use Raspbian 'Stretch' (desktop). This means at least 8Gb and a class 10 (or better) SDHC.
The .zip expands to over 3.5Gb, most of which is garbage (0.5Gb is "libreoffice" = a MS Office 'clone' that works OK on the Pi B3 but is an exercise in frustration on any other pi) and another 0.5Gb is the 'wolfram-engine' (whatever that is)).

So the minimum 'recommended' SDHC card size for the Desktop is 8Gb (and that had better be a Class 10 or faster because the GUI chews up 'disk' bandwidth). Other (smaller) Desktop system images are available (see this list), however these typically come with a lot less (user forum) 'support' (although for a multi-media project, starting with a version of KODI (eg OpenELEC) is a 'good idea')

Even with a fast SD card, if you really want to use the Raspberry Pi in Desktop GUI mode, 'to avoid disappointment' I suggest you stick to the 'B 3' (any other Pi will be frustratingly slow) - although (IMHO) if need a Desktop you need a small (USFF) PC, not a Pi at all (a 'second hand' USFF PC can be found on eBay for less than the cost of a Pi B3 :-) )

PS. good luck with downloading Desktop = it look me multiple re-tries and a couple of hours just to get the 'Lite' .zip (typical download bandwidth from the official site varied between 10kB/s and about 150kB/s = a far cry from the 500kB/s I'm used to)
FAT32 access
After you 'burn' the SD card, Windows SHOULD recognise the SD card and show it as a 42Mb FAT32 partition (only) and let you change the contents. If it doesn't, you will have to use a utility such as OSFMount to modify the FAT32 partition contents in 2017-09-07-raspbian-stretch-lite.img before burning it to the SD card
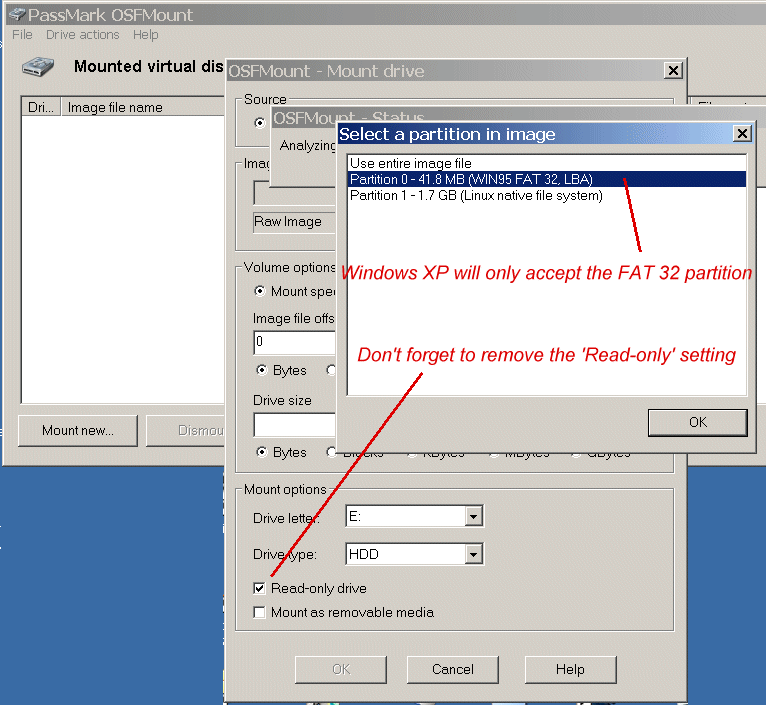
To get access to the FAT32 partition (0.fat) before 'burning', use OSFmount (this utility can't 'mount' the actual SD card , which is why you have to modify 2017-09-07-raspbian-stretch-lite.img before 'burning'). 0.fat will appear as a 'virtual' drive letter (eg E:).
NOTE Whilst OSFmount allowed me to mount the 'entire image' and even just the 'Linux' partition, Windows refused to co-operate (insisting that the virtual drive needed to be formatted). The ONLY .img partition I could mount and get access to was the FAT32 (partition 0).
NB. Don't forget to de-select 'Read-only' option before you mount the partition :-)
After mounting as a drive (eg E:), you can use any Windows application to make changes (i.e. modify cmdline.txt to remove the "init= " command, add the 'ssh' file and add the new init_resize.sh. After using 'Dismount', you can go back to Win32 Disk Imager and 'burn' the .img to the SD card.
Of course, before you can create a modified version of /usr/lib/raspi-config/init_resize.sh (and others, such as /etc/network/interfaces file) on the FAT32 partition, you will need to get a copy of the originals from the Linux partition !
Linux access
If I could get write access to the Linux partition, I could write my modified files direct (and avoid all the mucking about with FAT32 copies). However, despite all my attempts, this appears impossible (without using a Linux system = but that's another story = see my dual booting Windows and Linux page)
The ONLY Windows utility that I found that could actually 'mount' the .mg (or all the partirions of the SDHC card) as 'virtual drives' (F: etc) in Windows was diskinternals Linux Reader. This gives you READ ONLY access - i.e. it will 'export' the files but won't 'import' new ones (but it does let you 'copy' (extract) the files to a Windows folder)
Read Only is all you need to get a copy the /usr/lib/raspi-config/init_resize.sh (and /etc/network/interfaces file) and any other that you might want to modify (eg /etc/rc.local) using Windows.

After making changes, you can then copy the modified version into the FAT32 partition (assuming Windows can 'see' the partition direct, otherwise you have to 'mount' the 0.fat partition in 2017-09-07-raspbian-stretch-lite.img using OSFmount)
Note that, on the Pi itself, the FAT32 partition is 'mounted' as /boot/ by the Pi system
If you can't get it elsewhere, your can download copy of Linux_Reader.exe here
Network access
To connect the Pi Zero to your Ethernet network, use an Ethernet micro-USB 'dongle' or (better) a micro-USB hub with a built-in Ethernet port
Often, the Pi Zero will 'enable' itself onto Ethernet ONLY IF YOU PLUG IN THE USB DONGLE AFTER IT BOOTS UP

This is a real pain as I use a micro-USB Ethernet dongle that has been modified for PoE (so I can power the Pi Zero by back-driving up the micro-USB cable)

Lucky the Pi Zero as a seperate 'pwr' micto-USB. So removed the 'back-drive' and 'split off' the PoE onto a seperate micro-USB cable .. I plug this in first, then, once the Zero completes it's boot-up (when the LED stops flickering), I plug in the USB-Ethernet dongle data micro-USB cable

Some 'c;ever' Routers will 'drop' a connection after some 'idle' period, which can be as short as 30mins !

On a 'headless' Pi Zero, the only way to restore the connection is to pull the power ... so, if your Router is one that drops connections, one more thing you need to do is have the Pi 'keep alive' the Ethernet (eg. by 'pinging' the Router every 30 mins)
To enable PuTTY control you will need to place a file named 'ssh' in the /boot/ (FAT32) partition
When you boot the Pi, it will find your network and use DHCP to obtain a IP address
If you use the Apple 'Bonjour' driver on your PC, you can now access the Pi (from PuTTY) 'by name' - i.e. you don't need to know what IP address it obtained

However, finding and installing 'Bonjour' is a pain (especially if you don't what all the iTunes garbage that comes with it), so the 'east way' is just to set the Pi to some fixed IP in advance

Note. In Jessie, use Bonjout to find 'raspberrypi.local', in Stretch it's 'raspberrypi.lan' (actually, Boinjour will find 'raspberrypi' just fine - and once you have the IP you can use PuTTY 'as normal' (i.e. link to Pi by IP NOT by name))
To set a temp. static IP for PuTTY access add 'ip=x.x.x.x' where x.x.x.x is the IP you want the Pi to use) to the cmdline.txt file
If you are going to plug the Pi directly into your laptop's Ethernet socket, then (unless you are running DHCP on the laptop) the Pi (and the Laptop) will 'auto configure' with some random address in the 169.254.x.x range. Sonce this covers 64k addresses, it's a real pain to find the Pi's address (unless you have installed Bonjour, it which case 'ping raspberrypi.local' should find it)

So, those without Bonjour should add 'ip=169.254.1.1' to cmdline.txt

If you are going to plug the Pi into your Router (Ethernet socket), then the Router DHCP should issue the Pi with an address in the correct range (typically 192.168.0.x or 192.168.1.x)

Since this only covers 255 addresses, it's usually easy enoogh to find the Pi, even without Bonjour.

for /l %j in (1,1,254) do @ping 192.168.1.%j -n 1 -w 5 >nul && echo 192.168.1.%j

If you want to make it easy on yourself, by all means add something like "ip=192.168.1.201" to cmdline.txt, but don't power ion with the Ethernet connected< - if you do, the cmdline IP will be 'overwritten' when the Pi gets a DHCP address
In the FAT32 partition :-

Find cmdline.txt file. It contains a SINGLE line of text that is 'executed' by the Kernel during the boot-up process. The last entry is "init=/usr/lib/raspi-config/init_resize.sh", which launches the partition resizing utility (which expands to use the entire SDHC card is is responsible for making it extra hard to restore a backed up .img)

So, for temp. control, edit the 'cmdline.txt' file to replace** the text "" with the a fixed IP (eg "ip=192.168.1.201")

**replacing the 'init= stops the Pi resizing to max. == see Modify Resize, below
To set a static IP with Internet access you need to modify the /etc/network/interfaces file. Get the original from the Linux partition, then make changes as per below :-
For Jessie :-
Edit "/etc/network/interfaces" to set the static address 192.168.1.201 as follows :-
# find the Ethernet port (on a Pi Zero it will be on the USB hub)
auto eth0
# tell Pi you want to set a static address
iface eth0 inet static
# specify the address
address 192.168.1.201
# allow access to other devices on the LAN
netmask 255.255.255.0
# define the network base address
network 192.168.1.0
# for completeness, define the broadcast address
broadcast 192.168.1.255
# finally, define the gateway (you router - note Routers default to the 'top' (192.168.1.254) rather than the 'bottom' (.1)
gateway 192.168.1.1
For 'Stretch', it seems everything has been changed .. and 'eth0' is no longer the Ethernet port etc.
You will have to check the forums for the latest information on how to set Static IP in Stretch (some reports suggest that Stretch has been updated to go back to the 'old' naming ...
Place a copy of the modified file in the FAT32 partition and, after booting with the temp. IP address, use PuTTY to move replace the /etc/network/interfaces file with the one you modified (i.e. /boot/interfaces)
Modify init_resize.sh
If you let the Pi auto-expand the Linux partition to fill the entire SDHC card, chances are you will never be able to copy the .img to another card of the 'same size' (see my backing up your Pi page)
The auto-expand script is 'called' from the cmdline.txt (in the FAT32 partition) and the script itself can be found at /usr/lib/raspi-config/init_resize.sh

We will have replaced the 'call' with the 'ip=..' (if not, just remove the 'init= ..' call now)

Now all you need is to grab a copy of the original init_resize.sh and modify it so that instead of resizing to 'max' it resizes to (say) 3.75 Gb (after which you can restore cmdline.txt)

At the same time, add instructions to find your own script (eg winconfig.sh) in /boot/, copy that to the Linux partition (eg /usr/) add 'execute' permission and then run it.
To change init_resize.sh so it will resize to 95% of the SD card size :-
Modify the line ~:-
TARGET_END=$((ROOT_DEV_SIZE - 1))
to:-
TARGET_END=$(( ( ROOT_DEV_SIZE  / 100 ) \* 95 ))
# bash scripts don't support floating point, and you have to 'esacape' the * (else it's seen as a 'wild card')
# max Integer is 2^63-1 - however that may only be true on the Pi B3 (64b CPU). On the 32bit Pi Zero it may be 2^31-1 .. so do the divide first
To assist you, here's my 95% init_resize.sh script
Note that cmdline.txt is processed by the Kernel during core system boot-up i.e. prior any 'peripherals' becoming active. That means no USB and no network connection.
Create move_files.sh
What this script does to look for any files in a /boot/{subfolder}/ (ignoring /boot/ root and the /boot/overlays/ subfolder), and move them to the 'same place' in the Linux partition (so /boot/{subfolder}files are moved to /{subfolder}/files)
It then adds 'execute' permissions to any .sh scripts, and (if any move was done) re-boots the Pi (since the moved files could be part of the boot sequence before move_files was run)
For each /boot/{path}/file in :-
Skip non-path root file (/)
Skip /overlays/ path file
(not skipped) set 'reboot' flag
Move -f /boot/{path}/file /(path)/file
if .sh, chmod +x /(path)/file
Loop
If (reboot flag), reboot
To make it easy, here's my move_files.sh script
Copy move_files.sh to the FAT32 partition, ready for use later
2) On first boot
When the SD card (with FAT32 partition containing files added by Windows) is first run on the Pi, cmdline.txt won't run init_resize. So space will be tight - however all you need to do is replace the Linux init_resize.sh with the modified one you placed in the FAT32 partition.
Use PuTTY to ssh into the Pi and :-
sudo mv -f /boot/init_resize.sh /usr/lib/raspi-config/init_resize.sh
Add execute permissions
sudo chmod +x /usr/lib/raspi-config/init_resize.sh
Modify cmdline.txt to add back the resize command "init=/usr/lib/raspi-config/init_resize.sh" to the end of the single line of text
sudo nano /boot/cmdline.txt
Reboot the Pi
sudo reboot now
If you have a display attacked to the Pi you should see it perform the partition resize and reboot.
We now have a Pi SD that uses 95% of the SD card (and Init_resize wil ahve removed it's 'call' from cmdline.txt). So the next step is to get ready for file moves
Use PuTTY to ssh into the Pi and :-
sudo mv -f /boot/move_files.sh /usr/move_files.sh
Add execute permissions
sudo chmod +x /usr/move_files.sh
Modify cmdline.txt to add back the resize command "init=/usr/move_files.sh" to the end of the single line of text
sudo nano /boot/cmdline.txt
We don't need to reboot - instead we need to make a back-up so we can get back to this stage without stating again (with an unmodified .img)
sudo shutdown now
3) Make a real back-up
Once the Linux partition has been expanded to 95% of the SD card, make a REAL 'partitions only' .img back-up (i.e, one that contains ONLY the used partitions).
If you ever want to 'restore' to the 'same sized' SD card (i.e. 4Gb to 4Gb) then your .img MUST be limited to the Partitions ONLY (which are 95% of the SD NOT 100% !!).
If you make the mistake of using Win32DiskImager to create an .img, it will copy EVERY BYTE of the SD card, used or not. Then, when you come to write this new .img, chances are you will tun into the dreaded 'Destination too small' error !
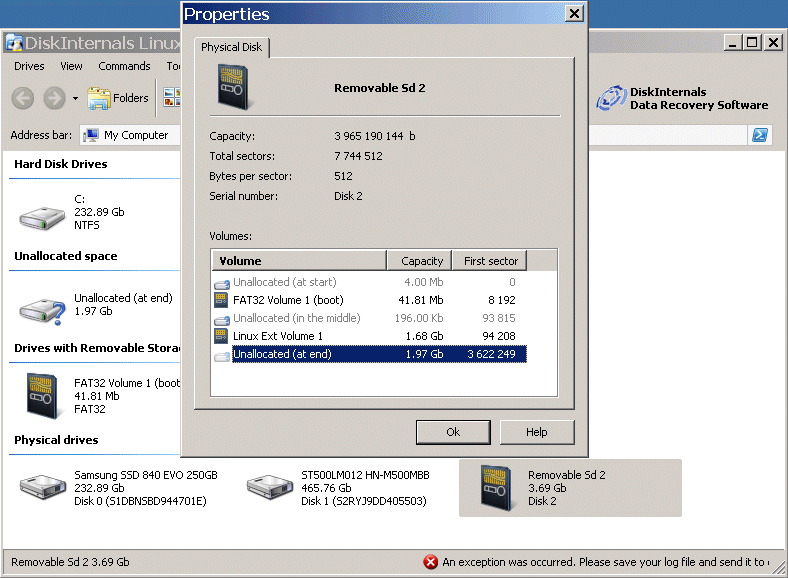
Instead use DiskInternals Linux Reader. On lunching, it should find the SDHC card - look in the 'Physical Drives' section.
Highlight the SDHC card drive and right click for 'Properties'. Make a note of the 'Unallocated (at end)' (eg. 3622249).
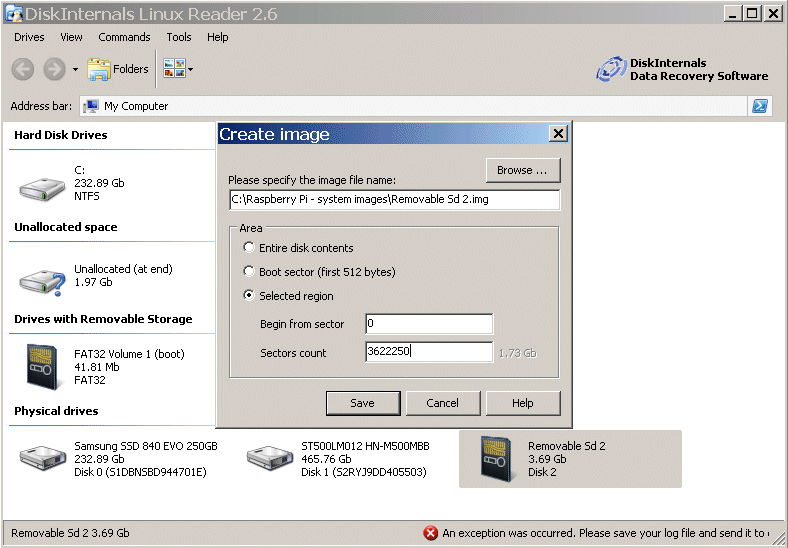
Right click again and select 'Create Image'. Change the file extension from '.dsk' to '.img' and decide where to save it.
Choose 'Selected region' and enter the Sectors count for the used part of the SD card (it's from 0 to 'Unallocated (at end)' eg 3622250)
Once you have a new Pi system .img, you can make as many 'Windows configurable' Pi SD's as you wish (without needing steps 1), 2) 3)
4) Project dev.
On Windows, copy your project scripts and up to 10Mb of additional files to the FAT32 partition. Move the SD card to Pi and boot.
Alternatives to ssh (PuTTY) via your LAN (Ethernet)
Your three choices are 1) Use the Zero as a 'USB Device', 2) plug in a local Keyboard and display, or 3) use the Serial Command Terminal
Zero as a USB Device
Instead of plugging the Pi into you LAN, you use an OTG cable to plug the Pi direct into a USB socket on your PC. This has the advantage of powering the Pi from the PC USB socket. To get access to the Pi, you will need the Apple Bonjour service running on your PC.
To configure OTG mode :-
In the FAT32 partition, on the PC, modify :-
config.txt, add 'dtoverlay=dwc2' at the end of the file (i.e. as a new last line)
cmdline.txt, add 'modules-load=dwc2,g_ether' between the words 'rootwait quiet' i.e. modify the line so it now contains 'rootwait modules-load=dwc2,g_ether quiet'
create a new empty file 'ssh'
To get access to the Pi, you will need the Apple Bonjour service running on your PC. You can then use PuTTY, connecting to address 'raspberrypi.local', log in as user=pi@raspberrypi.local, password=raspberry
For more on use as a USB Device, see my Using the Pi Zero as a USB Device page
2) Local Keyboard and display
Whilst it's possible use a locally connected keyboard to 'control' the Pi Zero in a 'stand-alone' mode, I really would not recommend it. But if you have no other option, by all means connect a local display + keyboard (+mouse).
It's far cheaper (and easier) to 'program up' the Pi from a PuTTY terminal on your PC, especially as you can 'cut and paste' text on the PC into the Pi 'nano' editor.

Once you have a link to your PC you can even 'map' a Pi folder to the PC (or 'map' a shared PC folder to the Pi) and drag and drop complete files (but don't forget to make scripts 'executable' (sudo chmod +x) on the Pi before trying to run them :-) )

This beats plugging in a keyboard/display direct and typing in the code one character at a time.
Using the Pi Zero as a USB Device (using a £1 OTG cable) beats the cost of 'programming up' almost any other 'stand-alone controller' (such as the PIC), except perhaps the BBC micro:bit (which can be 'programmed up' using a Tablet equipped with Blue-tooth = not that I would want to try this 'in the class-room' as Blue-tooth is notorious for failing to 'connect' even before you add a dozen or so other micro:bits all within range on the same work-bench)
If you must connect a keyboard to the Pi (as part of you project), I recommend using a 'dedicated' 2.4GHz wireless keyboard.

These can be had for well under £10 and don't suffer from the 'missing keys' and 'repeat keys' that you can get from a directly connected USB 'PC' keyboard
To use the Pi 'touch display' means a Pi A or B (the Pi zero has no touch display connector, although a simple 2 line 16 character 'serial' display costs less then £3 (make sure to get one with I2C/SPI or (best) direct serial drive - those with a 'parallel' interface need too many wires (and custom drivers))
If you 'shop around' a bit you can find an I2C 'character display' with half-a-dozen control buttons included on the 'shield' interface (you can even get one that plugs directly onto the Pi i/o pins for less than £10)
3) Using the Pi serial link 'command terminal'
If your project needs total control over the Pi USB port (and you can't even fit a hub), then you are stuck with the Serial command terminal. This is a right pain to set up, however once it's working you can use it for all your projects
By default, at boot time, the Pi will 'log in' it's serial port (which is found on the Header pins) as a 'command terminal'. You can link to this from your PC (by using a PC 'USB dongle') and control the Pi using PuTTY (or a similar 'terminal' application) on the PC.
To power the Pi from the PC USB port, you need a (4-wire) serial to USB 'dongle' (these cost a few pennies over £3).

Note that you MUST have the 4-wire type that comes with a power OUTPUT = i.e. one that passes the USB 5v (out from your PC) onto one of the hook-up wires (the others being Gnd, TxD and RxD), rather than one of the 4 wire types that are designed with a power INPUT wire (which would allows the Pi 3v3 to be used to power the 'serial USB chip' inside the dongle to get a 3v3 compatible TxD).

Once you have the right type, it will power the Pi just fine, BUT this type will have a serial TxD output (to the Pi) running at 5v = and since the Pi requires 3v3 serial you will have to add 2 resistors to 'divide' the TxD signal down to 3v3 (you add a 2k2 resistor 'in line' = between the dongle TxD and the Pi RxD header pin, then add a 3k3 from that pin (Pi RxD) to Gnd)

The advantage of this solution is that the Pi's own USB port is totally 'free' to be used by your Project (the disadvantage is that serial data transmission is 115k baud (about 10kb a second) so whilst you can control the Pi (via a CLI terminal window such as PuTTY) just fine, transferring 'large' data files to (or from) the PC isn't really practical.

The limit would be the sending of 'thumbnail' images from PC to Pi (eg. for a photo frame project). Transmitting full res. photos or any sort of movie would just take far too long
"If it ain't broke, don't fix it"
WARNING. Many guides will say 'update your Pi system' - my recommendation is, DON'T DO IT (unless you want to gain a fuller understanding of the maxim "If it ain't broke, don't fix it")
The Raspbian .img you just downloaded from the Pi Foundation will be a 'fully working' system. The MOST LIKELY effect of any modification is to change that into a 'fully non-working system' :-)

To do an update, FIRST the Pi must have access to the Internet - and that's not as easy as it sounds ..

If you must do an update, the sequence is :-

sudo apt-get update -y
sudo apt-get upgrade -y

The first updates your Pi's internal list of 'compatible' components, the second gets updated versions of those components THAT ARE compatible with your system configuration.
If you fail to 'update' before you 'upgrade', chances are you will end up with an 'incompatible' set of components !!

Further, IF you have installed ANYTHING that's not 'on the list', chances are, after the 'upgrade' that component will stop working !

SO = once you have your Pi Zero Project running OK, grab a .img back-up and DON'T CHANGE ANYTHING (and especially not any of the system files)
Final notes
If your project needs a display (many will), then (assuming you are re-using an old VGA/EGA/HDMI display) you will need a mini-HDMI to HDMI or mini-HDMI to EGA cable** (£1), or a mini-HDMI to VGA converter (plus a VGA 'gender changer') for about £2.50 (+£1 for the gender changer).
If your application is a 'multi-media' type, and you want basic (stereo) audio output (from the HDMI), you need to select a slightly more expensive HDMI-VGA adapter with 'audio-out' (cost about £4.50), although for Hi-Fi audio I recommend the pHAT DAC (I2C DAC output) board for about £12.
**Note. Don't even think of using a 'mini-HDMI to standard adapter' plug (included in many 'cable kits'). These will over-stress the Pi mini-HDMI socket due to their weight alone and the stress imposed by plugging in this along with a full sized HDMI cable attached will likely rip the socket off the Pi Zero circuit board
Other costs might include opto-isolators (to protect the Pi's input pins), 'current drivers' & relays (for the outputs), PWM motor control chips etc., however all these will all be 'project specific'.
Note that small/light items (adapters, USB 'dongles' etc) purchased from China via eBay are usually 'quite quick' to arrive (a couple of weeks), however larger/heavier items (eg. 25m of Ethernet cable, a multi-amp power supply etc.) are usually sent by container (and sometimes overland) and these can take 6-10 weeks 'if you are lucky' - whilst some never arrive at all.

In my 10 years of ordering stuff from China, I've only had a couple of 'failure to arrive' and BOTH were large/heavy items (which the supplier refunded me without question) = after the second occurrence, I no longer order anything heavy (my Ethernet cable and power suppliers now come from CPC ...)

So, when planning a project, it's a 'good idea' to start ordering 'bits' well in advance (whilst waiting for the Pi Zero to appear 'in stock')