

Why build your own JukeBox ?
By the time you have left your teenage years behind, it's likely you will have developed your own unique tastes in music. Most of us will even have accumulated (at great expense) an extensive CD music collection.
When you listen to your own collection, you don't have to put up with the incessant 'chatter' of some moronic DJ (talking over the start and end of every track) nor are you forced to listen to the 'radio station' or on-line streaming service forever promoting itself and bombarding you with repetitive and annoying adverts between every track. If you choose a 'real' radio station (rather than an Internet feed) you might even have to suffer the dumb idiot's who 'phone-in' just to hear the sound of their own voices !
Of course you can always 'sign up' to Internet 'radio' (Pandora, if you are in USA or Spotify/Google/iTunes etc. in UK) all of which claim to 'match your tastes' - but never seem to play the same tracks you have in your collection. What's more, unless you pay upward of £10 a month there will be no escape from the those moronic 'adverts' that infest most of the Internet, always pushing overpriced rubbish you don't need or want
The clever amongst you will be aware that, in the past, it was possible to listen to Internet radio (via Firefox and even Chrome) without the adverts by using various different 'Ad Blocker' techniques (even just adding the IP address of the 'ad-server' to your HOSTS file (and pointing it at '127.0.0.1') used to work, however most IP radio 'sources' have become rather more clever since those good old days). The point is, however you block the ads, the advertisers will keep trying to find ways to force them on you. The only 'sure fire' way is to avoid the Internet completely - and build your own local 'Jukebox' !
Whilst some PC media applications - such as Windows Media Player - can be used to 'play' your music, they insist on 'taking over' your music, performing their own 'indexing' and creating their own 'library' .. plus, of course, you do actually have to turn on your computer and launch the app. (as well as selecting the specific tracks you want to hear).
Using a stand-alone dedicated Raspberry Pi, however, uses so little power that it can be left running on top of your Hi-Fi amp. A single button press can provide a random selection of tracks direct from your a own music collection (on your own home 'Server' - or just a 'share' on your back-up NAS) - or play the latest track you just added - or whatever other method of track selection you care to employ, all without you having to 'nurse' it along or put up with annoying attempts by MS DRM infected garbage trying to connect to the Internet or perform never ending 'updates' etc
There are 3 main functions you might expect a Jukebox to perform (and a 4th for those willing to pay - or fight the Ad-Blocker war)  :-
1) Play music tracks from your existing collection (eg. from one of the multiple 'styles' you have stored)
2) Play music from a CD/DVD/USB stick
3) 'Rip' new tracks (add them to your collection) from a CD/DVD/USB stick
4) Play music from an external source (Spotify etc) as chosen by you
What were my main aims ?
My main goal is to make all operations as 'automatic' as possible. Generally, at power-on I would expect a 'radio' to start playing from whatever 'station' it was last left 'tuned' to - so my Jukebox will do the same. However, when a USB stick or CD/DVD is 'inserted', the Jukebox has two 'choices' = 1) start playing the contents ('play mode'), or 2) start transferring ('ripping') the contents to my music store ('load mode')
The simple assumption is that .mp3 / .wav files should be played, whilst a CD (.cda tracks) should be 'ripped' AND PLAYED (so you know what's being uploaded and can 'skip' that track if you wish - after all, we all have 'albums' that contain a few decent tracks but were then padded with rubbish we never want to hear again)
Of course, the 'default' is not always correct, so there has to be some means of controlling the Pi and selecting other actions
A Jukebox will be expected to display the artist and track name during play. So some sort of simple display (eg 2x16 characters) will be needed (some just plug into the Pi 'serial command' port, others use 'I2C' etc).
This same display can be used to show a simple 'menu' accessed using some 'control buttons'. However each button has to be physically soldered in and code written to 'detect' it's operation so the number of buttons needs to be kept low. In addition, it's a 'good idea' to use some sort of 'feedback'(eg LED) to indicate that a button press has been 'seen' and is being 'acted on'.
Plainly the fewer the controls, the better (even if that means more complex software code). My 'minimum set' is 3 push buttons :-

A 'Start / Stop' (play and rip) button (if stopped, then start, if started, then stop)
Start will check for a CD/USB memory stick
- if none, then playback continues with whatever track it was last playing,
- if one is found, then the Pi starts Ripping a (non-mp3) source, else it just starts playing.
Stop will abort whatever the Pi is doing at that time.
Playback will be stopped.
If there is a CD is in the drive, it will be ejected (so if it's ripping the CD, the rip will be stopped), and any USB stick will be 'unmounted' - this avoids the need for a separate Eject' button.

A 'Skip track / Next' button.
When pushed in play mode, skips the current track being played or ripped.
When pushed in menu mode, steps to the next menu choice (the number of menu choices will be kept small, so there is no need for a 'back' button = instead you just 'cycle around' the list)

A 'Menu / Action' button.
When pushed in play mode, enters Menu mode.
When pushed in menu mode, the current selected Menu option is 'actioned' (typically, that means the Pi switches to whatever 'mode' is selected). The top Menu item (default option) is 'no change / exit back to play mode. Note, playback / ripping will continue whilst the menu is being used
The display
I wanted to display text (track file name/number), so that required some sort of alphanumeric display. I went for a 2 line x 16 character display driven by serial link (from the GPU's on-board UART, which avoids using up a USB socket). The cost was approx £15 from eBay (Singapore)
A better choice today would be the Pi 'touch screen' (which was not available when I started building my Jukebox), since this avoids the need for lots of fiddling about with hard-wired buttons However these days you can also get an I2C connected 2x16 serial display that comes with half-a-dozen buttons that is 1/4 the price of even the smaller touch-screens (eg PiTFT 320x240 2.8", approx £32, or a little more from Adafruit/Amazon)
What about the case ?
I wanted to package the Pi together with a slim-line DVD/CD reader/writer (taken from an old laptop and linked to the Pi using a USB<>IDE adapter taken from an old stand-alone USB hard disk). I also needed to mount the 2 line x 16 character display, the buttons plus a power on/off switch and a (simple, low power) built-in stereo audio amplifier (so I could use the unit with headphones or as a stand-alone player 'away from home')
To accommodate all this, I found an ancient analogue 'modem' that I could 'cannibalise'. Since a 'DIY project box' is likely to cost more than the Pi, I suggest you 'cannibalise' something similar - for example, an old 5 1/4" 'stand-alone' hard drive case would also do the trick.
As I've often discovered, anything that is aimed at the 'DIY enthusiast' attracts a premium (i.e. rip-off) price.

So, if you need an enclosure for your project, it's often cheaper to buy some 'consumer' product that's the right size from eBay (and throw away the insides), than it is buy a 'DIY project box' !

One source of really useful boxes is the Really Useful Box range = these are made from just the right sort of plastic - firm enough to be drilled etc. whilst retaining  their shape without bending, but not so brittle that they crack and splinter.
What model of Pi ?
When I first started building my Jukebox I was limited to a choice of the Pi A/A+ or B/B+. Needless to say, when the Pi Zero was released there was just no point in using anything else - with the release of the Zero every other Pi (expect the B3) suddenly became totally over-priced. I've left in the following for those who still have an old redundant Pi A/B/A+/B+ that could be pressed into use
1) The original Pi A/B stereo output suffered from many problems, and whilst the 'clicks' were fixed (in software) it can still suffer from 'hum'. If you use an old Pi A/B, I thus recommend using it with a HDMI-VGA adapter that has stereo 'split off' (you don't actually need to plug this into a display, but it's not a bad idea to allow access from the back of the box in order to assist debugging).
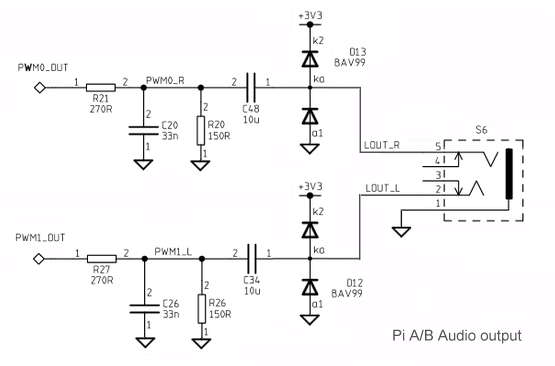
The old Pi A/B stereo output ('hum' gets into the output via the +3v3 pull-ups)
2) The Pi A+/B+ stereo output was a lot better, however nothing can be done to improve the quality (which is 'about 6 or 7 bits'). Again, the cheapest alternative is to use HDMI-VGA adapter that has stereo 'split off'
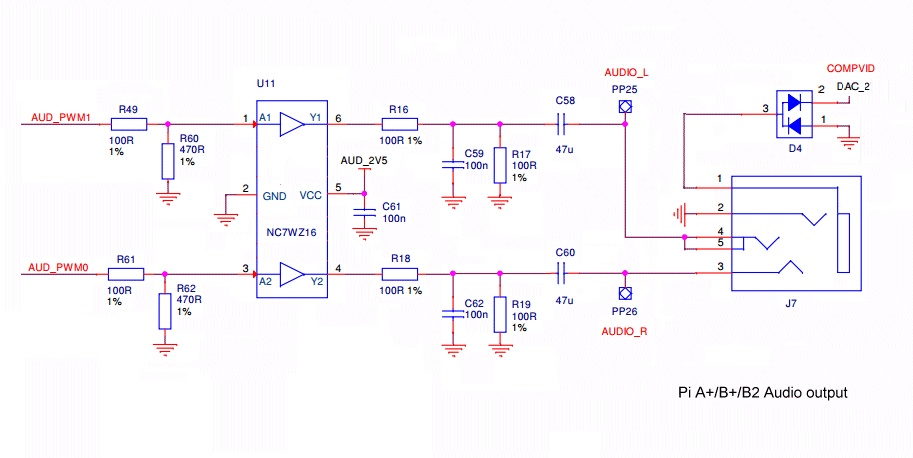
The A+/B+ stereo output (shares socket with TV Composite Vid out).
(Note you can pick off the audio output from i/o header Pins25/26, if you don't have a 4 way jack plug)
3) Of course the best solution is to use a Pi Zero (with an I2C stereo output (pHAT DAC) board) which gives good quality and allows you to 'turn off' the HDMI (and dedicate all the RAM thus released to support Ripping (as a tmpfs RAM disk) instead)
Surround Sound support
Modern Home Cinemas come with HDMI inputs, so all you have to do is cable this direct to the Pi HDMI socket to get glorious 5.1 Surround Sound
Older Home Cinema systems without HDMI inputs typically supported the older S/PDIF standard. HDMI to S/PDIF converters do exist but are horribly expensive. S/PDIF USB 'dongles' also exist, but are only slightly cheaper (plus you will have to divert' the 'pass through' HDMI audio data and this is not easy).
If you have a set of old 5.1 PC speakers, you need 6 channel PCM data. It MAY be possible to find a USB 'dongle' that will do this, however (again) there's the CPU loading issue. The only way to 'guarantee' quality (uninterrupted) playback is to 'decode' the 'pass through' HDMI audio data, HOWEVER a HDMI-to 6ch PCM (5.1) decoder is a 'specialist' device (you will have to get it from China because it's a 'copyright pirates' tool) and it's NOT going to be 'cheap' :-)
How many USB sockets do I need ?
If you are using the Pi Zero, I recommend using a 3port USB + Ethernet micro-USB dongle. These can be found for less than £3 each on eBay (China) or the exact same item for more than twice the price from a UK seller (at the time of writing, end 2016, a 4port micro-USB hub on eBay is actually a few pence more expensive than a 3port + Ethernet = go figure)
The Ethernet socket makes setup easy as well as providing a 'guaranteed' link to your LAN. I assigned the other 3 USB sockets as follows :-

1) the CD/DVD drive

2) USB memory stick

3) 'internal' storage
128Gb USB 'flash drives' can now (Jan 2016) be had for less than £20 (Amazon) = this is a better bet than a big SDHC card = the Pi tends to trash SD cards more often than USB flash drives and it's a whole lot easier to back-up a USB flash drive than the Pi SD card
How to power a Pi A/B from a USB Hub
The Pi Zero can be wired to +5v using the I/O pin sockets, however the other Pi's can not. So, to avoid the need for 2 power-blocks, you can 'back drive' the Pi from the Hub
On the Model A+
Link the +5v pins on both USB sockets together.

Once this is done, the Pi is 'fully compatible' with both powered and non-powered hubs (if the hub is not 'back driving', then the extra wire from the micro-USB input just means the hub will get a decent +5 direct from the Pi power supply). If the hub is 'back driving', the diode in the Pi's USB +5v path will prevent power flowing in 'direct' = instead it will flow via the extra wire to the Pi's micro-USB socket and power the Pi 'as normal'

Of course a standard powered hub won't normally 'back drive' power up the USB cable (normally it only sends power to the 'output sockets', and expects to receive power from the 'input' cable). So you will need to open up the hub and add a wire from the hub's 'power in' socket (usually the center pin) to the Pi connected USB cable (+5v power pin).
You might expect a 4 port powered hub to come with a 4x500mA = 2A power supply (which should be adequate to power both the Pi and the hub). Fat chance = IN PRACTICE almost all 4 port powered hubs will come with a 1A power supply or less ! Worse, even when 'powered' appears in the eBay auction 'title' the small print often explains that this means 'you can plug in your own power-block' (i.e. the trick is used to 'sucker' those who don't read descriptions :-) ).
So, before buying, you need to read the product details very carefully = if the seller fails to mention any power supply (or fails to mention the power rating), just assume 'none' (or 1A max) and you can't go far wrong.

Now a 7 port hub should have a 7x500mA = 3.5A power block. Needless to say, what you get (if you are lucky) will be no more than a 2A supply ! So to get a 2A (or better) power supply (on eBay) you will need to look at the 7 port hubs.

If you need more than 2A you will have problems. Maplins (and even CPC) will try to charge you a 'premium price' for a DIY 'stand-alone' power block. Look instead for 5v power supplies intended for Tablets and smart phones - or even for those included with "own brand" powered USB hubs.

NOTE. Many vendors have discovered they can extract huge profits from the DIY enthusiast with specific requirements - so before buying any DIY specific item, always check if you can get the same thing included as part of some 'consumer product' package (it will often be half the price ...)

Needles to say, most electronic items are 'made in China' these days and will typically be less than half the UK price when purchased direct from Chins ('post free' via eBay)