

The Dieppe Raid - 19 August 1942
Right click and 'Save link as' for steves-Dieppe-v1-set.zip (contains Dieppe Units, Tiles and Dieppe-v1 Map (.lev, .src))
As demonstration of incompetence, poor planning and a refusal to face reality by the commands involved, this was a disaster from start to finish. Indeed, it couldn't have been a better example of 'how not to do it' (it is, in fact, used as such by a number of modern military academies). It's major contribution to the Allied war effort was to take planning out of the hands of the well meaning (and well connected) Royal 'amateurs' and give it to the professionals. Sufficient 'lessons were learnt' (and amateurs re-assigned) to make the North African (Operation Torch) and Normandy landings (Operation Overlord) a success.
Allied fire support was grossly inadequate and the plan, which relied on absolute surprise (which didn't exist - the Germans had been expecting an attack for months) was compromised before the main 'assault' troops even started when one of the 'flank' attacks was discovered. The main attack suffered significant casualties on the way in and those that did make it ashore were largely trapped on the beaches by obstacles and German fire. After less than 5 hours the Allied commanders were forced to call a retreat.
Of the 6,086 men who made it ashore, 3,367 (almost 60%) were either killed, wounded or captured. The Royal Air Force lost 106 aircraft (at least 32 to flak or accidents), compared to less than 48 lost by the Luftwaffe (pilot lesses were even worse, at 71 to 22). The Royal Navy lost 33 landing craft and one destroyer.
Needless to say, the disaster was blamed on the Canadian commander who had been given the impossible task of carrying out the 'doomed to failure' plans whilst the true villain of the piece, one Earl Mountbatten, was 'promoted' to Supreme Allied Commander of the South-East Asia Theater (from where he was unable to do any further damage to the European war effort).
For more, see Deconstructing Dieppe
The British "secret weapon"
Dieppe marked the debut of the 'brand new' Churchill tank. Whilst it had very thick armour (102mm) with good tracks and cross country capability, it was underpowered (which resulted in a maximum speed of only 15mph on road, 9mph off) and was totally inadequately armed = early versions had the joke 2pdr (40 mm) 'Anti-tank' gun, although by Dieppe this deficiency had been recognised and production already switched to the 6pdr (57mm) 'Anti-tank' gun. Despite the Churchill being designed as an 'Infantry Tank', both the 2 pdr and 6pdr guns could only fire solid shot AT rounds, not HE, so were of little use against enemy artillery, anti-tank guns, infantry or soft-skinned vehicles.
In contrast, the main German tank, the Panzer IV Ausf. F2, had been equipped with the 75L43 (a medium calibre 75mm gun) since the spring of '42 (and had even been shipped to some 'second priority' units - such as Rommel's forces in North Africa (where it had already seen action (in small numbers) during August 42).

However the Panzer IV was an old design and thus not a fair comparison to the Churchill = instead we should compare the Churchill to the then newest German tank, the Tiger 1. With 120mm max. armour, it was armed with the 'short' 88L56 gun and could achieve 28mph (road) or 16mph (cross-country). It first saw action about 4 weeks after Dieppe (on the Russian front) in September '42.

When comparing the Churchill to the Tiger we can see how unbelievably far behind the British were when it came to tank design. Indeed, Germans examining the Churchill after Dieppe came to the conclusion that it was an obsolete model used because it was expendable, rather than the most "modern" - and most expensive - tank in the British army !

The sad fact is that both the British and American forces started the war at least 2 years (and more than a generation) behind the German tank designs. Of the Allied tanks at the start of the war, only the Soviet T34 - a design based on the Christie suspension that had been rejected by the Americans - came even close to the German Panzer IV. Worse, every British tank design until the end of WW2 suffered from inadequate firepower, with each one 'custom designed' and virtually impossible to upgrade (with one exception - the Sherman 'Firefly' - which the British had in small numbers (and which the Americans felt was an 'unnecessary' change (or at least they did until they ran into the Tiger tank after D-Day))

Of course, when initially designed, any new British tank may well have been 'on par' with the then current German tank. However before any new design could reach production, it's intended German 'opponent' would have been upgraded (often twice) or replaced.

For the first 2 years of the war, no British tank even had a gun capable of firing HE (High Explosive) ammunition, as opposed to AT (solid shot Anti-Tank) ammunition ! As a result, the only way to tackle a German Anti-tank gun was to close to within machine gun range, which very few tanks managed without being hit.

The vital need for a HE capability resulted in some of the 2pdr Churchill tanks being fitted with a hull mounted short 75mm (as was the US Lee/Grant), although both these guns were only equivalent to the one the Pz Mk IV started the war with, some 3 years earlier = indeed it's a fact that the 37mm turret gun of the US Lee/Grant had better armour penetration capability than it's (virtually impossible to aim at a moving target) short calibre 75mm gun !

When it came to armoured warfare, Allied thinking was even further behind (and remained so for the entire war). As far as the British were concerned, 'battle tanks' (such as the heavily armoured Matilda and Churchill) only existed to support the infantry (so it really should have been obvious that the lack of HE capability would present a crippling disadvantage when coming up against enemy infantry with anti-tank guns and artillery), whilst the 'cruiser' tanks existed only as a replacement for cavalry (especially in the reconnaissance role). Indeed, the Soviet and American thinking never really extended beyond the use of tanks as a replacement for cavalry, with their standard tactic consisting of a simple frontal assault i.e. 'charge the enemy'.

The Churchill with it's ability to plod forward 'no matter what' was, in many ways, a perfect fit to the outmoded thinking, limited imagination and poor mental capabilities of the 'average' Allied General in WW2
The path to ruin
The whole operation was doomed from the start by it's confused goals and faulty planning. On the day, inflexible command and control, characterised by poor communications and an inability to respond to changing events sealed the fate of the troops.
RAF Fighter Command = the "greatest air battle"
Fighter Command, having won the Battle of Britain, was left with little to do but squander their forces in ill-conceived 'raids' over France, using a few aircraft at a time, in an attempt to prod the Luftwaffe into coming up to oppose them. However when 'Ultra' revealed that the Luftwaffe in France had 'standing orders' to mount an 'all-out effort' against any Allied forces seizing a French port, Fighter Command saw a chance to fight "the greatest air battle" of all
By this date, however, the Luftwaffe in France was being equipped with the FW190 A2/3 (which totally outclassed the Spitfire V) and the Germans were quite capable of spotting the difference between a few thousand 'commandos' in a few dozen landing craft and a 5,000 ship, 120,000 man D-Day landing force.

In the event, only the local Dieppe Luftwaffe forces (some 200 x Fw190 + 100 Do218 bombers) opposed the 'raid', whilst other Luftwaffe fighters refused to rise to the bait - which was lucky for Fighter Command, since the FW190 proved able to shoot down Spitfires at a ratio of almost 2:1 (and did so for the rest of 1942).

One reason why the RAF beat the Luftwaffe over London was because the Me109's, fighting at the limits of their range, had less than 15min. endurance - whilst over Dieppe the roles were reversed (with the Spitfires having less than 10 mins endurance).

The result should have been predictable - the FW190 could be refuelled and re-armed whilst the last wave of Spitfires were still on their way back to their bases, and would be back in the air waiting before the next wave of Spitfires had even crossed the channel coast. So whilst the RAF had 3 times as many aircraft, the numbers actually fighting over Dieppe at any one time would have been more equal, if not in the Axis favour.

Worst, just like the German pilots over London, RAF pilots that survived being shot down (about half) over Dieppe were lost when they were captured.

None of this (short endurance, shot down pilots captured) should have come as any surprise to those in command, because that's exactly what happened at Dunkirk almost 2 years ago (May/June 1940)

However the shock result was the RAF lost 71 pilots (plus 10 other aircrew), whilst the Luftwaffe lost only 22
After Dieppe, both the RAF and Luftwaffe claimed 'victory' based on the usual massive over-estimates of enemy losses. However whilst the exact numbers in combat over Dieppe at the same time are hard to discover, both sides maintained good documentation of pilots actually lost (so 81 to 22 is an indisputable fact). When we consider that it's pilots (not planes) that really count (at least during this stage of the war, when aircraft were being quickly replaced by both sides) it's obvious that the RAF were defeated by almost 4:1.
RAF Bomber Command = no resources for "panacea targets"
Bomber Command, on the other hand, wanted none of it. The only 'focus' of Sir Arthur Harris, who continued to build his empire (which was absorbing over 30% of the entire British war resources) was to mount 1,000 bomber raids on German cities (having started with Cologne on 30/31 May 1942).
At this time of the war, Bomber Command still couldn't get more than 10% of their bombs within 5 miles of the 'target point' .. so aiming at the center of a nice big city was about the only thing they could expect to hit.

Not that this stopped Harris putting forward the argument that heavy bombing of the Port was counter-productive since it would "so destroy it's facilities as to make it unusable" (I think he meant "to the Allies"), which, even if such destruction was achievable (doubtful), was totally irrelevant, there being no intention to either destroy the port nor to hold and use it for more than a day or two.

It wasn't until 16/17 May 1943 that 617 Squadron (the Dam Busters) showed what could be achieved with good planning, appropriate training and a handful of aircraft. However even then "Bomber" Harris continued to use his heavy bombers target German cities (and kill German civilians) whilst turning down demands by the Army to hit "panacea targets" (such as German war factories, transport links or oil production plant).

It was only just prior to D Day that he was over-ruled (and threatened with the sack) by Churchill and the 'focus' of Bomber Command switched to supporting the troops on the ground - although he did manage to get many bomber crews killed by targeting Nuremberg on the perfectly clear cloudless moon-lit night of March 30, 1944 (just prior to D-Day) and indulge in one more pointless mass slaughter of civilians when he targeted Dresden in February 1945 (just before the end of the war).
The Royal Navy = "not with our ships"
When, in December 1941, Japanese aircraft sunk the battle-cruiser HMS Repulse and the battleship HMS Prince of Wales off Malaya, the Royal Navy finally woke up to the true meaning of the own success at Taranto in 1940 (when 3 Italian Battleships were sunk by less than a dozen ancient Swordfish bi-planes) = aircraft can sink Battleships.
The Royal Navy didn't trust Fighter Command any more than Bomber Command did.

So the Navy refused to send anything bigger than a destroyer to support the operation, although they did allocate six Hunt-class 'escort ' destroyers (modern, but armed with only 4 or 6 4in (102 mm) guns) to a shore bombardment support role (which was 'better than nothing'), plus two more to protect the troop transports.

However all the 'flanking' attacks (intended primarily to take out the German coastal batteries), would have to go in unsupported (no way was the Navy letting it's precious ships anywhere near those German guns).

In the event it seems that all 8 destroyers supported the ground troops at Dieppe, however this proved to be totally inadequate.

Navy fears turned out to be valid. The German coastal defence batteries consisted of three 170 mm (6.7 in) and four 105 mm (4.1 in) guns at Berneval, and six 150 mm (6") guns at Blancmesnil-Sainte-Marguerite near Varengeville. A third heavy battery was positioned at Puys, just outside Dieppe. All of these 'out-gunned' the British destroyers, resulting in them taking considerable damage.

To counter the German batteries, the British should have assigned at least 8" (200mm) gun Cruisers, as the 4" gun Destroyers had to come into range of the Germans before they had a chance to fire back.

To address the Navy concern, 'the plan' called for Commando's to neutralise the 'flanking' coastal batteries, but there was nothing to be done about those near Dieppe itself
Only Fighter Command made any real effort to support the 'raid'. In addition to the 600+ fighter aircraft assigned, there were almost 100 Hurricanes in Fighter/Bomber configuration detailed to 'ground support' role (see later). Bomber Command allocated 84 light bombers (i.e. those that didn't have the range to take part in their "city busting" efforts)
The problem was, as usual, that all the ground support was 'pre-planned' = and lack of communication (see below) prevented anything else
Preliminary bombardments = "don't upset the Vichy French"
Any sensible plan would have required multiple heavy bomber raids on the German defences and a concentrated direct shore bombardment of the beach defences before sending in the landing craft.
However, at this stage of the war, Bomber Command was only managing to get some 10% of it's bombs within 5 miles of the target - and (despite Fighter Commands confidence that they could 'deal with' the Luftwaffe) Bomber Command was exceedingly reluctant to risk their aircraft in daylight raids (they were much too busy killing German civilians in "1,000 bomber" night raids on German cities anyway).
Hitting a target as small as a Coastal Defence battery would have been almost impossible, except at low level and in daylight. The chances of doing so whilst under attack by FW190's would have been even less. On the other hand, it's hard to see how a "1,000 bomber" low-level raid escorted by 600 Spitfires could have missed hitting at least some of the guns.

But British (and Canadian) officials were supposedly determined to limit casualties to French civilians (and thus avoid alienating the Vichy French government), so the Army staff didn't press the issue of air (or Naval) support = plainly even at this stage of the war, British Generals were still placing 'political considerations' above tactical requirements (as well as placing the lives of French collaborators above those of the Canadian infantry).
The Soviet goal = "2nd front now"
There was intense pressure from Stalin to open up a second front in Western Europe 'this year' to relieve pressure on the Red Army. The June 1942 German summer offensive was deep into southern Soviet territory, pushing toward Stalingrad and it was apparent that the Germans were also moving toward the Caucasus (with their vital oil fields). Stalin was becoming desperate and demanded a second front in France 'now' in the hope that this would force the Germans to move at least 40 divisions away from the Eastern Front and halt (or at lest slow) their advance into Russia
Whilst Dieppe could never have been 'a second front' it did demonstrate to all concerned that the Allies just didn't have the ability in 1942 (or even 1943) to launch anything like a successful invasion.

It has been argued that "lessons learned" at Dieppe were vital for D-Day, and whilst some lessons (many of which should have been 'common sense') were indeed learned, many were not.

The most vital - to have commanders on the ground who could react to changing circumstances, taking advantage of any unexpected opportunity whilst holding back from actions, no matter how 'well planned', made irrelevant (or suicidal) by the enemy response, was not learnt.

In the end, the Allies (Russians and Americans) won the war by the simple process of using their overwhelming industrial capacity to generate sufficient forces (and absorb sufficient losses) to allow them to conduct simultaneous frontal assaults all along the line of both fronts, and thus grind the Germans down into the dust. This is well illustrated by the 2nd battle of El Alamein (where the Allies Sherman tanks outnumbered the Axis Panzer IV's by 10:1 but still took 3 weeks to defeat Rommel).

It didn't matter that Tigers killed Shermans (or T34s) at a ratio of 10:1 when you had 11 Shermans (or 11 T34s) for each Tiger = the war was won when the "Tanks remaining" score reached Allies '1', Axis '0'.
The Lord Mountbatten goal = "make a go of it"
Despite the fact that the original plan, Operation Rutter, was cancelled when (after about 6 months of fiddling) the planners realised it wasn't going to achieve surprise, Vice-Admiral Lord Mountbatten was still determined to 'make a go of it'
It's hard to see why Mountbatten thought he could achieve surprise when almost everyone else had already determined they could not.

Indeed, the Germans had already been alerted to the Allies interest in this part of the coast during the planning of Operation Rutter, and with Dieppe the 'obvious' target, they had had at least 3 months to prepare.

Operation Rutter was approved by the Chiefs of Staff in May 1942, based on the original plan that included the parachute units attacking German artillery batteries on the headlands (on either side of Dieppe) before the Canadians carried out the 'preferred' plan of a frontal assault from the sea (the alternative original plan, which was the 'non-preferred plan', consisted of a rather more sensible pincer movement designed to to take Dieppe from it's flanks).

Operation Rutter was almost 'a go' - on 4th? July the troops were boarded the transports but adverse weather prevented departure - and then the Luftwaffe spotted and bombed the still loaded transports. Whilst few casualties were caused, it was felt that the operation was fatally compromised and on July 7th it was canned.

By the time Mountbatten resurrected the plan (and renamed it Operation Jubilee), the paratroopers were not to be had, so instead No. 3 Commando and No. 4 Commando would land by sea to attack the artillery batteries.

Despite these changes, and the fact that the original plan had been scraped, it seems the action was still 'authorised' based on the original approvals.

No additional approval seems to have been needed = at least no records of any such exist. This has led some modern writers to suggest that Mountbatten didn't actually have 'permission'. A fairer assessment would be that Mountbatten was determined to 'have his way' so avoided the sort of 'high level meetings' that would have tipped off the 'nay sayers' that he was trying to 'keep in the dark'. For sure records show that those opposed to Rutter were excluded from Jubilee planning.
In the event it could be argued that tactical surprise was achieved for at least part of the operation - and that the other part was just 'unlucky'. However German convoys in the Channel were common - indeed the one they ran into was a nightly occurance - and to ignore the possibility of running into it, was, at the very least incompetent, if not outright willful negligence (although ignorance and 'wishful thinking' - something that the British were guilty of throughout the entire war (see, for example, loss of Singapore) - might have been more to blame)
The Canadian goal = "get into the action"
After over 2 years of training, the Canadian government wanted to ensure that the Canadian troops in the UK saw some action as soon as possible. So the well trained but 'untried' 2nd Canadian Infantry Division was selected for the main landing force.
Indeed, it's hard to escape the feeling that the whole thing was initially planned as some sort of 'live fire training exercise' for the Canadians !

The whole operation seems to have been put together as a 'practice session' in 'taking a Port', with no declared goal other than to 'show it could be done' and no with intention to hold onto the port for more than a couple of days (but see the 'Secret Objectives' below).

No-one seems to have taken the German defence seriously = there seems to have been very little reconnaissance of the beach defences and no real efforts were made to suppress those defenses (other than the attack on the coastal batteries) before sending in the landing craft.
Secret Objectives and "the Radar and the Enigma 4th rotor"
The 'published' secret objective of the Special Forces (Commandos) was to "discover the importance and performance capability of a German radar" at the Station just to the east of the town of Pourville.
Even at the time the forces assigned seemed to inadequate and the whole effort seemed to have been a 'side show' to the 'main event' of taking Dieppe. However recent documents show that a second Special Forces team (30AU) was present = and they intended to raid the German Naval HQ at the Hotel Moderne in Dieppe itself !
If the '4th rotor' was the main objective, the sectecy in planning and lack of records now make more sense.

The introduction of a 4th rotor to the German Naval Enigma machines early in 1942 meant the British were no longer able to read Kriegsmarine U-boat traffic.

By August, the Americans were getting "rather annoyed" (i.e. threatening to take over the whole decoding effort) due to the number of (American) ships being lost in the Atlantic - and the German Naval HQ at the Hotel Moderne in Dieppe had a 4 rotor Enigma machine !

Just as it seems no-one bothered to consider how the Germans defences might react to an attack, exactly how the Germans might respond if/when they realised the British had obtained the 4th rotor doesn't seem to have entered anyones head ...
The Plan = "we all agreed (so it must work)"
At this stage of the war, the British were still stuck in the WW I mentality of meticulously planned 'set piece' battles. That's not to say this approach could'nt be made to work (see, 2nd El Alamein), however it depended on 100% foreknowledge of the enemy forces and defences. To avoid 'tipping off' the 'nay sayers', Mountbatten was unable to gather all the necessary information (although it's also been suggested that he adopted a "We (I) don't kneed to know that" attitude when pressed for details of which he was ignorant). Worse, none of the planners ever seemed consider what might go wrong, and no-one ever seemed to consider how the Germans might 'react' when attacked (other than making the assumption that they would just sit around in their trenches and wait for orders)
Risk assessment and contingency planning were almost unknown arts to the British command.

When they did assess the defenders response, instead of expecting them to 'act like a German' the assumption always seems to have been that they would 'act like the British', i.e. sit tight, hold their position, and await orders (which would take the 'chain of command' hours, if not days, to issue) rather than the German 'default' which was 'organise a counter attack' (see 'Market Garden', German defenders at Arnhem.)

The British never did catch up with the Germans ability to improvise and react 'on the fly' as circumstances demanded, preferring to spend months planning and reaching agreements (after which they would proceed 'no matter what').

So having learnt nothing about the importance of communications and flexibility at Dieppe, 2 years later the British did it all again in Market Garden, Sept 1944
Once 'the plan' was agreed (which included an 'agreement' on how the Germans would (fail to) react) and communicated to everyone who 'needed to know', no provision existed to make changes in the event the Germans failed to play their part 'as scripted'.
Lack of any effective communications between the various forces taking part (and with no proper over-all command chain 'on hand' locally to make decisions and 'modify the plan') virtually guaranteed that no changes could be made anyway.

Even the various different parts of the landing force - such as the infantry and the tanks - appear to have been under totally different commands, with zero communication between the two (so delays in the tank landings could not be communicated to the infantry, with the inevitable splitting of the forces).

At this time the various branches of the British Army (such as the Infantry, Tanks, Artillery and even the Anti-tank guns) all wanted to 'run their own war'.

Instead of a 'combined arms' (German) approach (where units communicated directly with one another) the British system only allowed information (and requests for help) to be passed up the 'chain of command' and, after due consideration, commands would be passed back down again.

When the Infantry at the front needed 'inplanned' Artillery (or Tank) support - or vise-versa - by the time the request had been passed 'up the line' (and re-interpreted or garbled) and commands passed back down again (hours, if not days later), the situation would have changed and, like as not, the troops involved would have already been over-run.

Forces on the beach found themselves out of radio contact with the Navy, who in turn appeared to be oblivious to information available to Naval HQ back in the UK (see German 'S Boat' convoy).

Of course none of the forces on the ground had any contact with the RAF, not that any real 'ground support' seems to have been planned anyway = the RAF fighter/bomber attacks where all pre-planned, and (once again) these went in 'to plan' (at considerable loss), when the Germans, instead of playing their part 'sitting around waiting for orders', sent up FW190's to oppose them.

It would be another year or two before the Allied Air Forces came up with the 'revolutionary' idea of providing 'on demand' close ground support, and even then it was only the Americans who thought it worth while actually sending air controllers (with radios that were supposed to work) with the front line troops 'on the ground' (again, see Market Garden = whilst the Radios worked, they were on the wrong frequency, so in the event they couldn't actually contact the pilots flying in close air support).
The opposing forces
Allies
Canadian 2nd Division, consisting of 4th and 6th Inft. Brig., a total of 4,965 men (including the crews of the 14th Tank Batt. , 50 Churchill tanks)
British 'special forces' (Commandos and the Royal Marines), at least 1,200 men.
The 50 Churchill tanks of the 14th (Calgary) Tank Regiment were :-
18x 2pdr + hull 3" (75mm) HE gun
11x 2pdr + hull machine gun
18x 6pdr (the most modern tank and most modern gun in the British armory)
3x flame-thrower (experimental)
It's of note that after Dieppe, the very first 'batch' of the brand-new US Sherman tanks (which were then just coming off the production lines) were 'diverted' to the 8th Army in Africa. So maybe some lessons were indeed learnt (at the 2nd Battle of El Alamein, about 2 months later, these 300 Shermans made a huge difference to the outcome)
Royal Navy
A total of approx 250 craft were assigned to guide, protect and transport the forces, including gunboats, patrol boats and landing-craft etc.
8 Hunt class ("escort") destroyers (including one flying the Polish flag !). :-
Berkeley (type I = 4x 4", quad 40 mm (4x2pdr) AA, 2x20mm AA) (the only destroyer to be lost)
Fernie (type I = 4x 4", quad 40 mm AA, 2x20mm AA)
Calpe (type II = 6x 4", quad 40 mm AA, 2x20mm AA) - HQ ship
Albrighton (type III = 4x 4" (the other 2x 4" replaced by 2x 21" torpedo tubes), quad 40 mm AA, depth charges (4 throwers, 3 racks))
Brocklesby (type II = 6x 4", quad 40 mm AA, 2x20mm AA)
Garth (type I = 4x 4", quad 40 mm AA, 2x20mm AA)
Bleasdale (type II = 6x 4", quad 40 mm AA, 2x20mm AA)
ORP Salzak (type III+ = 6x 4", quad 40 mm AA, 2 (later 4)x 20 mm AA, depth charges (4 throwers, 2 racks))
The Sloop HMS Alresford (1x 4" gun, 1x 76 mm (3") AA gun)
The river gunboat HMS Locust (2x 4" gun, quad 40mm AA, 2x quad-barrel .5" MG, 2x 2-inch mortars)
The Special Forces gunboats (same as above ??)
9 'Landing Ships' ?, 60 assault craft, 8 landing craft plus at least 8 gun-boats (note 1)
24 tank landing craft (Note 2)
2 Minesweeper Flotillas (9th & 13th) = These guided the Naval forces through the German minefields in mid-channel and took no further part in the battle
The Hunt class, "designed" in the 1930's for "escort duties" reveals the Navy's obsession with 'ship on ship' gun fights and a belief (entrenched since Trafalgar) that more guns and a faster rate of fire was better than less guns and more accurate fire. This was made even more obvious when the Hunt "Mk II" adds an extra pair of 4" guns !

Of course, eventually even the Navy had to see sense, and (on the "Mk III") two of the (almost useless) 4" guns are removed and replaced torpedo tubes and depth charge throwers (and racks) - which even in 1930 should have been the more obvious requirement for an "escort" than 'more (4") guns' !

One deficiency that is never addressed is the lack of sufficient Anti-Aircraft (AA) armament, so these 'escorts' were never a real deterrent to the German long range 'Condor' bomber that preyed on the convoys with virtual impunity (as, indeed, the German U boats armed with double that number of AA guns were no deterrent to the British Sunderland flying boat)

Anyone but the Royal Navy 'requirements board' sitting in their 'Ivory Towers' designing an armed 'escort' craft in the 1930's would have started by assessing the 'obvious' threats to merchant shipping.

Even if they had only considered those threats revealed during WW I, it should have been obvious that Anti-Submarine armament needed to take priority over guns, although one (or, at most, two) 6" guns might have been added to deal with 'Q ships' (German merchant ships armed with up to 4x 100mm (4") guns, which were hardly likely to be deterred by similar armed 'escorts').

Even the most basic of 'joined up thinking' would have revealed the need for multiple anti-aircraft guns - after all, it was the British Navy themselves who launched the world's first purpose built Aircraft Carrier (HMS Ark Royal) in 1914 (which carried biplanes fitted with torpedoes). On 12 August 1915, the Navy made the first attack using an air-launched torpedo (from seaplane carrier HMS Ben-my-Chree), so you would think that some-one in the 'requirements' department would have woken up to the need for adequate defense against air attack

For sure, by end 1940 even the most obstinate should have seen the 'writing on the wall' after Fairey Swordfish biplane torpedo bombers from the aircraft carrier HMS Illustrious attacked and sunk Italian battleships at Taranto ...
Note 1. Since the landing craft were 'guided in' to each beach by a 'gun-boat', there must have been at least 8 such craft, most likely more
Note 2. The 50 tanks of the 14th (Calgary) Tank Regiment included 5 with 'bobbin' mounted 'carpet' (Beach Track Laying Device), 3 flame-thrower tanks which, along with one (or two = note 3) others, towed trailers. So each TLC could carry 3 tanks but only two if one had a trailer. However, on the day, it was reported that only 10 TLC's off-loaded 30 tanks - and this apparently included the 3 flame throwers and all the tanks with trailers. Since the TLC's had ramps intended for direct beach off-loading, we must assume that all trailer towing tanks were delivered from the 10 TLC's direct onto the beach. This requires that some of the other tanks (which were reported to be equipped with flotation skirts) must have been off-loaded from other landing craft into shallow water.
Note 3. Two (?) Churchill Tanks towed trailers which were apparently armoured 'sheds on wheels' with radios for "command and control". In the event at least one was lost on the beach when the towing tank reversed into it
Some reports suggest that only 6 of the destroyers were allocated to the bombardment of the Dieppe shore, however in the event it seems all took part (which gave the Allies a total of 34 102mm guns) - however this proved totally inadequate.
No doubt part of the problem was that the guns were firing more or less blind - first due to the smoke screens laid down to hide the landing craft approaching the shore and later (after they had landed) due to the total lack of 'on short' liaison (i.e. there were no target 'spotters')

Given that the Royal Artillery had spent much of WW I perfecting the art of dropping their shells 'exactly on target', you would have thought that the Royal Navy could have made use of their expertise - no chance - first there's "We are the Senior Service and can aim own guns" (and win the war on our own, thank you very much) attitude and then there's the "not invented here" syndrome (something every branch of every countries armed forces suffers from, even to this day = not that the British Navy had the corner on 'not invented here' - the US Navy even refused to institute the 'convoy' system (until losses became so bad that they had no choice) mainly because it was a 'British invention')
The RAF
Around 1.000 aircraft of all types
Allocated where :-
49 fighter squadrons: 4 squadrons Spitfire IX, 42 squadrons Spitfire V (2x 20mm cannon, 4x .303 machine-guns), and three Typhoon squadrons = a total just under 600 fighter aircraft
8 squadrons of Hurricane fighter-bombers (96 aircraft)
7 squadrons of Blenheim and Boston light bombers (84 aircraft)
4 squadrons of reconnaissance Mustangs (24)
The RAF Squadron was 4 'flights' and each 'flight' was 3 aircraft, for a total of 12 combat aircraft. During the Battle of Britain, many squadrons were under strength = sometimes they could only field as few as 2 flights (6 aircraft), however by the date of Dieppe we can assume they were all back to 'full strength'.

RAF Squadron flights were almost always limited by number of available aircraft. During the Battle of Britain, many Squadrons had 20+ pilots (leading to Squadron combat estimates as high as 20+ !) but often as few as 9 aircraft. Apparently, at full strength, a squadron would have twice as many pilots as the number of combat aircraft fielded.
Note that, with their limited endurance over Dieppe, the RAF fighters would have to arrive in 'waves' (and return to base for refuelling and re-arming multiple times) if they were to maintain continuous air-cover. My 'best guess' is that no more than 20% would be in the air over Dieppe at any one time.
Wehrmacht
The 302nd Infantry Division (a 'Garrison' unit which included many non-Germans, as the best of the troops were sucked into the Russian offensive), total about 2,000 - 2,500 men (estimated actual v book strength) was defending Dieppe and it's surrounding area coastal defences. In addition, elements of the 570th and 571st were defending coastal batteries whilst the rest of the 571st Infantry Regiment was positioned to the rear of Dieppe area and billeted in areas away from the coast (and out of direct shore bombardment range).
In Dieppe and nearby (coastal cliff defences) :-
302nd Static Infantry Division comprised the 570th, 571st and 572nd Infantry Regiments, each of two battalions, total approx. 1,500 men.
+ supporting elements, approx another 1,500 men :-
302nd Artillery Regiment, 302nd Reconnaissance Battalion, 302nd Anti-tank Battalion, 302nd Engineer Battalion, 302nd Signal Battalion
570th Infantry Regiment was deployed near the artillery battery at Berneval-le-Grand.
Elements of the 571st Infantry Regiment (Grenadiers) defended the Radar Station near Pourville and also the artillery battery over the Scie river at Varengeville. The rest of the 571st was well to the rear, but quite capable of reaching the coast within hours (rather than the days the British seem to have assumed - based, perhaps, on the British commanders own lack of initiative and inability to react as circumstances required)
Luftwaffe
With the best pilots and aircraft diverted to the Russian offensive, working out how many combat ready aircraft (with pilots) were actually available to the Luftwaffe 'on the day' is even harder than working out the RAF counts. There seems little doubt that the Luftwaffe were outnumbered (on paper) by at least 3 to 1, however taking into account the need for the RAF to return to their bases for much more frequent refuelling, it's likely that the numbers over Dieppe were rather more equal (or even to the advantage of the Luftwaffe !)
Further, the FW190 A2/3 had far superior armament compared to the Spitfire V (which had only 2x 20mm cannon (fed from 60 rounds drum**) plus 4x .303 machine-guns, whilst both the Fw190 A-2 and A-3 had 4x 20mm cannon with over 300 rounds (plus two 7.92 mm (.312 in) MG 17s). The FW190 was also much faster (and could climb and dive faster) than the Spitfire V (although the Spitfire was able to out-turn the FW190, which counted for a lot during combat)

**at 600rpm (10 rps), that's 6 seconds of fire. Later versions were belt fed with 120 rounds (so 12s of fire).

So, even with the numerical odds against them, the FW190 would have the advantage over the Spitfire when it came to knocking them out of the sky
Jagdgeschwader JG 2, approx 115 Me190 (A-2/3**)
Jagdgeschwader JG 26, approx 115 Me190 (A-2/3**)
Kampfgeschwader 2 (KG2), Kampfgeschwader 45 (KG45), and Kampfgeschwader 77 (KG77), total approx 100 bombers, mostly Dornier 217s.
There were about 120 other 'on call' bombers within range at bases elsewhere in northern France and The Netherlands that could have taken part in the battle.
*** From spring 1942, the FW190 A-3 had gained the option of an under-fuselage mounted bomb rack for carriage of 500 kg of bombs (1x500kg, 2x250kg or 4x50kg) or an external drop tank of 300 liters capacity.

It's quite possible that the FW190's at Dieppe would have access to the bomb rack option (after all, they were expecting British landings 'at any time'), however it seems that the bulk of the FW190's were all too busy downing Spitfires to bomb the attacking ground forces.

Even so, there were reports of 'dive bombers' attacking Churchill tanks - which (at this stage of the war) could not have been the Stuka. So maybe at least some of the FW190 A-3's were so equipped.

To simulate this option, one of the Axis factiries has a bomb making capacity (which the AI will use to make bomdbs but never seems to work out how to load the bombs onto it's aircraft)
The Luftwaffe fighters were close to their bases, however at best no more than half could have been in the air at any one time
How it went on the day
The British command on the spot, having never heard the maxim 'No plan survives contact with the enemy', plodded ahead with the 'perfect plan' and the troops on the ground did their best to carry out their orders 'no matter what' - and if that meant attacking the Germans at a specific time 'as per the plan', then the fact that their tanks still hadn't turned up was no reason not to go ahead, fix bayonets and charge the German machine guns
Yellow beaches - surprise lost
In fact, the first 'act' in the unfolding disaster had occurred at 21:30 the night before, when a German tanker left Boulogne-sur-Mer escorted by German S-boats. It was spotted on British radar at about 22:00, heading south along the coast toward Dieppe, which it would reach by dawn. Of course there was no provision to tell the 'Dieppe Raid' commanders (not that they would have done anything about this 'unwanted' information anyway - as, indeed, 2 years later (at Market Garden) the presence of the German 2nd SS Panzer Corps in the area north of Arnhem proved to be another example of 'unwanted' information)
So, at 04:50am, just as No. 3 Commando's landing craft were lining up for their run into Yellow beach 1 and 2 (on the far west (left in the map) of the operations zone), the German S-boats ran straight into them.

A confused fire fight ensued between the German S-boats and the British 'gun boats' that tried, without much success, to protect the landing craft, which were scattered all over the place. The result was that only one landing craft and 18 commandos managed to get ashore, although they did manage to distract the gun battery sufficiently to prevent them laying down any accurate fire.

The British destroyers had not been informed of any German naval units in the area, so the commanders of HMS Brocklesby and ORP Slazak (who could hear explosions) simply assumed the landing craft had come under fire from the shore batteries, made a 'note' of this and took no further action. There was, of course, no 'plan' to do anything - such as open fire on the shore batteries - should the Germans refuse to be surprised and then be so unsporting as to open fire on the Commando's landing craft.

Perhaps worse, no-one on the British side seems to have considered the possibility that the Germans defences along the coast toward Dieppe might be woken by the gun-fire and be sufficiently alarmed as to 'call an alert' (not that this would have made any difference to the 'plan' anyway).
Orange beach - according to plan
Also at 4.50am, at the far east of the operations zone (and well away from the noisy gun-fire), 4th Commando landed at 'Orange Beach 1&2'. Here it went 'exactly to plan' - they achieved the required surprise and successfully attacked the battery at Varengeville in a pincer movement.
It was a complete success. The battery was destroyed and the commandos re-embarked between 7.30 and 8.15am with scarcely a man lost.
Green beach - where are we ?
Next to see action was 'Green beach' east of Dieppe (the Radar Station), at about 4.52am (only 2 minutes late), also well away from the gun-fire at Yellow beach, although by now the 'jig was up' and at 5.15 the German Coastal guns received orders to open fire. But they were just too late = the South Saskatchewan Regiment's 1st Battalion had already landed without having been detected. Unfortunately that's when their luck ran out because most of their landing craft had drifted off course and the majority of the battalion found themselves on the wrong (east) bank of the River Scie !
No-one seems to have considered the risks of landing on the wrong side of the river.

Since their objective was the Radar Station on the Dieppe (west) side of the village, they had to enter Pourville to cross the river by the one and only bridge (the area further inland was marshy and virtually impassible).

Since no tanks had been assigned to this beach (indeed, none were assigned to any but the Dieppe landings), the defending German Infantry, who were able to take up positions without being inconvenienced by any shore bombardment or air attack, caused the attacking Canadians huge casualties as they were forced into the bridge 'bottleneck'.

Eventually the Canadians forced a crossing and the 'spooks' managed to reach the Radar Station, but were unable to gain access (the unsporting Germans having taken up new defending positions around the buildings and had even locked the doors !), so the attackers were limited to cutting the phone lines (thus forcing the radar technicians inside to use their radio, which was intercepted back in England and provided some useful information).

The Brits did, at least, learn from this. On D-day, not only were tanks allocated to every beach in the 'first wave' but when the Royal Navy found the sea conditions at the planned 'launch point' of the British 'DD' tanks were much too rough, they dropped them much further in-shore.

The American Navy, however, 'stuck to the plan' and dropped their own DD tanks way too far out - and the US tanks then 'stuck to the plan' and attempted to reach their 'designated' beach, despite the rough seas and strong rip-tide.

The result was that most of the British tanks made it to the beaches and assisted the infantry as planned, whilst almost all of the American tanks were swamped and sunk straight to the bottom - and the US forces on the beaches were pinned down (especially at Omaha) without their planned armour support and took high casualties
Blue beach - too late
At the same time, directly west of Dieppe at 'Blue beach', the Royal Regiment of Canada plus three platoons from the Black Watch of Canada and an artillery detachment were supposed to be landing on the beaches. However this landing was running a critical 20 mins late.
Once again no-one seems to have considered the risks of things not 'going to plan' and thus no provision was made to cope when things started to run late.

During those vital 20 minutes, the noise of the German S-boats further up the coast (sinking No. 3 Commando) had alerted the German defenders - and the meticulously planned, timed and executed smoke screens that would have hidden the Canadian assault (had it been on-time) had already lifted.

There was no means of informing the destroyers laying down the smoke screen that the landing had been delayed, so it's hard to see how this could have been avoided ...
... and even if the destroyers had been informed of the delay, there is nothing they could have done as they were already moving away to deliver their next planned task - the perfectly timed shore bombardment in support of the main landings at Dieppe itself.

With no tank support and the German defences now fully awake and alert, the result was predictable - the Royal Regiment of Canada was annihilated on the beaches (of the 556 men in the regiment, 200 were killed and 264 captured).
Red and White - late tanks stuck on the beaches
At the same time as the Royal Regiment of Canada was being annihilated on Blue beach, four of the destroyers started an ineffectual bombardment of the beach walls at Dieppe to support the main landings on the (Red and White) beaches in front of Dieppe itself.
Also on plan, at 05:15, five squadrons of RAF Hurricanes bombed the coastal defences and then set a smoke screen to protect the assault troops. Finally, between 5:30am and 5:40am, the main frontal assault by the Essex Scottish and the Royal Hamilton Light Infantry landed at White and Red beaches exposed by the tide in front of the sea wall
However this was at least half an hour after the 'Alert' had been given (trigged by the S boat action at Yellow beach). Worse, the Churchill tanks of the 14th Army Tank Regiment meant to be landing at the same time were at least 10 minutes late.

Normally the tanks landing a bit late would not have been a problem, however 'the plan' called for an immediate 'attack' on the (assumed to be asleep) German defences, and not 'wait for the tanks'. So the two infantry battalions proceeded to attack the now well awake and alert German heavy machine guns on the sea wall. They advanced in the best traditions of WW I 'going over the top' .. and were cut down in droves (again, in the best traditions of WW I).

Needless to say, many of their radios didn't work and, as usual, German snipers concentrated on officers and radio operators, so even those with working radios didn't last long. As a result, they couldn't warn anyone of the unfolding disaster, not that this would have changed 'the plan' anyway.

This was a lesson the British totally failed to learn. At Market Garden, some 2 years later, they managed to replicate the exact same 'non-working radio' trick to a tee, along with the 'stick to the plan no matter what' mentality. So the air-drops of vital supplies and reinforcements went into the 'pre-designated' landing grounds which, as it turned out, were firmly in the hands of German forces.

Over half (some 30) of the tanks eventually arrived, and 29 were offloaded under fire (1 got stuck and two of those fitted with the 'deep water wading kit' promptly sank). The remaining 20 remained off-shore (perhaps as some sort of 'reserve' = the plan being, no doubt, that after the German machine guns had run out of ammunition shooting up the infantry, the brand-new (and hugely expensive) Churchill's could come ashore without getting their paint scratched).

The Churchill tank had about the best cross-country capability of all the Allied tanks, but this didn't stop almost half of those that landed (some 12) becoming bogged down on the soft shingle beach (as the small stones became jammed in their tiny road wheels and threw their tracks).

No-one had bothered to check what the beach consisted of, however this was one lesson that was very well learnt. Prior to D-day, the Allies actually had Special Forces land at night to collect samples of the sand on each of the landing beaches !

Eventually 15 tanks made it to, and across, the seawall. However, just when the town was in sight, the tanks were confronted by a series of concrete tank-traps they couldn't cross (the Churchill could cross trenches and actually climb hills the Sherman couldn't, however none of the planners had considered the possibility that the Germans would be so unsporting as to build tank-traps that were largely immune to solid shot and then kill the Engineers that were supposed to support the tanks and clear them). The few Engineers that did get through found their explosive charges no more effective than the Churchill 2pdr/6pdr anti-tank rounds.

Unable to make further progress, and with another 5 of the tanks now immobile due to track damage (this being about the only way to 'knock out' a Churchill) the remaining 10 tanks returned to the beach where they at least managed to provide some limited fire support (remember, the 2/6pdr guns had no HE capability, so essentially the Churchill became a 'mobile machine gun post') for the now retreating infantry. All the tanks that landed were lost - there was no 'plan' to lift them back off the beaches (the few Tank Landing Craft had all been damaged or sunk and the tank wading kits had been jettisoned on arrival using 'explosive bolts', so 'retreat' was never going to be possible for the tanks anyway) and all their crews killed or captured.

The Churchill tanks at Dieppe were a mix of the early MkI 2pdr+75mm howitzer / MkII 2pdr (howitzer replaced with machine-gun) and the brand-new MkIII 6pdr versions. Since the howitzer armed version would have had some chance of destroying the obstacles, it appears that only the 2/6pdr (MkI / III) versions (and 3 tanks converted to use an early flame-thrower, none of which used) were actually landed !

The intent had never been to 'hold' Dieppe indefinitely, so the lack of planning to recover what was a very expensive brand-new tank (at a time when the British had very few tanks at all) once again suggests that the planners saw Dieppe as some sort of 'training exercise' (with the expectation that the Axis would allow the Allies to 'pick up their kit' at leisure and 'take it all home' when the exercise was over).
Four of the destroyers (Calpe, Fernie, Berkeley and Albrighton) moved to within one mile of the beaches to cover the retreat with direct fire support, however they were out-ranged by the German Coastal guns at Dieppe and got shot up for their pains.
The Navy's fear of the German coastal batteries was exaggerated. Yes, they out-ranged the Destroyers, however whist the Destroyers took quite a lot of damage, in the event only one was lost (and that only due to excessive damage suffered by direct hits right at the end of the action that led to the British decision to abandon and scuttle her)

On the other hand, if Cruisers (or even Battleships, as requested by the Rutter planners) had been present, it's highly likely the Luftwaffe would have made a much higher effort to target the ships (remember = there were at least 100+ German bombers available that were never called on)
Red and White - reinforcing the losses
Unaware of the situation on the beaches (because of a smoke screen laid by the supporting destroyers) and unable to make radio contact, the officer in command (Major General Roberts) assumed everything was still 'going to plan' and so sent in the Fusiliers Mont-Royal reserves to 'consolidate the position'.
At 07:00 the Fusiliers in their 26 landing craft were heavily engaged by the Germans, who hit them with heavy machine gun, mortar and grenade fire, sinking the lot.
More losses but (just) avoiding total and utter disaster
By now the Enigma machine 'snatch squad' (No. 30 Commando or '30AU') along with the Royal Marines aboard gunboat and motor boat transports had made a number of attempts to sail up the River D'Arques into Dieppe itself (against the fully manned and undamaged defences) but the volume of fire forced them to turn back. Rather than give up, they decided to transfer into landing craft and join the Fusiliers Mont-Royal (who, 'according to plan', would by now be strolling into town from Red/White beaches).
When the Marines eventually approached the beach, the Germans (who had had plenty of recent practice) engaged them on the way in, with the result that many of the landing craft were destroyed or disabled. Those Royal Marines that did reach the shore were either killed or captured.

As he became aware of the fact that the Germans were not behaving 'according to plan', Lieutenant Colonel Phillipps (the Royal Marine commanding officer) stood up on the stern of his landing craft and signalled for the rest of his men to turn back. For his pains he was killed a few moments later, however both the rest of the Marines and '30AU' (who knew what the objective was, even if not the reason for it) did turn back and so at least some of the British forces managed to avoid inevitable death or capture.

So the Germans never found out how much the Allies knew about Enigma (although it's said that some German field commanders had as much faith in their superiors belief in the 'unbreakable code' as did the Allies (i.e they didn't think it was unbreakable either), and especially toward the end of the war, just assumed that the Allies could read anything they sent)
During the final retreat, HMS Berkeley was hit so badly that it had to be abandoned and scuttled (although most of it's crew were saved).
For a more details of the (supposed) 'lessons learnt', see Wikipedia references
The game
Due to the low number of units involved, a ground scale of 10 hex's per mile can be adopted, giving a Map of 120 x 65 hexes. This is some 12 miles wide, looking South, from Yellow Beach at Berneval (4 to 5 miles east of Dieppe) via Blue Beach at Puys (about 1m east of Dieppe), Red and White beach (at Dieppe itself), Green beach (the Radar Station, about 2 miles east) and finally, Orange 1 and 2 (nr. Vasterival-sur-Met, the German anti-aircraft battery, 4m east, and the Coastal battery at Quiberville (6 miles west). The map needs to be 6 to 7 miles deep (to at least include the German airfield 3 miles South of Dieppe). England is represented by the factory at on the very bottom edge of the map (near the center)
To play against the computer, you have to take the Allied side (the AI has no idea of how to handle landing craft, and will spend a lot of time trying to 'work out' what to do with all the units in the Transport Ships - so much time, in fact, that you might think crimson.exe has crashed).
It can be fun to play both sides in 'hot seat' mode .. when doing so I found a few 'issues' that I couldn't totally fix ..

Unlike the A.I, a human Axis player might decide to meet the Allied Landing craft literally 'on the beaches' which actually prevents the Allies 'landing' their Infantry at all. Since the Landing Craft had no 'power' against anything, not only can't they 'clear the beaches' but the Axis infantry can attack them with impunity ! Of course, the Churchill tanks with their 'wading kit', can be 'offloaded' into shallow water, however firing any hull-mounted weapon through the 'wading skirts' would not be a 'good idea'. That leaves them with their turret machine-gun (and 2pdr/6pdr solid shot), effectively halving their effectiveness.

I've never seen the A.I. do this, however it seemed realistic to give Landing-craft some small 'attack' value (against ground targets), so any Axis player who did lineup their defenders on the beaches would make a perfect target !

The German 'S' boats can sink landing craft with impunity.

The Commandos are supposed to be in 'gun boats', however these have too small a carrying capacity - so in 'Version 1' I used landing craft instead. To redress the balance, in 'Version 2' I've switched some of the landing craft over to gun-boats

When you drop bombs on the Coastal Batteries, because the bombs are inside the guns minimum range, they can 'explode for ever' (i.e. they don't 'die')

Bombs are type = 'ground sea air', and the guns are effective against both ground and sea targets = so all I had to do was change one of the gun minimums to '1' for them to 'kill' the bombs in their 'counter attack'. For the 105min's that was 'ground' and for the 170's 'sea' (they are located far enough from the sea that changing the min. has no effect on game play)
The game 'briefing' pop-up dialogue box will give you some hints on what to do :-)
Essentially, you get until German reinforcements (and the Luftwaffe) arrive in overwhelming force (and wipe you out), to achieve your objectives. If you read the above, you will know what these are (and where to find the things you need to 'snatch').

To give you a chance, you get complete control over your all the forces just after the German S boats spot the Allied Troopship launching No. 3 commando (i.e. right after all chance of surprise has been lost).

There is no need to 'follow the plan', but you will find not everything is as well ordered in the Transport Ships as you might like (and you don't have any time to waste sorting it out :-) )

Your biggest dilemma will be how to use your Fighter/Bombers and the Destroyers = do you send them to fight the S-boats or send them straight in to support the landings ?

Then there's what troops to load into which landing craft and were to send them (do you land your tanks on the beaches in front of Dieppe (and risk them bogging down), but if not there, then where ?) .. and do you send your Patrol Boats up the river (or land the Royal Marines and 30Au on the beaches) ?

Remember = fighter aircraft won't be taking off until dawn (i.e. as the first landing craft are supposed to be reaching the beaches) and the Axis airfields are a lot closer to the beaches than the RAF in England.
Note - when designing the game I intended to replace the 'tank-trap' Terrain tile (which is 'invulnerable') with a Unit (that can be destroyed). As of today (22 Mar 2017, release 'Dieppe v1') that has not been done, so there is no way to get past the tank-traps
Hints and tips
Check what's in the Troopships - you will find things aren't quite as bad as they were historically
Your 25pdrs can be deployed direct from Landing Craft onto suitable terrain but can't move any further - you need an APC to pick them up and transport them - and they can't fire on the same turn they are deployed

APC's and 25pdrs can't climb cliffs (but Infantry can - although fighting whilst climbing cliffs is a fast way to die).

The German 88mm isn't just an Anti-Aircraft gun ...

Units in trenches (or houses) get a defense bonus.

To 'replicate' the 'element of surprise' (and delay the Axis ME109's from taking off), the Axis Airbase is 'neutral' (so the A.I. has to 'capture' it first). However, once their aircraft 'take off' they will outnumber the Allied aircraft and will beat the Spitfires (and especially the Hurricanes) on a 1:1 basis (so don't fight them 'one on one' :-) )


Destroyers have AA capability (Infantry, Churchill tanks and 25pdrs don't !)

At long range, your Destroyers (and the coastal guns) are not as effective as you might hope (or fear)

Finally = remember your true objectives, something that only a very limited number of your units are capable of completing !
NB. In 'v1', the RAF Spitfire 'count' is way too low (somehow the 'Event' that provided the reinforcement 'crystals' for the 'England' factory got lost :-( ). This will be corrected in 'v2' (but remember = the FW190's at Dieppe took out Spitfires at 2:1 or better)
One reason why the RAF won the Battle of Britain was because they were fighting over home ground - at Dieppe it was the other way around.

This is 'replicated' quite well in Crimson Fields as the A.I. returns it's damaged aircraft for repair to it's nearby bases, whilst the Spitfires have to fly all the way back to 'England' for repair, and are thus 'out of action' for many more turns.
The guns
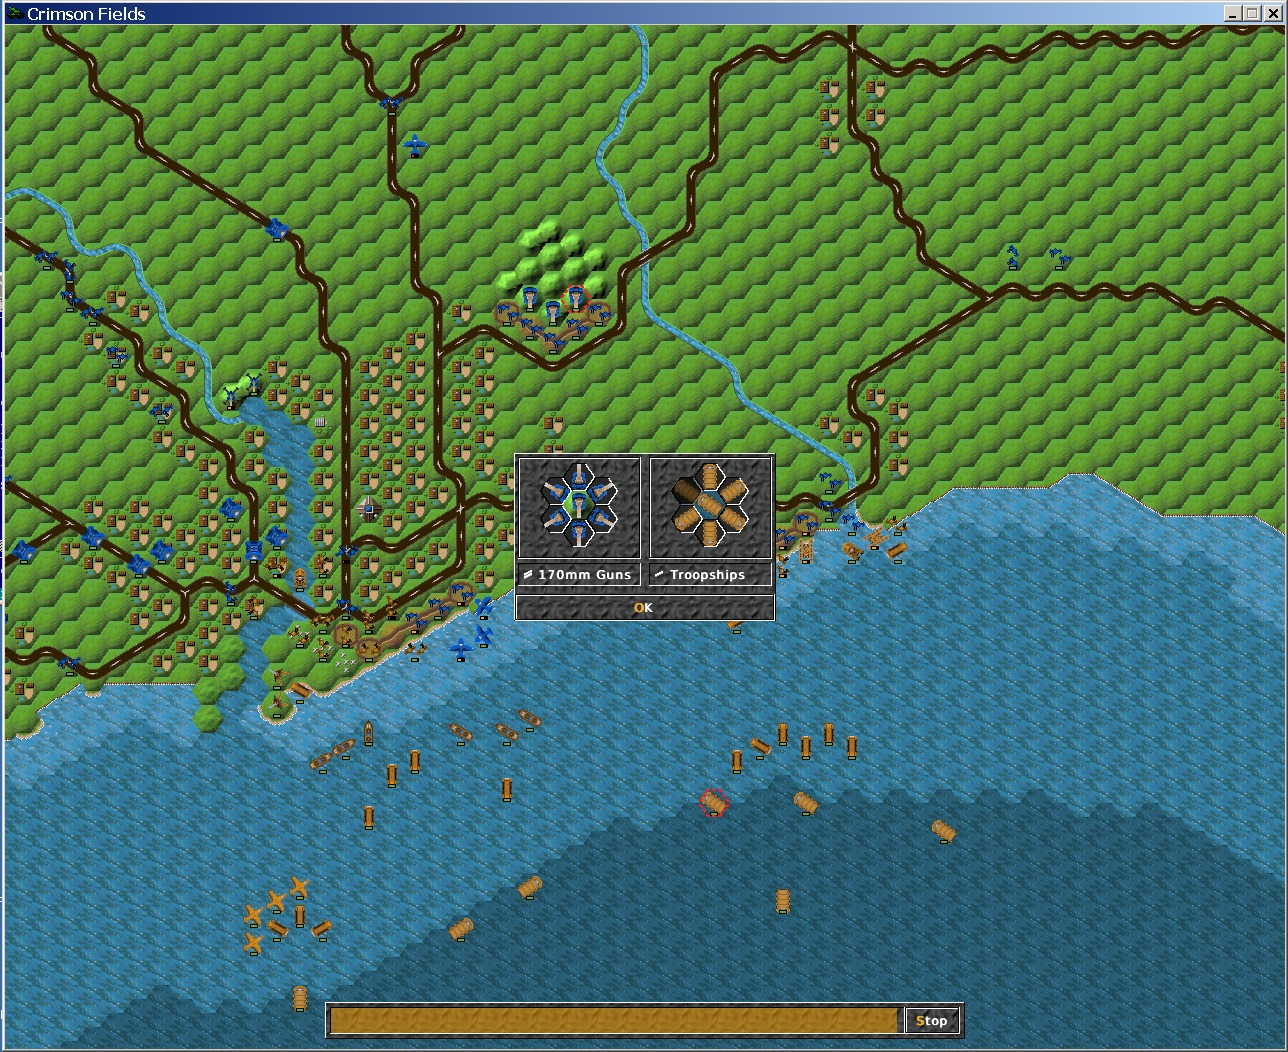
The Germans have 105 (4"), 150 (5") and 170mm (about 7") guns, the British Destroyers 4" (102 mm) guns. A standard 150mm (6") gun would have a range in excess of 10 miles, so the 150mm gun batteries at Berneval and Varengeville, 5 miles east and 5 miles west of Dieppe, would both be able to cover the approaches. The other two batteries even closer to Dieppe would have been quite capable of firing on any landing craft approaching the mouth of the River D'Arques at Dieppe (as well as at landing craft elsewhere along the coast).
Even if we take the 'effective' range as half the maximum range, the 150mm (6") guns should have a range of at least 50 hex's. This means the British Destroyers will be 'in range' no matter where they start on the Map.
Since the 'plan' called for the Commandos to put the Axis gun batteries out of action before the Destroyers approached to deliver the supporting fire, the map 'depth' had to be increased to 75 hexes to allow sufficient 'sea space'.

I assume the coastal guns can't be 'depressed' sufficiently to hit targets directly in front of them, so the ranges will be :-


Allied guns:-
British Destroyers 4" gun = 2-20 (they also have AA capability, 1-2)
Churchill tank 6pdr (57L43), 1-3 (has no HE, so minimally effective against 'soft' targets)
Churchill tank 2pdr + hull mounted 3" (75mm) howitzer, 1-6 (short range reflects the difficulty of 'aiming') note in real life none of these landed
British 25pdr (87.6L28), 2-12 ('short' range but with a decent rate of fire and HE capability)

The Churchill gains it's effectiveness as a 'mobile pill box' that can machine gun the German Infantry with virtual impunity (rather than killing one person at a time by firing 2 (or 6) pound lumps of solid metal (Anti-Tank rounds) at them). An early version of the Dieppe scenario gave it a range of '1', however I felt that limited the player options too much, so relented some-what

German Flak 36 (88L56) could knock out any tank at ranges of over 2km, so gets a range of 2-20 (ground/ship/air).
Coastal batteries, 105mm gun = 3-25, 105mm Field Howitzer 5-20, 150mm gun = 5-30, 170mm gun = 8-40.

Initially, to give the Allies the 'element of surprise' I intended to use 'hidden factories' for the Coastal Batteries (from which the AI will first have to 'build' them and then deploy them). The 'build speed', set by the 'crystals per turn' rate, would delay the deployment of the coastal guns for a sufficient number of turns to allow the Axis S boats to encounter the Allied forces (and the landing craft to reach some of the beaches, if the Allied player is quick).

HOWEVER I discovered that in practice, crimson.exe takes into account the 'range to target' during artillery fire, which means none of the coastal guns have much effect until they are firing at targets well under half range !!!

This means everything tends to 'play out' OK = i.e. the Troopships don't all get sunk before unloading units into the landing craft (and the Landing craft don't all get sunk on the way in - although they do take damage when the A.I. chooses to target them (rather than the now mostly empty Troopships)).
Player Notes
Only Boats and Landing Craft can actually move into shallowwater (such as the River D'Arques).
The Allies 'factory' (bottom of the map) represents 'England' ...
It can build Fighters, Fighter Bombers and 'bombs' (or you can reserve the crystals for Repairs), however be aware that the Axis have a factory or two at their Airport which not only out-produces you but is a lot closer to the action ..
Much of the Axis reinforcements (571st Infantry Division) start the game 'mounted up' in their trucks (APCs).
OK, this is unrealistic - even if they responded to the Alert within seconds, they couldn't possibly be ready to move for some hours. But the A.I. is quite incapable of loading troops into the APC's ... and I wanted to impose a sense of urgency on the Allied commander.

Lucky for the Allies, the A.I. always seems to 'dismount' them on it's first go, and the resulting 'traffic jam' more or less guarantees even the APC's won't arrive any time soon
Remember, FW190's kill Spitfires at 2:1
New Units (dieppe-u)
The "x3units" artwork and definitions set was used as the basis for the dieppe-u set.
The Artillery, Rail-Gun and Medium Tank 'icon' positions are all reused for the 3 types of coastal guns (105,150 and 170mm)

The Submarine icon position is reused for the Destroyer and the 'Aircraft Carrier' becomes the Landing Craft.

I tweaked the 'AA Gun' to look more like a German 88 and the Heavy Tank to look more like the Churchill. The existing AA Tanks icon is used as the German Light AA Guns 'as is' (with adjusted parameters)

The existing Torpedo Boat is used as the German S boat, and the existing Patrol Boat as the 'special forces' craft (so it's translots are adjusted to allow 2x infantry to board)

The Bomber, with translots added to carry bombs (the old mine icon), is used as the Hurricane.

The Fighter is used twice = as both the BF109/FW190 and the Spitfire.
Two or more Units can use the same single icon (the units names and definitions can differ wildly)

The Infantry icon is used for multiple Units :-
Commando and Marines (same as normal Infantry, just differ by name, and set to a higher start 'experience')
'Garrison Infantry' = same as normal Infantry but non-moving (to stop the AI moving them out of the trenches / defences)
'Radar Technicians' = non-moving Infantry with a 'weight' of '2'

Two totally new icon 'sets' (12 tiles each) were defined :-
A 'Parts set', which is used for two new (non-moving) Units, the Enigma parts and the Radar parts
The British 25pdr (non-moving, the APC is used 'as is' for the 'gun tractor')
New Tiles (dieppe-t set)
The "x3tiles" artwork and definitions are used as a basis for the dieppe-t set.
The existing 'spare' tile slots have been used for :-

Four 'cliff' Tiles (-10 attack, -10 defense, 15 move cost, type=mountains)

Two Radar Station (building entrances) when 'captured', the 'building entrance' (whatever tile you have set) is automatically switched for the Tile 'next door', so you have to define entrances twice  - once for Axis and again for Allies
NOTE - to generate the new Units and Tiles artwork, in both cases I started with the existing .bmp files (this is the only way to 'preserve' the Color Palette and (especially) the 'transparency' color setting)
Rebuilding the dieppe set
To make changes, I suggest you start by using CoMET on my dieppe.lev to create a new {whatever-name}.lev and 'export' this to {whatever-name}.src. Then copy the .src to the \steves-Dieppe-raid\source-and-build\mapsource\ folder
You can open {whatever-name}.src in a text edit utility to change messages etc. You can also change Units names (if the Unit names don't match the current definitions, then the .src won't (ever) 'compile' to .lev again)
I used the spreadsheet (.xls) files to define the Unit and Tile parameters. I then 'export' these as '.csv' files and place them into my C:\QBASIC\CF\ folder.
The BASIC script csv2usrc.bas is then used to convert 'dieppe-u.csv' into 'DIEPPE-U.USR' (and csv2tsrc.bas to convert 'dieppe-t.csv' into 'DIEPPE-T.TSR')
The .bmp icon files must be in the \steves-Dieppe-raid\source-and-build\dieppe\ folder and the CF map {whatever-name}.src in the \steves-Dieppe-raid\source-and-build\mapsource\ folder
I then launch 'make.cmd' from the \steves-Dieppe-raid\source-and-build\ folder
This will use mkunitset.exe and mktileset.exe to build dieppe-u.units and dieppe-t.tiles in the .\dieppe\ folder, and then use cfed.exe to build {whatever-name}.lev in the .\mapsource\ folder

NOTE cfed.exe build of the .src into a .lev will 'fail' on the first 'error' caused by your changes

The most typical error is changing a units weight or transport (total/min/max) weight settings leading to 'illegal' combinations of units with existing transports.

Since CoMET can't be used to edit the .src, you have to fix each error (one at a time) using a text edit utility to change the .src.

The .src uses Unit 'names'. If you change a 'name' in the definitions, you MUST do a 'search and replace' before trying to rebuild the .src :-)
You then need to copy the new dieppe-u.units and dieppe-t.tiles to C:\Program Files\CrimsonFields\ and {whatever-name}.lev to C:\Program Files\CrimsonFields\levels\ (from where it can be played with crimson, or further modified with CoMET)