

Some 'myths' of astrophotography
1) It's only possible to take astrophoto's with a fully guided (i.e. AutoGuided) mount
Not true when applied to Planetary Imaging. You can take successful images of the moon and planets with an unguided, 'manually' guided or (in theory at least) even a Dobsonian !
Since you are using 'movie' mode (web-cam), each exposure is a fraction of a second. Modern 'stacking' software will cope with the image shifting around in the field of view. The problem, of course, is keeping the subject in your field of view at the very high magnifications needed. Unless your Web-Cam recording software has a 'live view' option (which shows you what's being recorded) you may have to spend a lot of time with your eye glued to the 'spotter' scope trying to keep the planet centered.
One way to quickly switch between camera and eyepiece without having to take them out (and refocus) is a 'Flip Mirror' (or, if you have plenty of light, a 50% split mirror). As with all 'specialist' kit, these can be very expensive, so I suggest you check out this DIY Flip Mirror design.
If you have at least a single motor EQ type mount e.g. GEM (German Equatorial Mount) or even a 'Barn Door', so long as you align it properly with the 'North Star' (Polaris) this will be 'good enough' for most imaging.
2) Alt-Az ('fork') mounts are no good for deep sky astrophotography
Only because images taken using Alt-Az mounts suffer from 'Field Rotation', however that's perfectly 'OK' when taking multiple individual images of no more than a few minutes each. Modern stacking software is quite capable of compensating for the Field Rotation produced by a tracking or guided Alt-Az mount.
Depending on the magnification and angle from the pole (objects near the horizon 'move' faster), Field Rotation will be apparent as 'smears' on long exposures (i.e. from perhaps 10 minutes or so).
Avoid Alt-Az mount Field Rotation
You can fit a 'wedge', however these are quite expensive.
Also these and any mount with a single drive motor or single movement axis (such as Haige Mounts or 'BarnDoors' eg. mine) need to be aligned with NCP (see later) if exposures over 5 or 10 minutes or so are to be attempted.
3) A really professional (== really expensive :-)) is worth every £
Not really. Whilst it's generally true that the more expensive the mount, the easier it is to get good results, this only holds for mounts costing a few hundred £. There really is no point in paying the extortionate amount's demanded for 'professional' mounts, where the difference between £1,000 and £10,000 is only going to be noticeable if you are exposing for hours at a time (and with a camera costing the same as the mount :-) ).
This is because Auto-guiding (of which more later) can compensate for the 'average' motor drives and gearing found in £ sub-thousand mounts, but not for a mount that is sensitive to vibration and poorly 'damped'. Since autoguiding is relatively easy these days, there really is no justification for spending £ multi-thousands on a mount in order to avoid autoguiding
TIP - to improve the steadiness of a lightweight tripod, the old photographers trick is to hang a heavy weight off the center 'bracket'. In the case of astro-photographers, start with your battery pack and then add your equipment pack. If you are at home, just add your spare counter-weights.
Those with the older hollow 'square leg' aluminium tripods have been known to fill the legs with sand (or even 'lead' shot) :-)
NB. Walking around near the telescope whilst it's imaging is likely to effect cheaper mounts more = so stop walking around :-).
4) It's well worth paying extra for an APO (Apochromatic, aka 'ED') refractor
Generally, that's true. The APO refractor design corrects for chromatic aberration (colour 'fringing') caused by the inability of a single glass lens to focus all wavelengths at the same place. This is not a problem when imaging using individual R, G & B (or OII etc) filters since you will be refocusing for each colour anyway.
However, for 'single pass' imaging of 'coloured' objects such as Mars, Jupiter, Saturn and deep sky nebulae & gas clouds, a non-APO refractor will limit you to low magnifications if you want to avoid 'fringing'. This can be a real limitation for planetary imaging, where you need maximum magnification (to pull out the surface details) and especially Jupiter (which rotates so fast that it's almost impossible to image using separate filters as significant (> 1 pixel) movement will occur (between the first & last separate colour image) for any exposure time more then a few seconds (this would be one occasion where a motorised filter wheel could really help).
5) Unless your pay thousands, it's impossible to avoid 'smears' or 'star trails / streaking' effects on your images
The key to achieving good sharp results is good focus and good star 'tracking', not how much you paid for the camera or the mount.
To help with focusing, use a Bahitnov mask (design your own using the free Bahitnov mask file generator (SVG)) (these can be purchased 'ready made' from various supplies and typically cost £15-£50).
Good tracking starts with the alignment of your telescope to the North Celestial Pole (NCP = for my approach see here). This is vital for long exposure DSO, less so for short exposure and not at all important for planetary imaging (so long as you can keep the planet in your field of view).
6) Unless you have a 'pillar' (or observatory), set-up takes so long that there's no time left for imaging
It's generally true in the UK that the longer you take setting up, the less observing time you have before it clouds over - and the less willing you will be to get the tripod out if the weather looks 'marginal'. You also need to factor in Mirror 'cool down time', especially for basic (unsealed) Newtonian reflectors.
However, on a good weather day, there's nothing to stop you doing the basic set up before dark ..
Tips on minimising set-up time
1) Set up a permanent 'pillar' or 'pier' mount in your garden - or even setup your own observatory !
If you really want to do some serious astro-imaging, you really do need a permanent 'pier' to mount your telescope on. This is especially the case if you take your tripod (and telescope) out for observing sessions away from home, since in doing so, you will change the leg heights (and upset the 'flatness') and possibly even the head left<>right and latitude position alignment thus leading to even longer set-up times on your next home use.
Once you have the pier, you will want to leave the telescope mounted on it (to avoid cool down time) and, given the British weather, that means some serious DIY effort building a weather-proof housing - e.g. 'Roll Off Roof' garden shed conversion or a classic 'dome' observatory.
A small commercial 'dome' observatory will cost at least £3,000 (although sometimes second-hand ones can be found). A commercial 'roll off roof' shed should be a lot less - and a shed suitable for DIY conversion a fraction of than
2) Start your set-up during daylight.
First select where the telescope will be placed, ideally a flattish/level hard** surface such as your patio - however you will need to take into account the effect that any trees (and your house) will have on limiting your observations. If you have a particular 'target' in mind for that night, use Stellarium (or similar e.g. Celestia, Cartes du Siel) software to 'predict' where you will need to 'point' your telescope. You will also need an uninterrupted view of Polaris (the North Star) from your chosen position :-)
**If you have no choice but to set up on grass, the tripod legs need to be 'stuck in' to prevent the scope shifting / settling as the weight on each leg and the balance shifts during tracking.
If you are setting up away from home, in the daylight, it may not be obvious which way is North ! So start by marking 'North' on the ground ... this can be done using a compass** or a Sat-Nav. If you are well prepared, before travelling, you will have zoomed into your planned location using Google Earth and printed out a map (noting both which way is North and the Latitude).
**Warning - many modern tripods now come with steel (as opposed to aluminium) legs. These can become magnetised - and even slightly magnetised legs will throw off your compass [it has been suggested that problems with magnetised legs is what led to the demise of the Meade LNT system - on the other hand, perhaps it was the availability of cheap SatNav technology :-) ]
Next, line up** your tripod mount with North. If you are at home (and after confirming that you can indeed get Polaris in the alignment scope) more permanent leg positions can later be dug into the patio floor paving slabs :-)
** The head alignment 'lug' must be facing North. This is typically 'next to' one leg or equidistant between two legs. Your mount may differ (it's even possible the 'lug' should be set facing South !).
Now adjust the tripod leg heights until the head mounting plate is totally flat (use a spirit level). If the scope mount head is not flat, it will be impossible to achieve 'drift free' star tracking.
Tip - tripods are most stable when set at their lowest height. Since you are setting up for your camera (and not so you can comfortably spend hours looking through the eyepiece), the less you extend the legs the better.
Mount the head and check the flatness again. The tripod head mounting position will have some sideways (left<>right) adjustment screws that engage the 'lug'. You should set the screws to the 'centre' position.
TIP = if you are 'away from home', now is a good time to check the head mount is set to the correct 'latitude' HOWEVER since the scale/pointers on almost all scope heads are 'approximate' at best and you will still need to precision align later.
3) What to do when it gets dark
Look through the RA axis polar alignment scope and make sure you have Polaris in view. Adjust the position with the tripod head 'left<>right' position and latitude adjustment screws until you have Polaris centred in the alignment scope. Then tighten the head clamp screws.
Get this right now, since it's a lot harder, if not impossible, to get your eye to the RA axis polar finder after the telescope tube is mounted on the head.
TIP - if you have a web-can that you use for auto-guiding, see if you can find a way of also mounting it to the polar scope eyepiece .. 'live view' makes a huge difference to polar alignment = it's a lot easier to adjust left/right & latitude whilst not kneeling down looking through the polar-scope eyepiece
Now mount the telescope tube & counter-weights and swing it around to it's 'alignment' position and adjust it's position until Polaris is centred - and then lock the 'scope.
TIP - when mounting the 'scope it should be balanced (in the mounting rings and against the counter weights) with the entire set-up that you intend to use that night (e.g. 90 degree mirror, Barlow, eyepiece projection & Camera) attached.
Finally, check the scope's own finder is centred on Polaris (and adjust the finder mount as necessary).
4) Don't waste time on un-necessary NCP Polar Alignment
For planetary imaging (or auto-guided imaging), Polaris is 'good enough' = web-cam / movie imaging for planetary takes lots of short exposures (so there is no time for 'star trails' to form) and (so long as you avoid hour long exposures) auto-guided mounts will keep 'smears' to 1 pixel (or less)
For long exposure (DSI) photography, if you are NOT using auto-guiding, you should now perform a final adjustment by moving from Polaris centred to NCP centred.
Starting with everything 'locked' on Polaris, you now make a final tripod head position adjustments. This is done whilst looking through the polar axis finder scope and using the head left<>right and latitude adjustments.
Ideally use your mounts illuminated / cross hair polar axis finder. If you can't reach it, use an illuminated cross hair eyepiece in your telescope. If you don't have one, it might just be possible of offset from Polaris to NCP using the telescopes own finder-scope. Remember to offset using the MOUNT HEAD left<>right and latitude screws (and NOT by moving the telescope tube). Your tracking should now be 'spot on'.
TIP - cross hair eyepieces, especially illuminated ones, can be expensive (£50 is typical). If you are confident of your DIY skills, it's entirely possible to modify a 'spare' eyepiece (high power is not required = 20 mm is ideal). The cross-hairs have to be fitted at the 'focal plane' of the eyepiece and the (red LED) illumination set to shine 'down' on the cross-hairs. The usual way to fit the cross-hairs is to create a 'ring' that can be inserted into the eyepiece and it's position adjusted (many eyepieces have 'steps' at the focal plane). Depending on the thickness of your eyepiece 'walls', an off-the-shelf glass reticle may do the job. The LED will require a hole drilled into the side of the eyepiece (a tiny switch & watch battery container can be epoxied to the side).
How to check your tracking ?
One way to check is to use the Drift Method = manually swing the scope to centre on some bright star near the horizon (the further from North is the target star, the 'faster' it will seem to 'move') and engage the drive .. if the target star 'drifts' over a few minutes, then the most likely problem (assuming you offset from Polaris to NCP in the correct direction, that the drive is engaged & not slipping and your batteries are not flat), is that the tripod mounting head is not 'level'. This can only be fixed by going back to adjusting the tripod leg heights.
Software exists that can use your camera / CCD to assist you in NCP manual alignment using the 'drift method'. One example is WCS (which costs 21 Euro but does have a 30 day 'free trial') which works on any star (so even if Polaris is 'out of view' - so long as you start with the RA axis pointed 'approximately north'). Since it supports any camera that installs as a Windows device (or a Meade LPI or an 'ImagingSource' (IS) camera) it should work with the Canon 350D 'live view' output.
Another way to check alignment, starting from NCP, is to invoke the scopes own computer controlled GoTo 'set-up' auto-alignment process. When the scope moves to each of it's chosen 'alignment' stars, that star should be EXACTLY centred in the telescope field of view (again, a cross hair eyepiece helps a lot).
Note - if the target star is only slightly off centre, you might be tempted to 'adjust' on to it and continue with the GoTo 'auto-align' process. This will be OK for normal viewing but, if you intend to do any long exposure (Deep Sky Object) imaging, you should really correct whatever caused the error, especially if it is an 'out of level' tripod head mount.
A small drift over half an hour is to be expected - this is due to accumulated mount/drive gearing errors and you can use 'Auto-guiding' to compensate during imaging.
Can you use a (cheap) Meade mount for long exposure DSO imaging ?
Yes, however whilst the older Meade mounts (LXD55 etc) are easily within the grasp of the 'low end' (and small cost) Astrophotography 'wannabee', it is generally accepted that for any reasonably long exposure (> 10 minutes i.e. Deep Sky Object (DSO) imaging) some effort must be made to improve the 'tracking' of the mount.
Note - for short exposure planetary imaging, absolutely accurate 'tracking' is not an issue - all current generation 'stacking' software can cope with images 'drifting' across the field of view so Planetary imagers can skip the rest of this section.
One way to improve tracking is to measure the mounts gearing errors and create a 'PEC' (Periodic Error Control) table that can be used by a computer (laptop) to send corrections to the Meade AutoStar controller. Unfortunately, creating a PEC is not easy and this approach has been eclipsed by the simplicity of Auto-guiding (especially now that good free / open source autoguiding software is freely available).
How does Auto-guiding work ?
Autoguiding works by observing (videoing) a (bright) star and then moving the telescope in a way that prevents the star drifting. All you need to do is select a star and video it, using a video camera such as a CCD Web-Cam :-)
This involve the transmission of 'correction' signals from a PC (laptop) to the mount controller (eg AutoStar handset) via (typically) a Serial Link control cable. For the Meade AutoStar, the same cable is used to update the handset firmware, so first you should make sure your handset has the most up-to-date version = see Meade site)
TIP - DO NOT go to a telescope retailer and pay $$$$ for the rip-off 'spare part' priced Serial cable. Either make your own DIY Meade AutoStar serial cable** (see here) or buy one from China via eBay.
** A good place to find the Meade controller RJ10 'plug' is to start by cannibalising an old telephone handset cable.
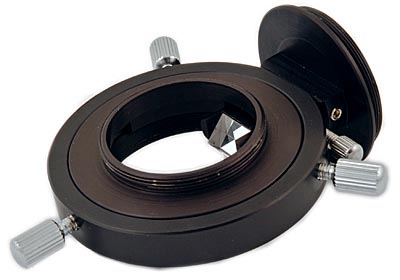
It is possible to use a specialist 'off axis guide mount', where a tiny mirror/prism (see left) splits off part of the field of view for the autoguider CCD camera whilst leaving the rest to be imaged using your SLR
However the problems of simultaneously trying to focus two dissimilar cameras is hardly worth thinking about. The other problem is, of course, that there is no 'guarantee' that a suitable (bright) star to auto-guide on will be anywhere in the field of view anyway.
Finally, unfortunately, the specialist nature of these items means the cost is truly astronomical = even on eBay the best 'Buy it Now' price (Nov 2011) for an 'off axis guide mount' was £250 !!
A simpler (and significantly lower cost) approach is to co-mount a small telescope for the auto-guider. A cheap 'no-name' small aperture refractor (e.g. 4") which can be used for auto-guiding is likely to set you back less than £100
Tip - SO LONG AS your NCP alignment is (reasonably) accurate, the autoguide scope does not need to be 'pointing' in the same direction as the main scope. Since tracking errors cause stars near the horizon to 'wander' the quickest, the autoguide scope is best aimed at a bright star 'near' the horizon. Of course, it's inevitable that you will pick the 'setting' horizon & the 'guide' star you choose will disappear behind some obstacle during imaging !
What autoguiding software do you recommend ?
By far the best software for Autoguiding is the free 'PHD' ('Push Here Dummy') from Stark Labs. All you need is a 'streaming' image feed from the CCD Web Cam and a means of transmitting the correction signals back to the Meade controller.
Some alternative (also free) software (which I have not used) is Guidedog (ASCOM) and Guidemaster (ASCOM as well as direct support for LX200 mount). Quite a lot of 'paid for' software exists, however none beats PHD for easy of use (and why pay for worse software ?)
What computer (Hardware) do you need ?
For autoguiding with the Meade AutoStar controller, you use the Serial cable, so need a Serial Port. Those blessed with older laptops will have both a Serial and Parallel ('printer') port, as well as 2 or more USB ports. One USB port will be needed for the CCD camera (direct or via a PAL video RCA feed to USB converter 'dongle') and the Serial port will be needed to communicate corrections to the Meade controller.
Tip = this leaves the parallel port free for the DSLR (imaging camera) shutter control (see later for a cable diagram).
What if my Laptop has no serial Port ?
If yours is one of the newer laptops without any serial port, you will need a USB to serial adapter. eBay is a good source, however you need to be aware that not every adapter generates 'real' serial (RS232) signal levels (+/-12v).
How many ports will I need ?
Typically, 3. One USB for the CCD guide camera video feed input & 2 Serial adapters = one serial for the autoguide control & one serial or parallel for camera shutter control.
If your laptop has only two USB ports, dedicate one to the CCD guide camera feed and use the second with a USB hub to connect the USB<>Serial adapters.
Tip - to avoid the use of a hub, the camera shutter control can be performed by a 'stand-alone' multi-shot timer control unit (these are available from eBay for approx. £20).
Note - planetary imaging will typically NOT require long exposures. Thus auto-guiding may be dispensed with - and if you have a multi-shot timer control for your camera, your laptop can also be left indoors (or at home).
Camera (DSLR) or CCD (Web-Cam) ?
It depends ...
A1. A DSLR is ideal for imaging Deep Sky Objects (DSO). You will need a Camera specific 'bayonet' to 'T ring' adapter. A 2" mounting tube will allow this to be used with a 2" focusing assembly. Although DSLR's can be used with 1.25" focus assembly scopes, you will get significant vignetting at the edges of the DSLR sensor chip. When imaging DSO's such as nebula etc. this is a significant drawback.
Tip - A DSLR can be used with a 1.25" focus assembly for planetary imaging since vignetting at the edges is of no real concern (you will only ever be using the centre portion of the camera's sensor).
Note - if you do use a DSLR for planetary imaging, make sure you use it in 'mirror lock-up mode' (otherwise taking thousands of short exposures will soon wear out your mirror even if the vibration doesn't ruin your shots).
NB/ Many modern DSLR's have a 'movie mode' (some even boast 'HD movies'), however the output will only ever be 'compressed' data (eg mpeg) which is highly unlikely to give acceptable results
A2. The ideal choice for planetary imaging is the CCD Web-Cam. Make sure you operate it in 'uncompressed' (.avi) mode.
Web-Cams have small sensor chips and thus no vignetting problems with a standard 1.25" adapter. However, for planetary imaging, chances are you will be using a Barlow, and perhaps even eye-piece projection. So a 2" tube mount that allows you to enclose a 1.25" eye-piece will be needed. No matter what the set-up, it is highly unlikely you will manage to obtain a magnified image larger than even the smallest the CCD chip area (even when imaging Saturn & it's rings).
Tip - the higher the magnification, the worse the effect any unwanted vibration and atmospheric distortion. To overcome this, you can use shorter exposure times. However, the shorter the exposure time, the worse the SNR (Signal to Noise Ratio) i.e. the more the image will be lost or 'swamped' by electronic 'noise'.
What can I do to improve the image and reduce the noise ?
'Stacking', of course. Modern stacking software will automatically select the best of the images (from an .avi file), but this can only achieve so much. One 'rule of thumb' is that noise is halved (SNR, Single to Noise Ratio, improved) for each doubling of the 'stack' .. so going from 1 to 2, to 4, to 8, to 16 .... to 1024 halves the noise 10 times. But to halve it again from 1024 means going to 2048 ... and another half means adding another 2048 (then 4096 and so on ...).
To improve the SNR (without increasing exposure times) you must increase the amount of light reaching the sensor pixels being used i.e. you must focus more of the available light onto a smaller part of the sensor chip, which means dropping (reducing) the magnification.
Some specialist astrophotography camera's have sensors that support 'binning'. Binning is a process whereby mini-'grids' of 2x2 = 4 pixels can be combined within the chip to generate each output pixel. This is equivalent to 'stacking' 4 images so reduces the noise by 75% (two halves). If your camera supports this mode, by all means experiment with it, however remember that a 2x2 bin reduces your pixel count by 3/4 and is equivalent to reducing the magnification by half
What else can be done to reduce noise ?
Most electronic 'noise' is caused by heat. So reduce the temperature of the sensor chip and the noise goes down.
If you can 'get at' the (sealed back** of the) sensor, adding a simple heat-sink will help and fan cooling will be even better. Note however, if a Peltier Device is used to reduce temperatures below zero, you will then need to worry about condensation.
** unless you like "twinkling star" effects, you won't want to move the air over the front of the device :-)
You may also be able to reduce the power being supplied to the chip. For example, you can reduce the supply voltage to the minimum supported by the chip. If you can 'get at' the Web-Cam chip you may be able to remove power from parts of the circuit that don't need to be energised during exposure (i.e. the 'read-out' circuits).
If you 'turn off' part of the chip, you may end up with temperature variations across the sensor array. You can compensate for this using 'light frames' (of which more later)
For Use of filters, click 'Next >>' (left, in the navigation Bar), otherwise go straight to How to use your DSLR Camera