

Basics of keypad sensing
The 'standard' 16key 4x4 matrix keypad has 4 'column' lines and 4 'row lines', so 8 wires. Each key connects one of the column wires to one of the row wires. To 'detect' which key has been pressed, the 'standard' method is to 'scan' the matrix by outputting a logic value (typically '0') on each column in turn whilst sensing each of the 4 rows looking for the logic value to be returned via a pressed key.
The keys on a 'hex' Keypad are labeled '0' to 'F'. Each key is wired to one column and one row. A typical wiring layout is shown in the diagrams below, however your actual keypad wiring may differ.
The simplistic 'column scan, row sense' approach requires a total of 4 outputs (columns) and 4 inputs (rows), i.e. 8 i/o pins (plus 4 pull-ups, to ensure a '1' is seen when no key is pressed (only needed for PIC's without internal 'weak pulls ups')).
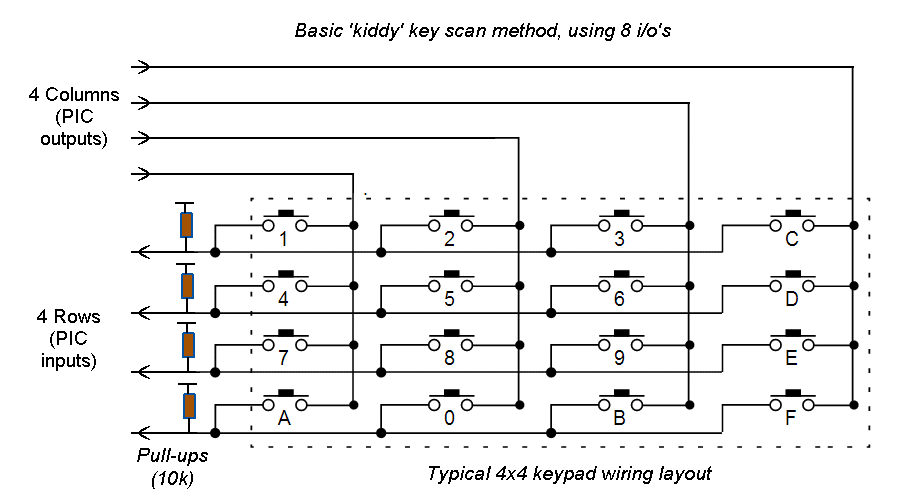
Needless to say, few PIC's have sufficient i/o pins to waste 8 on keypad 'sensing' (not that this hasn't stopped the 'joke' design, left, appearing in just about every 'toy' PIC design handbook you can buy)
Scanning the key matrix in this way can be performed by a simple software loop that takes less than 100 instructions. A 2 MIPS PIC (eg 16F684 using the internal 8MHz OSC) could thus scan the keypad 20,000 times a second !
Since the 'average' human would be hard pressed to type at even 10 keys a second, we plainly have lots of spare CPU cycles. What we don't have in the average design is plenty of PIC i/o pins to spare - and for sure few will want to waste 8 pins on sensing only 16 keys. So how can we use 'clever' software to reduce the i/o pin count ?
Key scanning using one i/o pin !
Many PIC's have an internal 8 or 10bit ADC that can be 'assigned', on the fly, to 'sense' the voltage on one of many (or even most) of the i/o pins. Assigning one such i/o as the 'sense' pin, adding a pull-up resistor and then wiring the rows and columns to different resistor values, a 'voltage divider' is formed when a key is pressed. Which key is pressed then becomes a matter of sensing which of the 16 possible divider voltages is present
The key 'matrix resistance' will vary between 'infinity' (no key pressed) and zero (when the key at the junction of the '0R' column and '0R' row is pressed). The matrix resistance forms the Gnd arm of a voltage 'divider' (the other being a fixed pull-up resistor between the sense pin and Vdd).

There are 17 possible states = 16 keys plus 'no key' (Rmatrix = infinity). Key '1' is at the 'top' end (max. Column resistance + max. row) and 'F' is at the 'bottom' end (0 resistance).

When no key is pressed, the sense i/o pin will be pulled-up direct to Vdd (5v). When Key 'F' is pressed, the sense pin will be connected direct to Gnd (Ov).

This means we have to fit 15 keys between Vdd and Gnd (i.e. divide Vdd into 16 steps). Each key should produce a voltage of n/16ths of Vdd, so 'no key' = 16/16ths, key '1' = 15/16ths, key '0' = 1/2 and key 'F' = 0. The 'target' voltage values are shown below :-
              Col3  Col2  Col1  Col0
               c3    c2    c1    c0
Row3   r3    15/16 11/16  7/16  3/16
Row2   r2     7/8   5/8   3/8   1/8
Row1   r1    13/16  9/16  5/16  1/16
Row0   r0     3/4   1/2   1/4    0
I started with a sense pull-ip of 3k3. The voltage on the sense pin (Vs) = Rmatrix/(Rmatrix+3k3). Re-arranging we get Rm = Vs*3k3/(1-Vs).

The column resistors can be calculated by applying the formula to row0 (where R = 0 ohms, so Rmatrix = Col resistor).
Col1 (Row0) = 1/4, giving c1 = (1/4*3k3) / (1-1/4) = 1k1
Col2 (Row0) = 1/2, giving c2 = (1/2*3k3) / (1-1/2) = 3k3
Col3 (Row0) = 3/4) giving c3 = (3/4*3k3) / (1-3/4) = 9k9
The PIC data sheet recommends keeping the ADC input resistance to 10k or less, so funny how this works out :-)
The row resistors are calculated from Column0 (0 ohms), giving us Row1 = 1/16, r1 = (1/16*3k3) / (1-1/16) = 220, Row2 = 1/8, r2 = (1/8*3k3) / (1-1/8) = 470 and Row3 = 3/16 r3 = (3/16*3k3) / (1-3/16) = 760
ADC solution
However using a 5% (E24) resistors with 10k for c3, means the Row resistors (r1-3) must each differ by more than 500 ohms (each row has to exceed any inaccuracy in the column) !
Changing r1 to 500 ohms means c1 ends up as 80k = but then 5% of 80k means r1 has to be 2k !!! Plainly we have a problem. The only solution is to drop the 'target' 1/16ths voltage values. A 10 bit DAC sensing 16 values would have 64 steps between each value = way more than necessary. Allowing different 'gaps' allows more resistor variation.
Eventually I ended up with a 4x4key-Rmatrix spreadsheet. This 'simulated' the effect of the whole matrix on the sense i/o pin so I could change any of the values (including the 'sense' pull-up and even the r0, c0 '0 ohm' assumptions). After much playing around with resistor values, I ended up with a 4k3 pull-up and resistor values from 7k5 to 560R.

This reduced the smallest step gap to 24 (for key '7' to 'A'), with a maximum (key 'E' to 'F') of 168.
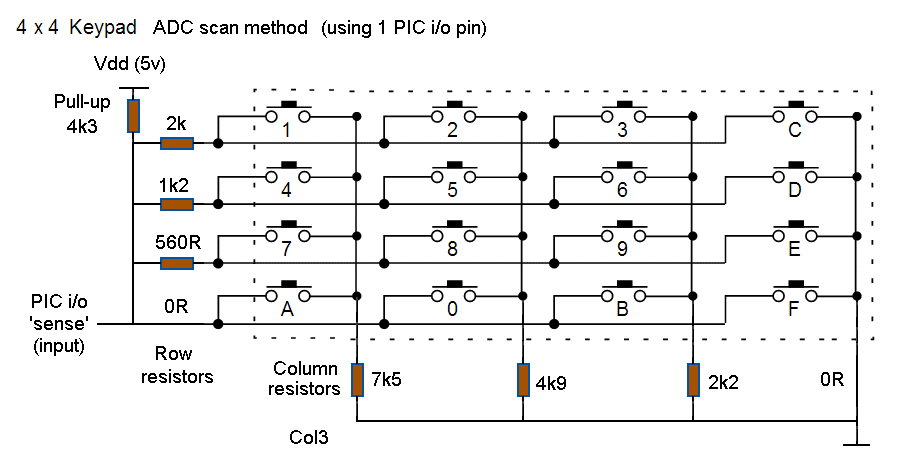
My final resistor 'set' has a 4k3 pull-up and :-
Column resistors of 7k5, 4k9, 2k2 and 0R with
Row resistors of 2k, 1k2, 560R and 0R.
With the above values and ADC Vref of 3.5v, the smallest 'step' gap (10 bit ADC) is 24. 'No key' = 5v and this is guaranteed to cause ADC 'overflow'.
Using a 10bit ADC and Vref = 3.5v, the expected counts are :-
1006 900 722 464
 978 857 645 319
 953 818 571 168
 929 778 495   0
Using E24 values, 5% of 7k5 is 375 ohms, so the minimum row 'step' of 560 should be 'detectable'. However, when building your own ADC key-scan solution, I would still recommend measuring your actual resistor values and entering them into the spreadsheet. The actual expected ADC values can then be programmed into the PIC (rather than using the spreadsheet 'defaults').
If your PIC doesn't have an on-board ADC
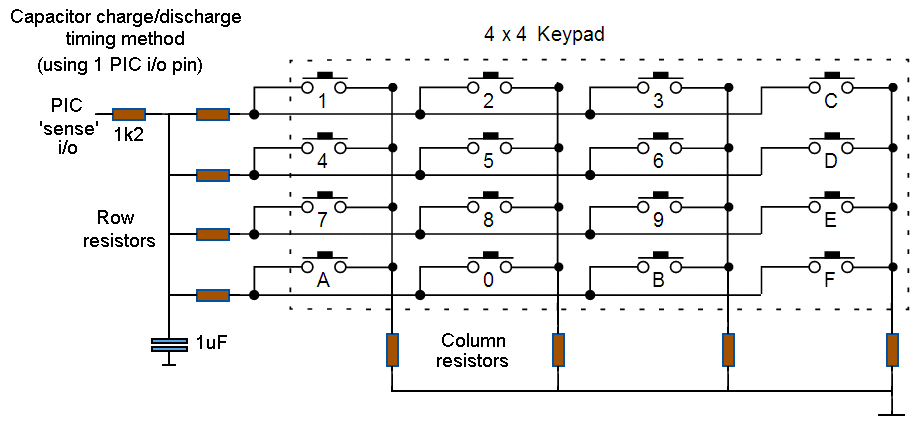
Many basic PIC's have no Analogue to Digital Converter circuit. Can you still get away with a single i/o pin ? Yes = by using 'charge/discharge threshold detect'
This approach works by wiring a capacitor between the sense pin and the key-matrix. The PIC then has to detect how long a pressed key takes to charge (or discharge) the Capacitor (to some threshold)
Ideally, for maximum accuracy - and thus reliable 'which key' detection - you need to use a PIC with an 'analogue comparator' circuit. Fortunately, almost all PIC's have one or more 'comparator' circuits along with an internal voltage reference that can be used as the 'threshold'.

Even if your PIC has no 'analogue' capability, you can 'cheat' by using a digital input and timing how long it takes to 'crossover' from '0' to '1' (or 1 to 0) when a switch is pressed.
Charge up to Hi threshold
The key resistor matrix is wired between 5 volts and the capacitor. When a key is pressed the capacitor starts to charge up via the resistors, the total value of which will determine how fast it charges. A PIC i/o pin is wired 'direct' to the capacitor - it then 'times' how long it takes for the capacitor voltage to reach the logic Hi ('1') threshold voltage
The same 'sense' i/o pin will be used as an output to discharge the capacitor (so it's voltage always starts from '0'), so an in-line resistor will be needed (assuming a 4mA 'sink' limit from a fully charged cap. (5v), R(in-line) will be 1k2 - note this also allows one key to be '0' ohms (i.e. wire the cap. direct to Vcc giving a 'zero' charge up time)

The matrix resistors will need to be chosen so the 'charge up time' is significant compared to the PIC 'sense' timing steps (i.e. OSC period).

A further issue is that when a key is pressed whilst the PIC is holding the cap. in the 'start' state (i/o Lo) the cap. voltage will be dragged higher due to the voltage divider formed between the PIC i/o Lo to in-line resistor to Cap, and then via the key resistor to Vcc. This will reduce the time taken to reach the '1' threshold, especially for low values of key resistance.

Detecting the difference between 4 pins should be 'easy' (especially as one is '0', so you only need 3 resistors - remember 'no key' = open circuit = 'infinity')

8 keys (7 resistors) should also be possible, although 16 (15) may be a 'step too far' (it's hard enough with a 10 bit DAC :-) )
Even trying to 'sense' 8 keys/switches required the use of SPICE simulation to choose a suitable capacitor and the resistor values
NB. When running the SPICE simulation, don't forget to include the i/o pin 'leakage' current, otherwise you van be misled into using resistor values in the mega-ohm range (too high a value means the capacitor never charges up)
One problem with the above approach is that the 'threshold' voltage for a '1' is relatively 'low' = 2v. Since the 'starting' voltage (i/o output Lo) is 0.6v, the 'charge up' gap is only 1.2v = which means quite high capacitor and resistance values are needed to give a significant 'charge up' time. Leakage currents limit the values making it had to detect more than 8 keys or so.
Discharge to Lo threshold
Wiring up the key resistors on the Gnd side of the capacitor leads to a bigger voltage differential, as the PIC charges the capacitor to a 'Hi' state and then senses how long it takes the key resistor to discharge it to a 'Lo' state.
For example, a 1uF cap discharged via a 10k resistor (to Gnd) will take about 17mS to go from Hi of 4.3v to Lo of 0.79v (about 34,000 CPU cycles :-) )
PIC i/o 'Hi' is Vdd-0.7, so (for 5v) 4.3v. The 'Lo' detect threshold is 0.8v (0.2v if an i/o pin with Schmitt-trigger input is used).

This increases the 'voltage differential' from 1.2v to at least 3.5v (almost 3x) - which reduces the capacitor/resistor values for a 'significant' time to threshold

Note the same in-line calculation = 1k2 limits the 'charge up' current (into a filly discharged cap.), plus one key can still be '0' resistance (i.e. wires cap. to Gnd) = time 0.

Note also that as soon as a key is pressed it reduces the capacitor 'start' voltage (by forming a voltage divider from Gnd with the PIC i/o 'sense' in-line resistor to 4.3v (PIC output Hi)) = however this actually helps because a higher resistor (longer discharge time) starts at higher voltage !
SPICE simulation is recommended to get actual working values, however I've put together a 'quick and dirty' Lo threshold spreadsheet to get some idea of the values involved
The spreadsheet assumes the Capacitor 'start voltage' is defined by the voltage divider formed by the key Row+Column resistance and the PIC 'sense' i/o in-line resistance (1k2), ignoring losses. Note that sufficient time has to be allowed to 'fully charge up' the cap. before starting a measurement (off the cuff, with a 1uF cap. this will take about 1,000 CPU cycles)
Using a 1uF cap. with various Row+Column resistors between 1k and 10k, it takes between about 1,800 and 32,000 CPU cycles (at 2MIPS) to reach the threshold (ignoring losses).
The difference between the lowest resistance and the highest is about 30,000 CPU cycles, so a quick estimate of the 'key to key' difference is 30,000/16 = 1,875 cycles

Even though the difference won't be 'linear' from one end to the other, detecting which of 16 keys has been pressed should be quite easy !
Note that this circuit has the advantage of consuming 'zero power' when the keypad is not being 'sensed' (or when no key is pressed) and minimal power (just enough to recharge the Cap. after a key is found) in operation, making it a good approach for battery powered systems.