The NiMH UPS
Pi distributors have offered a number of 'UPS' style 'hats' for the Raspberry Pi, however most are 'jokes' containing non-rechargeable batteries (not included) for outrageous amounts of money. A typical offering from CPC was listed at over £26 and din't even include a 'normal' 5v Pi power supply !
I thus determined to build my own UPS, and set myself a 'target' cost goal of less than half the CPC price
What's neded for a real UPS ?
1) a battery pack - rechargeable, of course (unlike most of the joke UPS 'hats' mentioned above)
2) a 5v regulator (to supply power from the battery to the Pi)
3) a mains power 'block' (not included in the CPC "HAT", nor with most other vendors offerings) that can be used both to power the Pi 'normally' as well as to recharge the battery pack after mains loss (so if the Pi uses 1A and you want 1A recharge current, then you need a 2A power block)
(+) Can this approach be scaled up to a PC UPS ?
Target cost
My initial aim was to come in at no more than half the cost of the CPC 'solution' (i.e. half of £26). However I'm building a 'real working system' (whilst the CPC joke doesn't even come with batteries let alone any sort of mains power block). So, to compare 'working solutions', the cost of some non-rechargeable batteries and a Pi PSU block has to be added to the CPC 'bundle', which brings the CPC total to at least £31.39. Half of this, rounding down, gives me a 'target' of 'less than £15'
Basic design
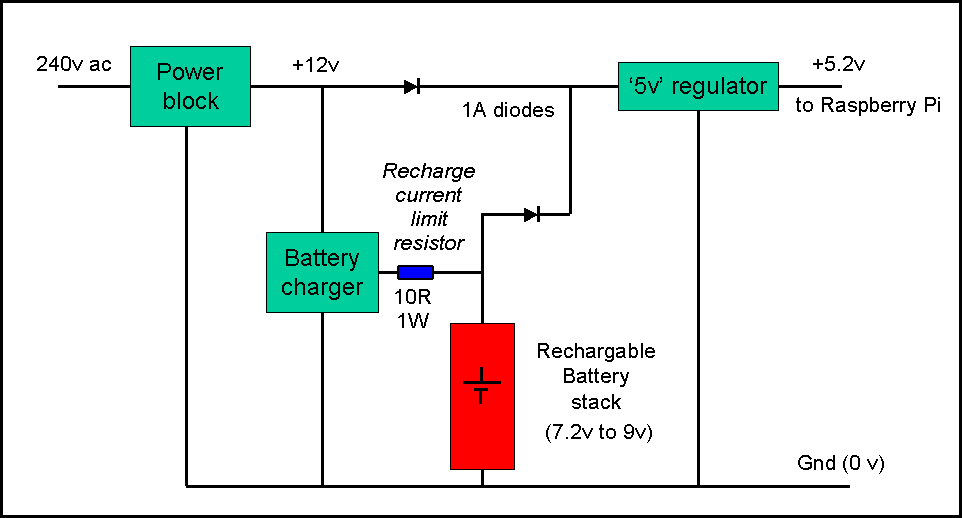
The 'mains power block' would have to deliver a high enough voltage to recharge the batteries. These in turn would have to deliver a high enough voltage to drive the Pi 5v regulator. To keep the costs down I would use 'standard' parts, so the mains power block would be 9v or 12v. Working backward from the Pi (5.2v) to regulator drop-out (typically 2v) and allowing for 1v diode drop gave me a 8.2v as the minimum battery voltage. Adding the battery recharger drop-out (2v) got me to 10.2v - which ruled out a 9v input - and hence the 12v input circuit shown below :-
In the above, the Battery Charger only operates when the +12v is present. Plainly the Battery Charger recharging voltage must be lower than +12, so the Battery Stack voltage must be less than that (no higher than about 9v).

After the mains power is lost the Battery Stack will be used to power the Pi and it's voltage will start to drop. The longer it can keep above the 5v Regulator 'drop out' voltage the longer it will power the Pi. So using more batteries (and/or using LDO (Low Dropout Voltage) 5v Regulator) can extend the run time but at a higher cost.
Next we have to decide the size (i.e. do we use AAA, AA or bigger) and 'capacity' (mA-hr) of the batteries . The higher the capacity, the longer the run time, but the higher the battery cost. Plainly building my own UPS will involve quite a few 'run time' V's 'cost' trade offs
Build cost
Everything depends on the rechargeable battery pack voltage, and this is set by the 'drop out voltage' (the point at which the power fails because the battery voltage has dropped too low).
I started by looking at a 6 cell rechargeable battery pack (to keep the cost down) giving me 6x1.2 = 7.2volts. To use this I would need a Pi voltage regulator with a low drop-out voltage. On CPC I found the 'powerpax - p7805-1000 - voltage regulator, 1a, 5v dc', however the cost (£5.50) for what is a simple linear (power wasting) regulator is totally outrageous - so I went off to eBay
I found eBay sellers offer the 7805CV (1.5A) for 99p (postage free). However the 7805 is a 'linear' regulator, and will 'eat up' the battery power by throwing away the 'excess' voltage as heat. So instead I decided to go for a LM317 based 'buck converter' module (still only 99p, post free from Hong Kong) which incorporated both input and output capacitors and was adjustable (allowing me to set a more ideal 5.2v). So, cost of Pi 5v regulator, 99p
However it turns out that the LM317 has a Vdo (at 1A) of 2v (at 1.5A it's 2.25v) ! This means that, if we set the output to 5.2v and the battery stack diode (D2) drops another 0.5v, the LM317 will drop out when the battery pack drops below 5.2 + .5 + 2 = 7.7v ! So plainly we can't start with a battery pack voltage of 7.2v :-)
So, the battery voltage has to be increased. Adding 1 extra battery gives us 7x 1.2 = 8.4v which gives plenty of 'headroom'. Of course this adds an extra battery to the cost.
Could I have chosen a 'Low Drop out regulator' or even a 'DC-DC converter' instead ? - well, maybe, however in 2014 that costs a lot more than that extra battery at £1 !
Mains power
In my first design I directly connected the Mains Power block to the Battery stack = i.e I had no separate Charger. However I quickly realised that this would give me problems with the 'too high' a recharging voltage. Whilst a stack of diodes (each dropping 0.5v) would address this, this seemed rather 'inelegant' (not to mention that the diode drop would reduce as the recharge current dropped so the Battery stack would see higher and higher recharge voltage as it charged up !). So I went for the 'separate charger' approach shown at the top above
<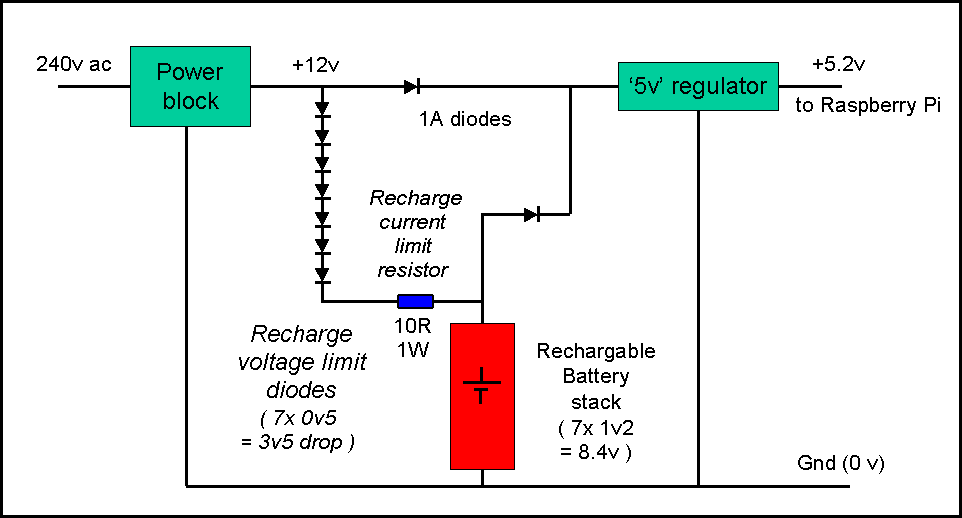
Initial design, not built
The final design had a mains power block that supplied power to a separate Charger (to recharge our batteries after a power fail). This would need to recharge the batteries at the same time as supplying power to the Pi Regulator (assuming we want both battery charging and Pi running after power is restored)).
Of course the Charger output has to exceed the 'nominal' battery voltage (plus the Vdo of the charger). So if the battery pack voltage is 8.4v, then a 12v power-block would allow the Charger 'headroom' of give me 12-8.4 = 3.6v which should be more than enough.

A typical (cheap) Charger can be expected to deliver about 250mA (so would take about 10 Hrs to fully recharge a totally flat 2400mAHr battery stack). If we allow 1A for the Pi, that means a 12v @ 1.25A power block.
However, if we use a non-linear ('buck') power regulator, we can trade voltage for current, so 1A at 12v means (more than) 2A at 5v. This reduces the Power block requirement to 12v @ 1A max.
Actual Pi power usage is quite low, even when the camera is operating (see below), however most applications will have some plug-in USB devices (WiFi etc) that also have to be taken into account - see below for some figures I discovered later (only the Zero and Pi3B are now relevant - the Zero making all others (except the 3B) massively overpriced and thus totally obsolete) :-
8 cell battery ?
I next looked at what would be needed for an 8x battery stack. The formula is then 8x1.2 = 9.6v (battery) - allowing 2v recharger dropout gets us to 11.6v which is rather too close to 12v = so a 15v power-block would be needed. It's only a question of what's the cheapest - from CPC we can have 12v @ 500mA for £5.58 or (next cheapest) 24v at 500mA for £6.90. A quick check on eBay and (sticking to UK sellers) gets us 12v 1A for £3.42 (or £1.79 from Hong Kong). I also found a 15v supply (at 3A) on eBay for £5 !
However one eBay seller was offering a 1A x 12v supply for £1.40 with US power pins (and supporting 110-220 VAC mains input). This power block could be mounted inside a case (along with the Pi) without needing to chop off the huge UK mains plug pins (as the incoming mains cable could be soldered direct to the chopped off US power pin stubs). So for 12v, the power supply comes in at £1.40 !
PoE, not mains ?
At this point I asked myself, "Do I really need a mains power block at all ?"
The most likely use of a UPS is for a CCTV camera. A CCTV Pi is likely to be using power-over-Ethernet (PoE) .. so the 'incoming' PoE 24v could be fed directly to the 'battery back-up' circuits with no need for a separate mains power block at all !
A quick check shows that the LM317 will continue to deliver 1A up to the input/output voltage differential of 22v (if you can keep the differential down to 17v you get 1.5A, or down at 12v, 2A = see pg 5 of the LM317-D.PDF data sheet) = so no problems there.
So, for a CCTV POE, there's no need for a mains supply to the UPS after all. Now back to the design :-
The battery stack
The rechargeable Batteries. These are the highest cost items, since we need 7 x NiMH rechargeable batteries (ideally, with a capacity of 2400mAh). The cheapest from CPC would be 2 packs of 4 at £5.63 ea. = £11.26 (7 singles at £1.82 ea. is much more expensive at £12.74). However the CPC batteries have a measly 1300mAh capacity, almost half of what I was looking for (although even these should be good enough to power the Pi for 1Hr+).
Packs of 2 NiMH batteries can be found for £1 at the well known UK High Street store of the same name - however these are even worse with a rating somewhere between 800 and 1100mAHr (depending on size and what's 'in stock'). So it was off to eBay again.
As I suspected, a pack of 6 'AA' NiMH batteries, each rated at 3000mAh, is only £2.15 (from 'directsales-hk'), post free. I needed 7 cells, and the 'standard' battery box is 6 or 8 - so rather than 6 + 1 extra 'solder tag' battery (for at least £1) I decided to go for a pack of 8 batteries at £3.70 (8x1.2v = 9.6v, fine for a PoE 24v recharger although a bit close to 12v for the mains power solution .. but I could always throw one away)
The 'best price' 8 AA cell 'holder' (arranged 8 x 1, so I could 'bridge' the unused position) I could find on eBay is 99p, giving me a total cost for batteries + holder = £4.69
Where did the 2400mAh capacity requirement come from ? Well, it's rather arbitrary = if we assume we can extract 80% of the rated capacity before the voltage drops too low, and your Pi 'system' consumes 750mA, a 2400mAh stack will keep the Pi running for 0.8 * 2400/750 = 2 1/2 Hrs.
Since UK power cuts rarely exceed 10 minutes, this is total over-kill. Of course in a CCTV application there is always the possibility that a mains power wire has been cut by an intruder - in which case 2 1/2 Hrs should be well long enough to record both entry and exit of the criminals.
NB. In the PoE (power over Ethernet) case, when the PoE cable is cut, Ethernet comms. is lost - so the Pi must 'switch' to recording images to it's internal SDHC card (which makes a 'detecting power fail' function = see below, even more vital)
Now the 'battery charger'**, a LM317. CPC has the LM317T for 33p ! It's only possible to beat that on eBay if you purchase in 'lots' of 10, so CPC it is, cost of charger, 33p.
**If you keep the current down (to the C/10 rate) you don't actually need a 'proper' charger that controls the charging cycle.
Typically, with a charge voltage of 1.41v per cell you must limit the current to 'capacity/10'. NiMH charge 'efficiency' is rather poor - you need to charge for 150% the rated capacity, so for a 2400mA stack, that means 240mA for 15 Hrs (max).

However, if the current is limited to 50mA (or less), at the battery stack rated voltage, you can 'trickle charge' the battery indefinitely, no fancy controls needed (although to recharge a totally discharged 2400mAHr 'stack' will take 1.5 * 2400/50 = 75 hrs !)

To limit the current, a series resistor is required.  Lets say we use 10 ohms. At 50mA (.05A) 10 ohms will drop 0.5v = so limiting to 50mA when a 7 cell stack of NiMH 1.2v batteries reaches 8.4v means the 'charger' voltage must be set to 8.4 + 0.5 = 8.9v (or approx 9v). A 12v mains supply leaves 3v 'overhead' which should be plenty.

To work out the max. charging current we have to discover the 'minimum' battery stack voltage i.e. the point at which the UPS fails. Worst case, the Pi needs a minimum of 4.75v (actually we aim at 5.2v). If the regulator drops 0.5v (more likely it will be at least 1v) and the diode another 0.5v, then the batteries can be discharged down to 5.75v. A Charger set to 8.9V recharging from 5.75v means the 10 ohm resistor will drop 8.9-5.75 = 3.15v, and the recharge current will be 315mA. At this current, the resistor will dissipate 0.99225W = so a 1W resistor will be required (or 2x 1/2W 20 ohm / 4x 1/4 Watt 40 ohm in parallel)

Why bother with the 'recharge regulator' at all ? We could just use a resistor to drop 3.5v instead (at 50mA, R = 70 ohms). Well, yes, but there are two problems - first the '12v' is likely not exactly 12v 'all the time' (so we could end up over-charging the batteries) and second, when the batteries need recharging, 70 ohms will limit the current to 90mA (so the recharge time will be 3 - 4 times longer)
Bits and pieces. You can get a 10R 1W resistor from CPC for 6p (or better, buy a 'pack' of various values from China and pay about 1p each). We still need the 2 diodes. These have to be rated at 1A minimum. D2 (battery to Pi) must be a low 'forward voltage' drop (i.e. Schottky) type = so the 1N5817 (DIODE, SCHOTTKY, 1A, 20V) at 4p each (from CPC) or (if you use a 24v PSU or feed from PoE, to be safe) the 1N5819 (DIODE, SCHOTTKY, 1A, 40V) at 8p each (from CPC) should do the job nicely (both have a fwd drop of about .45v). D1 (power supply input) must also be low fwd voltage if a 12v PSU is used, so I used the same (20v rated) type again.
NB. I check the CPC Bargain corner web page for components every month or so. Recently I managed to get some decent 100uF 6.2v capacitors at only 1p (+VAT) each (although I did have to order these with a few other items to reach a total order of £5 and thus avoid the £2.50 'postage & packaing' charge) !
Total extra parts, 22p (or less)
I noted that the Pi B+ uses a DMG2305UX semiconductor based 'reverse protection' device, which 'drops' less than 0.1v at 2A ! This would be ideal .. so can I get hold of some ? Well yes = but only 3000 at a time :-).
Total cost
My UPS Total cost is 33p + 99p + £1.40 + £4.69 + 22p = £7.63 !
This is well within my £15 'target' and at least 3 times lower than the non-rechargeable joke from CPC and "HAT's" some other well known Pi 'accessory' ('hat') vendors :-)
Building a Pi UPS for less
As of late 2016, with the release of the £4 Pi Zero, even £7.63 for a UPS seems extravagant :-). After building this unit, I found a couple of even cheaper ways to build a Pi UPS = see below (and my Next pages)
1) Using 'buck' or 'boost' DC-DC 'step up' converter
The majority of the cost is in the batteries (£4.69 out of £7.63). This is 'forced' on us by the number required to bring the voltage up to a point where an 'off-the-shelf' regulator can be used to get 5v, and this is governed by the minimum 'voltage difference' (voltage between input and output) and the minimum input voltage supported. However technology moves on, and it has become cheaper to use an 'up converter' (rather than a 'down converter').
The MT3608 is a modern design that runs at 1.2MHz and thus requires only a single small inductor. It operates down to 2v (it cuts out at 1.98v input) with a minimum differential of 1v (i.e. the output must always be at least 1v higher than the input). This means it can operate as a 'step up' converter from a battery voltage that is 1v (or more) LOWER than the output !

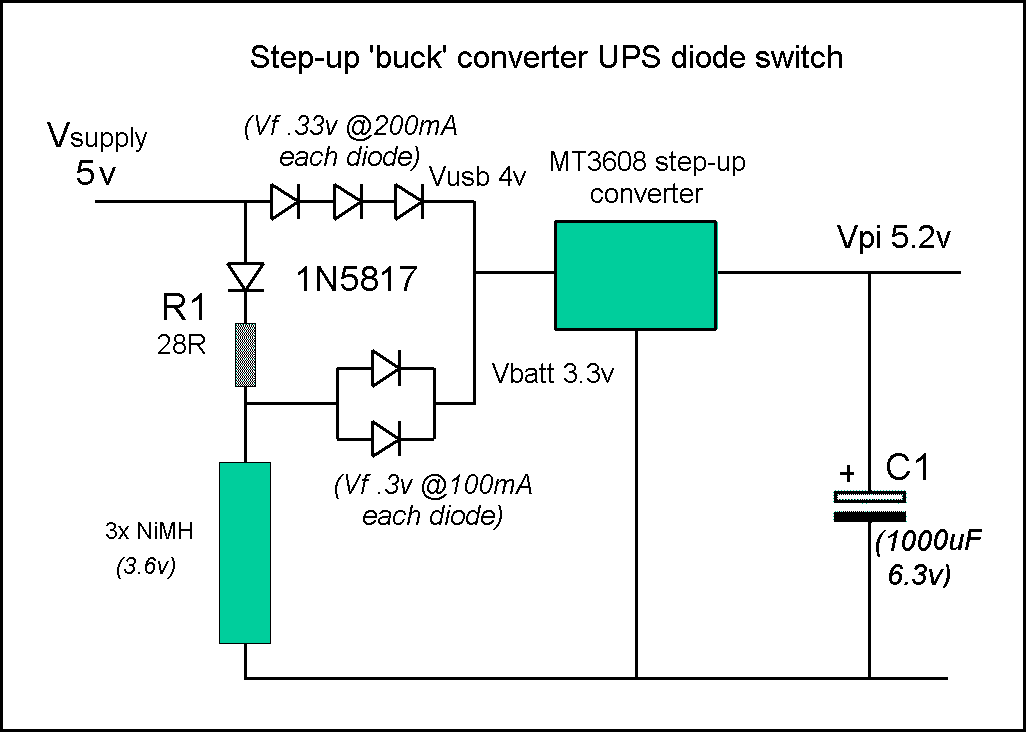
The advantage of using such a converter is that we can cut down the number of batteries to less than half = for a 'target' output of 5.2v, the batteryt voltage has to be less than 4.2v, which is 3x NiMH batteries @1.2v = 3.6v (or about 4.1v when fully charged), to less than 3v when 'flat' (still within the MT3608 min., even after subtracting the 'switch over' diode drop).

Another advantage is that the batteries can be charged (more or less) 'direct' from a '5v' USB mains power supply !

In above = to limit the charge current of the fully charged stack at 3.6v, from a 5v source, the series resistor has to drop 5-3.6 = 1.4v at 50mA. This gives us a value of 28 ohms (70mW).

The disadvantage is (of course) that with less than half the voltage we use more than double the current = so the UPS run time is more then halved (or we have to use larger capacity batteries, which puts the cost up again)
Step-Up UPS circuit
Note the diode switch over circuit (below) has to reduce the incoming Vusb to less than 1v below Vpi (hence the 3x diodes in series) so that the 'step up' (boost) converter will work OK.
Note also, R1, the recharge current limit resistor (together with in-line 'reverse protection' diode, which stops the battery discharging via the charger, when the charger is unplugged)
The MT3608 step-up regulator is 99p, 6 diodes at 4p = 24p and 3x NiMH come in at £1.80. Adding 49p for the battery holder means the whole UPS comes to £3.52 !

However before I could build such a unit I discovered an even cheaper 'PowerBank' based solution, see below
2) At the end of 2016, a well know High Street store started selling a (single LiPO cell) 1700mA Hr. PowerBank for £1 ! After adding a simple diode switch-over circuit, a PowerBank UPS costs than £1.16. Even using a MOSFET switch-over circuit it's possible to keep the cost to less than £2 !
A PowerBank that supports 'pass through' charging (so no need for any external 'switch over' circuit) can be had for about £10, although (as of late 2016) manufacturers are moving over to 'smart charging', which has had a drastic impact on the reliability of 'charge through' (i.e. they now tend to 'glitch' which results in a Pi reboot)

Once the bugs have been worked out, PowerBanks that 'work' more than once or twice before 'giving up' should become available again.
In 2017, the Pi shops have 'caught up' to the existence of LiPO batteries and you can now get a UPS 'HAT' designed to take a (single) LiPO cell battery (not included) for £10 ... to this you have to add the LiPO battery ... for another £10 !!.
A Poundshop PowerBank based UPS is MORE THAN TEN TIMES CHEAPER that these rip-off HATs, so don't be tempted by the hype of the Pi resellers (who are currently 'limiting' their £10 rip-off LiPO batteries to '2 per customer')
Shutting down the Pi
The Pi needs to shut itself down before power is totally lost, ESPECIALLY if it's likely to be 'writing' to the SDHC card (as it will be in the case of a CCTV application when Ethernet comms is lost). For more details see :-
(-) Auto shut down
Shutting down the Pi
Shut down is by software 'command'. So what's needed is some way for the Pi to 'discover' that it's running on batteries and that the battery power is about to 'run out'. This does not have to be very 'clever', just 'reliable' (we don't want to shut down when there's plenty of power remaining and we don't want the Pi to be writing to the SDHC card when the power fails).
If you are using LiPO batteries, then you need to stop using them before they are totally flat (a LiPO battery can't be recharged from totally flat)

Most systems cut the LiPO off at 3.0v - and it's easy enough to wire up a Zener diode together with a 'Op Amp' style comparator that will 'flip the switch' when the battery reaches 3v0
To give the Pi a chance to shut itself down after power is lost, fit a decent capacitor across the 5v supply = if you trigger 'power lost' at 4.9v, then the Pi has until the capacitor drops below 4.75 to shut down cleanly
Pimoroni clean-shutdown code
If you wire your 'low power' detection to any GPIO pin between #4 and #27 (Hi = run, Lo = low power), you can use the existing clean-shutdown daemon from Pimoroni (for more details, see end of this page)
Detecting 'Mains lost'
From this 'How To' reference and the Raspberry Pi GPIO pins spec, it's obvious that the pin you choose to 'sense' the power state can be controlled by software to enable a 'default 0' (internal pull down resistance).
To 'detect' a 24v supply as 'mains-enabled' = 'logic 1', we have to 'pull-up' the pin above 1.3v (or 2v = reports differ) but it's vital not to exceed 3.3v (or at least limit the current to 0.5mA). The internal 'pull down' appears** to be about 50k. For a 24v supply to 'pull up' this up to 2v requires a 24/2x50k = 600k resistor. Current flow into the pin from the 24v would be 22/600k = .04mA (well within the .5mA limit)
**The internal pull down is specified at 40-65k.
So, the cost of 'detect mains lost' is approx 1p (one resistor) !
Ethernet loss as system shutdown
If your Pi is being used as part of a CCTV camera, and has PiPO (or other) battery backup, you might want to keep it running (and saving to SDHC card) even when the Ethernet cable is cut :-)
However if you are only using PoE (so Ethernet out = no power) or if the Pi is unable to funtion without the Ethernet, you ca use 'los of Ethernet' == 'power-down'.
Of cousre this is a lot easier with any model B Pi since they have built-in Ethernet. The Pi B+ and later have 2 LED's on the Ethernet socket itself :-

The Yellow LED is on for a 100-Mbps connection (and this off for 10mbs or when connection is lost) = same as '10M' LED on the B
Green LED is on for 'link established' and blinks for 'link activity' (and off for 'no link') = same as 'LNK' LED on the B

One Pi user has written custom software to monitor the Ethernet 'link' (the B 'system LEDS', which includes 2 Ethernet LEDS, '10M' or '100' and 'LINK' or 'LNK', are all accessible to the Python user, see here)
The 'best' choice on the B+ for 'Ethernet LAN down = power loss' would be to pick off the yellow LED (no modern Ethernet runs at 10mbs)
Detecting 'Low Battery'
For PI's with battery backup, the 'obvious' approach to discovering that 'we are running out of (battery) power' is to monitor the battery voltage 'directly' with some sort of 'voltage detection' circuit (e.g. built around a 741 op-amp and a Zener diode etc. (see image)). An alternative is to use a special 'low voltage detector (LVD) chip' (such as the STM1061).
For example, NiMH battery voltage holds up very well during the discharge cycle with quite a steep voltage 'drop off' as it's capacity is used up, so the 'drop off' point is easy to spot.
An alternative approch is to montor the supply 'input' voltage and compare it to the Pi volts = as soon as input drops below Pi, the '/Pwr off' can be triggered. The drawback to this approach is that quite a decent capacitor is needed on the Pi 5v line to keep the Pi running long enough to shut itself down
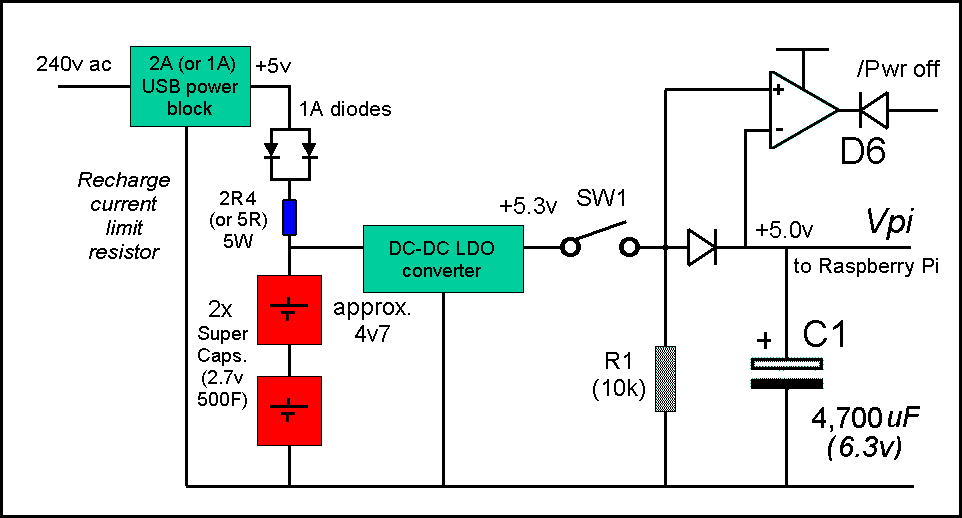
If you can vary the voltage of the Pi 5v supply, adding a single diode in series with the Vpi power line means a simple 'comparator' can be used.
So long as the regulator is supplying power, the '+' input will be higher then the '-' and the comparator output 'hi' = 5v (D6 prevents this reaching the Pi i/o pin which is limited to 3v3 input max.).
When the regulator 'cuts out' and drops below Vpi (which is supported by capacitor C1) '/Pwr loss' goes 'Lo' (0v) and this is passed to the Pi i/o pin via D6.
If you are using LiPO batteries, then you need to stop using them before they are totally flat (a LiPO battery can't be recharged from the totally flat state). The typical cut-off point is 3v0 (so you need to 'trigger' the 'power-off' at 3v1 and have the Pi respond with a 'disconnect' when it shuts down). If you are using a Powerbank, this will 'switch itself off' as soon as it's internal battery voltage drops too low.
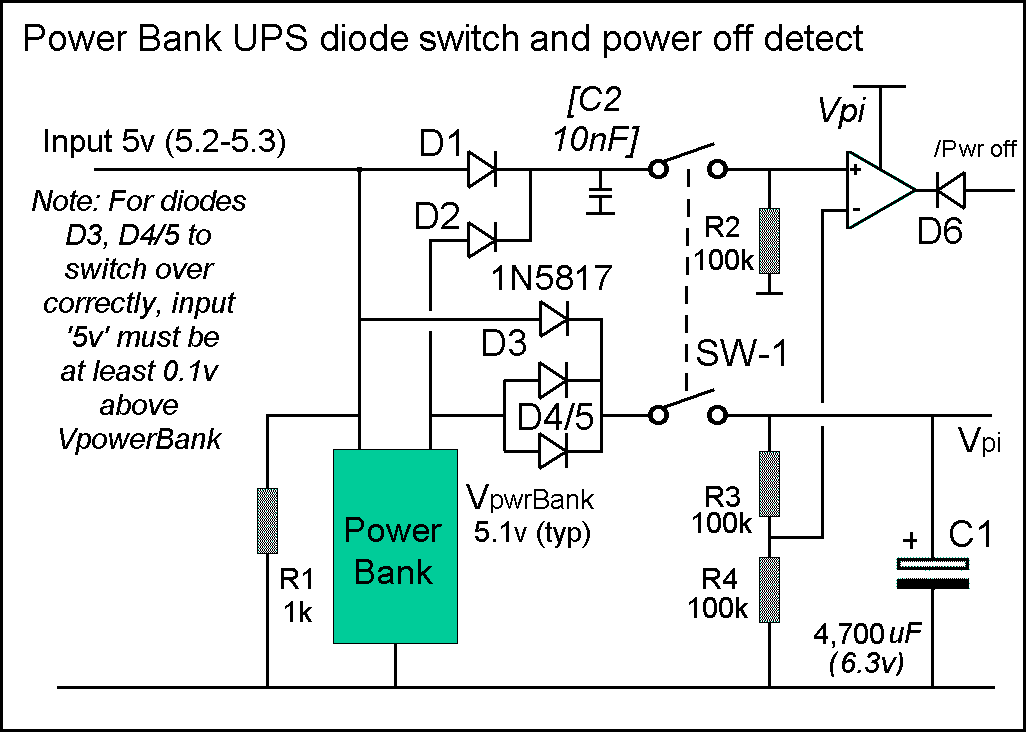
A more complex circuit is needed if you can't change the Pi power input voltage.
The circuit (right) 'monitors' both the supply input voltage and the actual battery voltage.
The comparator output will be Hi (5v) so long as the supply or battery '5v' is higher than the Pi 5v.
As soon as the power supply cuts off (and drops below the Vpi voltage) the comparator output will flip to the Lo (0v) state. Again, the capacitor on the Vpi line has to hold up long enough for the Pi to perform an 'orderly shut-down'.
One of the above approaches should work for all UPS designs.
This note last modified: 4th Jun 2017 15:27.
