

Market Garden - 17 Sept. 1944
This page reviews the Arnhem part of the Market Garden plan. I have built two 'Market Garden' maps for Crimson Fields. The one (on my next page) focuses on the battle in Arnhem itself to secure a bridge over the Rhine (so the British win once a crossing is secure). The second (on the next but one page) focuses on both Arnhem and the relief forces coming up from Nijmegen (so the British only win when the relief forces cross the Rhine).
The Plan

The British, led by Bernard Montgomery ('Monty'), were becoming tired of the losses generated by the American approach, led by US General George S. Patton ('Old Blood and Guts'), of simple direct head-on frontal attacks (anywhere, anytime). So Monty proposed a plan to 'punch through' to Germany in a sort of 'Allied Blitzkrieg'. The ground forces tasked with carrying out the 'Blitz' part of the 'krieg' would be limited to an obvious path (along a single road). So, to prevent the Nazis simply blowing bridges along the route (which could stall the attack before it got going), paratroopers would be used to secure all 4 bridges along the way ('Market') in advance of the main ground attack ('Garden').
The British planners responsible for capturing the final bridge (over the lower Rhine, at Arnhem), having learnt very little (actually, almost nothing) since the Dieppe Raid, over-planned the wrong things (such as the supply and re-enforcement drops, all of which should have been left to the troops on the ground to call in 'when (and especially where) needed') and under-planned the vital things = like achieving surprise (by landing at dawn as close to the objectives as possible), landing in force (on the first day), ensuring the gliders delivered the sort of anti-tank guns needed to take on Tiger tanks and enough 'spares' of any vital equipment (such as ground-air radios, so the loss of a few gliders would have minimal impact on their ability to achieve their objectives).
They also failed to prepare properly - one of the most vital requirements being training with the actual equipment (such as radio sets) they would be using on the day (so the fact that radio range was drastically reduced in woods and towns might have been discovered in time to do something about it, especially as close air-support would be vital in the event that heavy opposition was encountered).
If 'call in support as required' had been part of the Plan, then I like to think that someone would have given a little more attention to the vital need for good communications - but it wasn't and they didn't (see later)
To make things even harder, the Commander-in-Chief RAF Bomber Command, Arthur Harris, refused to divert aircraft from the strategic bombing campaign, to transport troops. So there were insufficient aircraft to fly in the complete Division on Day 1 - instead it would take 2 drops (in fact 3 drops were planned, the 3rd being for the Poles). As a result, the Air-Landing Brigade would have to be used to protect the drop zones and landing zones for the second lift, leaving only the three battalions of the 1st Parachute Brigade to secure the bridge.
 the 101st Airborne Division landing at Nijmegen would need only one lift. The 82nd Airborne Division at Grave required two lifts while the 1st Airborne Division at Arnhem would need three lifts.

Whereas the two American divisions delivered at least three quarters of their infantry in their first lift, the 1st Airborne's similar drop used only half its capacity for infantry and the remainder to deliver vehicles and artillery
The planned Arnhem drop zones
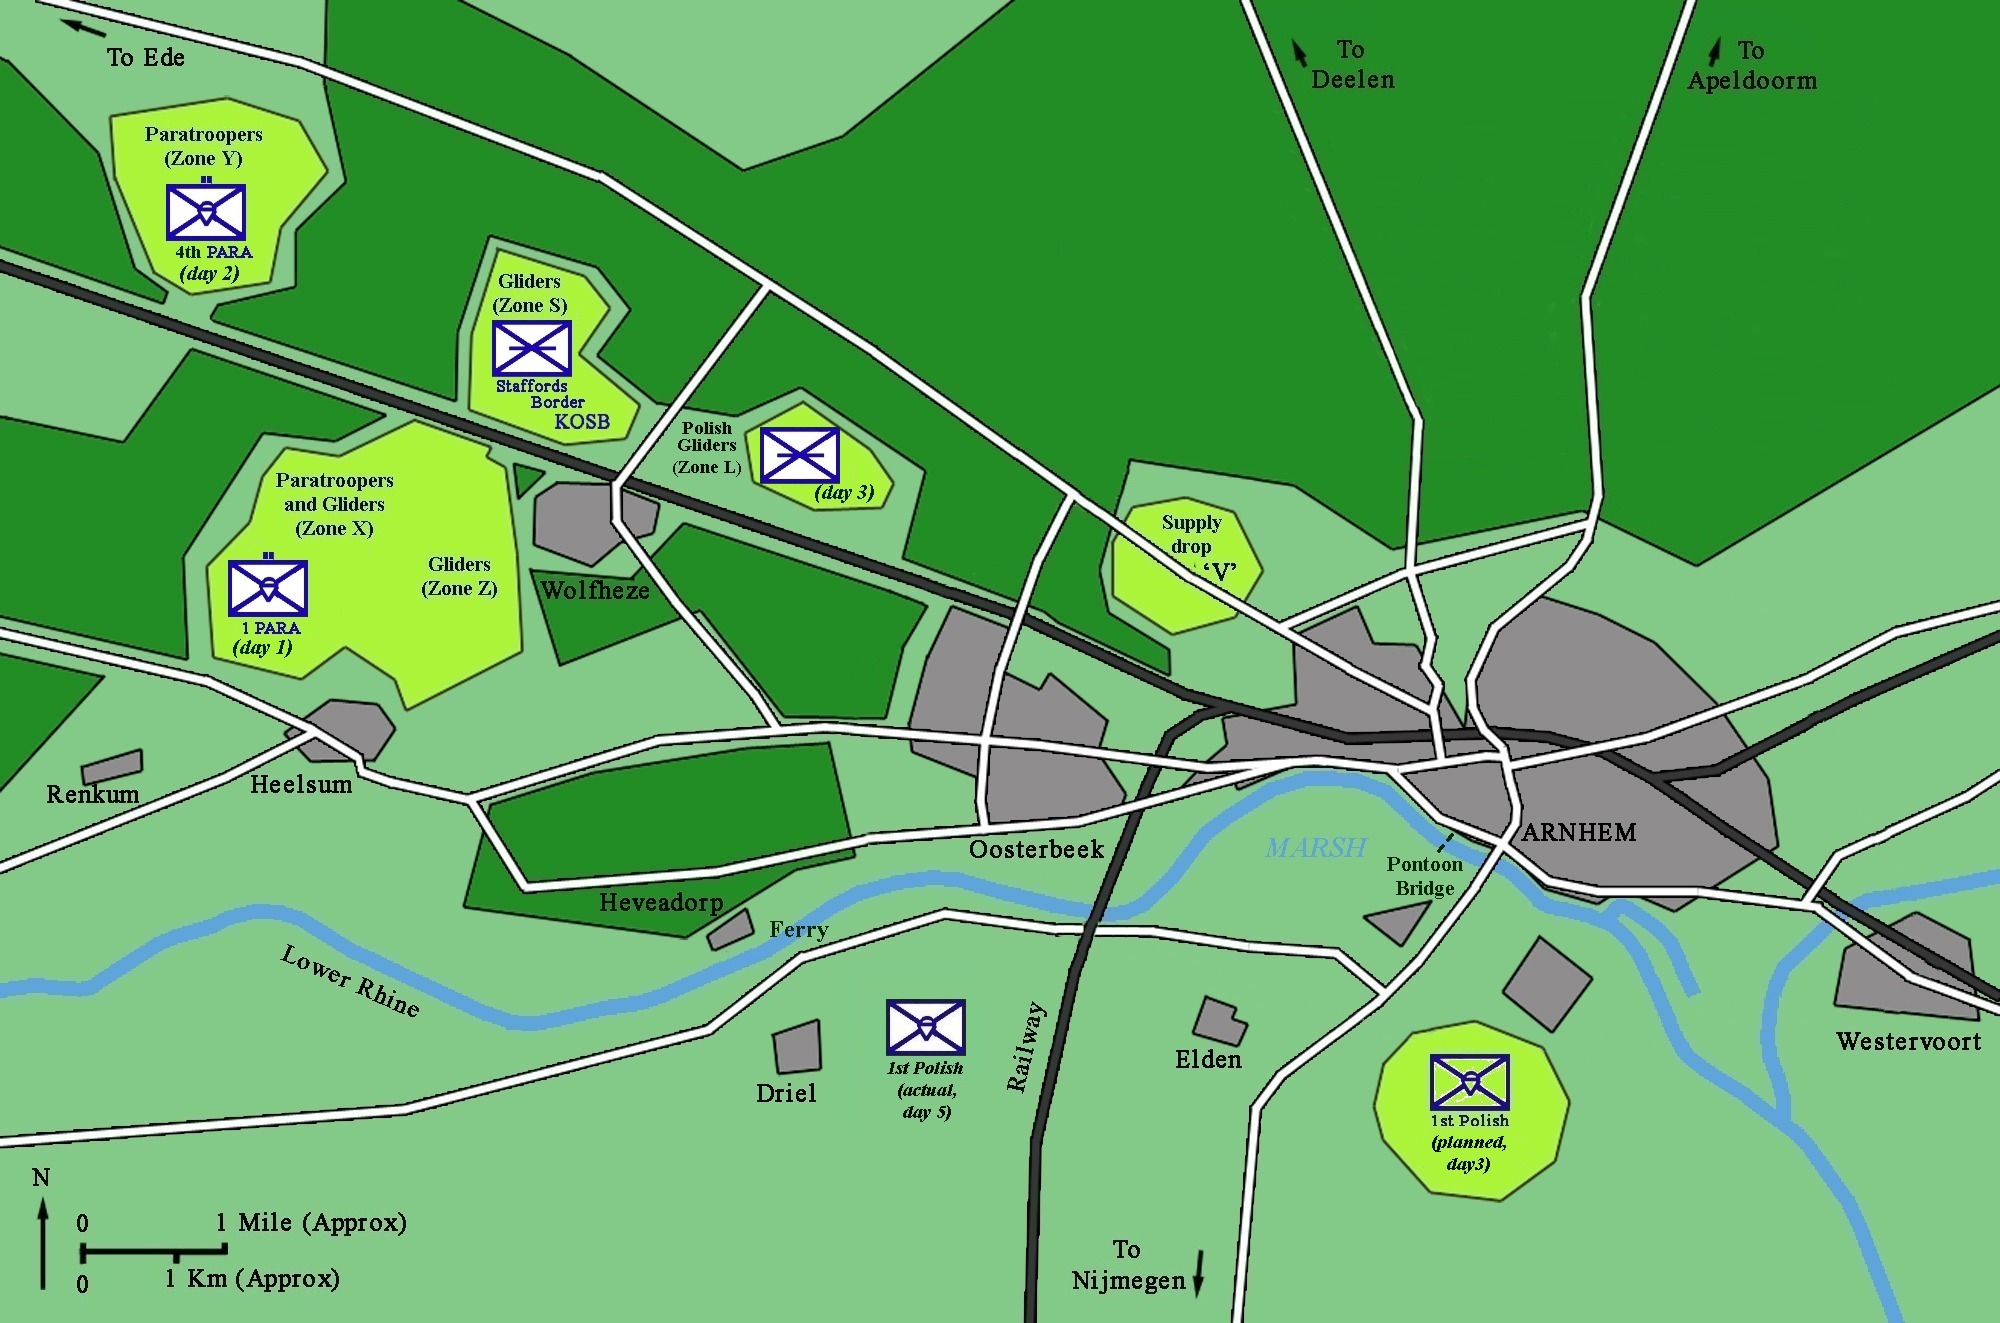
The planners were fearful of sustaining huge losses from anti-aircraft fire from the massive numbers of Nazi Flak guns believed (by the planners) to be in the area, not that these were reported by anyone, nor seen in any reconnaissance photograph (not that there were many of those) and which were apparently 'manned' by units whose existence was 'invisible' to Ultra.
So they decided to drop the British paratroopers well to the west of the town (although north of the river), at least 5 miles away from the main objective, Arnhem road bridge.
Even worse, the landings would be at mid-day and, to reach the bridge, the paratroopers would have to pass Oosterbeek and move through the suburbs of west Arnhem all in broad daylight, so the chances of them reaching the bridge 'undetected' was essentially zero.
As usual, the whole plan lacked even the most basic of 'joined up thinking'.
First, IF huge numbers of anti-aircraft guns existed then they must have some way of detecting the approach of enemy aircraft.
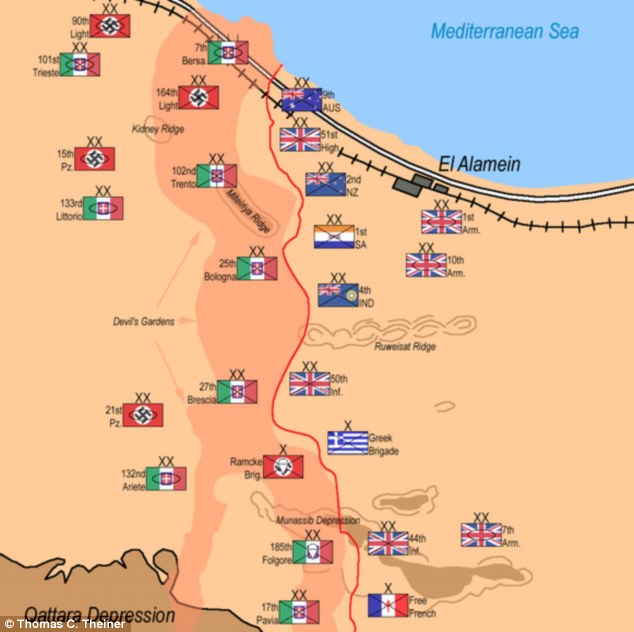
Whilst 5 miles might be too far away for the AA Guns to hit the transports, it would seen inconceivable that the guns would not be 'alerted when enemy aircraft were detected coming so close. Further, all the troops manning the guns would have to be billeted 'somewhere' and it's hard to believe that 'somewhere' would be anywhere but mostly Arnhem (and the nearby towns of Oosterbeek and Westervoort). So either the troops were manning the guns - or they would be in Arnhem and the surrounding area from where they could not fail to recognise hundreds of parachutes floating down out of the clear blue sky and from where they could be quickly organised to oppose the enemy landings.

In either case, how was it possible for the planners to assume the paratroopers would achieve 'surprise' and then simply 'rush (to) the bridge', without encountering any opposition ?

The only possible explanation is that instead of 'thinking like the Enemy' (and assuming the Nazis would react like Nazis) they assumed the enemy would think like them. Since British AA gunners are not foot soldiers, and would not be expected to oppose enemy paratroopers, they assumed the Nazi gunners were the same i.e. they would watch the parachutes float down and do nothing but inform their superiors (and then sit around waiting for orders to pack up their guns and leave).

Monty, of course would have known better - he experienced Rommel's use of the Flak 88 AA guns against his tanks in North Africa, so knew exactly what the Nazi AA gunners were capable of - however since he believed Ultra (and would know the US fears were groundless) he would have seen no point in making plans to deal with them.
Next, to avoid Wolfheze and Oosterbeek, the Plan called for the advanced (Recce Battalion) force to take the north road from their drop sites and 'secure the bridge' whilst the main force would take the roads through the middle and south of Oosterbeek
However this failed to take onto account the likely response of either the Nazis or the townsfolk (who came out to welcome their 'liberators', so clogging the road that movement slowed to a crawl).
The advanced force was expected to take the north end of the bridge against no opposition, and then stroll across the bridge to secure the southern end before dark on day 1.
Again, it seems that no-one expected the Nazis to do anything to stop them.

Further, none of the planners considered the possibility that the Nazis on the south side might decide to blow the bridge when they spotted the British on the northern end (as they actually did with the Rail bridge).
The paratroopers would land first, immediately followed by their 'heavy equipment' (and more men) in the gliders. The lack of suitable glider landing zones meant that the force would be split over an area of some 25 sq. miles (centered some 10 miles to the west of the bridge). Worse was the lack of transport aircraft would prevent the whole force landing in one go.
Despite the British experience of over 2 years of successful night bomber operations, and the paratrooper and glider landings in the dark (at the start of D-Day), the Allied 'Air Lift' seems to have been dominated by the US Air-force, which (at that time) was simply incapable of flying at night.

Taking off after breakfast at 09.45 from the UK, they would be flying over Arnhem at noon and be back home again in time for supper, well before dusk. The limited number of aircraft would only allow 1/3rd of the force to be delivered in each lift, so 3 airlifts would require 3 days to complete.

There were 3 other airlifts taking place on the first day, so lack of aircraft could not be avoided.

However it should have been possible to allocate sufficient RAF aircraft to Arnhem to allow the glider-borne troops (at least 1/6th the total) to land 'next to' (just south) of the road bridge (using the zone that was allocated to the Polish 1st division) at dawn. The US aircraft following up at noon could then drop the paratroopers outside Driel (to seize the railway bridge). The British 'dawn' aircraft would have sufficient time to perform a second mission on the same day bringing in more paratroopers, using both the 'Polish' zones and the 'supply drop' zone V, before dusk.

On 'Day 2', sufficient aircraft should have been 'freed up' from the other operations to deliver the whole of the rest of the force in one lift.
The Plan only expected the paratroopers to hold out for a day or two, because (according to Plan) the tanks of XXX Corps would relieve them on Day 2 (or Day 3 at the latest).
However the Plan also called for the Polish paratroopers (who would be dropped much nearer the south end of the bridge) to be dropped last, on Day 3 ???

Yet (according to plan) 30 Corps should have arrived the day before ???

So what on earth were they thinking of ?? (perhaps, just as Dieppe seems to have been planned as 'training exercise' for the Canadians, maybe this was a 'training exercise' for the Poles ?).

In the event, bad weather delayed the main Polish drop (their gliders seem to have landed north-east of Wolfheze, as planned, on Day 3, but not their main force) so by the time they arrived (day 5), their Planned drop zone south of the road bridge was in the hands of the Nazi forces - so they actually dropped between the Ferry and Rail Bridge - the IDEAL position from which, on day 1, to have taken BOTH these crossings.

Further, IF, on day 1, at least some of the British paratroopers had dropped into the Planned Polish zone (south of the road-bridge) there is a very good chance that they would have captured the entire bridge from the southern end whilst the rest of the British were still forming up and searching for their jeeps or trying to clear the peasants out of the way (although this happened quite quickly once the Nazi ambush opened fire on the 'advanced force' see later) ! However that's another 'what if'
Although the British still hadn't worked out how, since 1939, Nazi Stuka pilots had managed to hit their targets with such accuracy (yep, the Nazi forces on the ground had been 'talking them in'), the Americans, however, had worked it out. So they knew that any 'air coordinators' had to be with the front line troops (and not sitting at their desks in Whitehall). So two American Air-support Officers did go with the British into Arnhem.
Unfortunately the Air-support Officers were plainly new to the job or they might have discovered before leaving that had been issued with the wrong set of radio frequency crystals for contacting the pilots. Their radios were (of course) only short range, so they would be unable to talk to anyone else (outside Arnhem) either. In fact, it turned out that all the Radio sets had their range very restricted by woods and built-up areas, so communication with anyone outside Arnhem was difficult (i.e almost impossible) once they had left the landing zones.

It is, perhaps, of note, that the British Communications Officers had with them a number of carrier pigeons, which either shows amazing foresight or vast experience (by this stage of the war, the British 'squadie' had learnt that 'no Plan survives contact with the enemy' - even if their commanders had not - and some were starting to make provision for the most obvious things to go wrong)
According to Plan, the tanks of XXX (30) Corps were to travel a distance of l00km and relieve the paratroopers by the end of day 2 (or start of day 3 'at the latest').To achieve 'day 2' they would have to move some ten times faster than they had ever done before, and this along a single road where the first breakdown or slightest opposition would be sure to stall them. Even the most optimistic planner should have seen the rather obvious flaw in this requirement ! XXX Corps had spent the last six months advancing at walking pace in a grinding frontal assault and they really had no understanding of Blitzkrieg tactics at all - not that advancing up a single road toward a series of obvious objectives (each of the bridges over the other rivers) would have given them much opportunity to employ such tactics anyway.
Finally, as per usual, once the Plan was 'agreed' by 'everyone', nothing was going to be allowed to upset things = especially not the discovery of 2nd SS Panzer Corps 'refitting' less than 30km to the North East of Arnhem, some 3-4 times closer than the relief forces
In fact there are even reports of the Arnhem planners destroying reconnaissance photos and having their Intelligence Officer forcibly removed from meetings.

Worse was to come = once things had been agreed it seems that the Plan was betrayed to the Nazis !

There is still debate about when and how much the Nazis knew about Market Garden.

One report claims documents were found in a crashed glider of the 101st US Airborne (or, as suggested in the film 'A Bridge too Far', one of the Arnhem force gliders), whilst another report suggests that the Dutch double/triple agent 'King Kong' Christiaan Lindenmans, operating out of Ikes HQ, betrayed details of the 101st Airborne and Polish operations to the Nazis.

If they had known far in advance, one might have expected the Nazis to have made better provision for defending the town, since (in the event) is seems more by luck that the Paratroopers were stopped from taking both sides of the bridge.

Of course as soon as reports of each of the air landings came in, it would have become blindingly obvious to the Nazi commander what the overall objective was (and even more obvious what road the ground force attack would have to take), even without any fore-knowledge.
How it went on the day
The aircraft took off in daylight (at around 9.45am) so was somewhat after noon before the first paratroopers started landing outside Arnhem (12.40pm to be exact). These 'pathfinders' were followed by the rest of 1,2 and 3 Para and the gliders with their 'heavy' equipment (Jeeps, 6pdr anti-tank guns and Bren-gun Carriers), although some of the jeeps needed by the 'advanced force' to 'rush the bridge' never made it (they were 'lost' on the flight over).
The air drop was essentially unopposed and achieved reasonable accuracy with the paratroopers avoiding the roofs and gardens of houses (unlike 2 plane loads of the US 82nd Airborne Division on D Day who had ended up being dropping into trees and houses all over Sainte Mère Eglise the night before the D Day landings, which was perhaps the reason why the Allies had given up the idea of night drops and dawn attacks).
The 'advanced' (or Recce) force (mainly 1 Para) started off, following the railway, directly toward Arnhem and it's road bridge by mid afternoon, only a couple of hours after the first landings. Meanwhile 3 Para took the middle road (via Oosterbeek) and 2 Para the south road (toward Heveadorp) = see map below.
Of course the Nazis reacted like Nazis and the 16th SS Training and Replacement Battalion immediately barricaded the streets and then successfully ambushed the 'advanced forces' of 1 Para (who were 'rushing the bridge' and expecting zero opposition).

1 Para pushed north in an effort to bypass this opposition, only to run into another ambush (prepared by a 'scratch' force put together by Spindler), after which they turned south again to join 3 Para who were still trying to push through Oosterbeek.

Meanwhile, 3 PARA had ran into General Friedrich Kussin, Feldcommandant of Arnhem in his staff car. They opened fire, thereby killing General Kussin, his driver, guard and interpreter.
The route of 2 Para
Only 2 Para took the most direct (and only) route from the landing zones that would avoid built-up areas and might have allowed the ferry and all 3 crossings to be seized, one after the other, in a series of surprise attacks.
So what were the planners thinking of when they sent 1 and 3 Para through built-up area's ??? Their route virtually guaranteed that any surprise was bound to be lost, not to mention it being where the Nazis were likely to set up defences (and where ambush would be easy)
So 2 Para passed to the north of Heveadorp (and it's ferry) and then followed the Rhine river to the south of Oosterbeek and then the rail bridge.
Also, why did the Plan ignore the Heveadorp ferry ? This could have allowed at least some of 2 Para to reach the southern bank, which might have allowed the rail, pontoon and road bridges to all be attacked from both sides simultaneously.

By the time anyone on the British side thought of using the ferry (on Day 5, when the Poles landed near Driel and moved to reinforce the trapped British) it was too late (the Poles discovered it had been sunk, apparently by it's operator, to prevent any future use by the Nazis).
As 2 Para approached the rail bridge, it was blown by the defenders. They then continued along the river through Arnhem and to the pontoon bridge
When 2 Para reached the pontoon bridge, the center section was found to be "missing".

Blowing a bridge is simple enough when the explosives have been pre-positioned - however removing the center section of a pontoon bridge would have taken a lot longer. It's much more likely that the center section had been moved to allow shipping to pass up the river (see the reconnaissance photo taken at the time, right) so it's quite possible that the 'missing' section was to be found simply tied up alongside the riverbank ! However by now it was getting dark, so it's quite possible 2 Para had already walked straight past it without recognising it.

By this stage of the war, with allied air superiority, Axis troop movement was largely restricted to the hours of darkness. So it's likely that the pontoon bridge would have been assembled and 'in use' each night (when the river boats would have been moored), whilst during the day a section would be moved to allow river traffic to take priority. So if the Paratroopers had landed at dawn, there's a very good chance that the pontoon bridge would have been found intact and could have been captured without too much of a fight
Finally, in the late afternoon, 2 Para reached the northern end of Arnhem road bridge to find it intact and undefended !
Whilst the route of 1 and 3 Para took them into direct conflict with the Nazi forces holding Arnhem, the unintended result was that the ensuing battle drew the defenders attention away from the path of 2 Para.

2 Para was thus able to pass into Arnhem unnoticed and take the road bridge without opposition.

In fact, elements of the 9th SS Panzer 'Reece' division had arrived at the road bridge much earlier that afternoon, but finding no-one there they had crossed over and moved on toward Nijmegen !!
So, by the end of day 1, some 750 men and 4 6pdr guns of 2 Para had reached the north end of the road bridge, which they secured during the night. However they were now cut-off as leading elements of the 9th SS Panzer entered Arnhem and moved to block 1 and 3 Para who were still moving through Oosterbeek toward the town. Later on Day 2, 4th Para landed even further away from Arnhem than 1 and 3 - and soon found themselves under attack by the Dutch SS arriving from Ede (to the west).
Remember the 'what if' above ? Well, if the British Paratroopers had been dropped at dawn (and especially if they had been dropped at 'zone V' and the actual and planned Polish LZ's south of the bridges) they could have been at both rail and road bridges whilst the Nazis (and Dutch civilians) were still having breakfast. The gliders could come in at noon to provide the 'heavy' equipment (that would then allowed the Para's to resist 9th SS Recce division). The Poles could then have dropped at dusk on the southern end to finally secure the road bridge ...
In the event, the British holding the north end of Arnhem bridge were unable to take the southern end, however if, according to Plan, the tanks of XXX (30) Corps had arrived the following day all would be OK. However they didn't - instead it was the 9th SS Panzer 'Reece' division who returned from Nijmegen to secure the southern end of the bridge whilst the rest of the 9th SS Panzer started to arrive from the north.
In fact it took 30 Corps seven to eight days just to get from their start line on the Belgium border to Nijmegen, a road distance of about 80km. On average that's about 10km a day, a rather slow walking pace, but that was still quicker than their usual speed and it should be remembered that the Axis forces were doing everything possible to delay them.

One of the mysteries of Market Garden is why the advanced tanks of XXX Corps were then ordered to pause for 18 hours after crossing the bridge at Nijmegen (to 'consolidate' their position) before preparing to press on to Arnhem = by which time it was all too late, with the result that Arnhem and it's vital bridge remained firmly in Nazi hands
The other Allied air-drops managed to capture all of the other bridges intact, which is what allowed XXX Corps, against fierce Nazi opposition, to move as fast and as far as they did
However 30 Corps was still at least 10km short of Arnhem when the paratroops, after holding out 3 times longer than Planned (and twice as long as anyone thought possible), were finally finished off by the end of day 9.
By the end of the operation, the obvious failure to achieve 100% complete success allowed the Americans to get their own way. So the Allies returned to the 'tried and tested' (Blood and Guts) method of simply overwhelming the Nazi forces by attacking them head-on more or less every-time (which, of course, is exactly what the Soviets had been doing ever since Stalingrad (the one exception was at Kursk, where they allowed the Nazis to attack first and waste their tanks on the well prepared Soviet defences - however that's another story))
Just like Dieppe, the fault laid with the Plan, not the troops (although the 18 Hr. halt by 30 Corps at Nijmegen still defies explanation) or the weather** (that other great British 'scapegoat'). Of course, as usual, those 'in charge' blamed everyone but themselves - and, as usual, scapegoats were to be found amongst the 'outsiders' (at Dieppe it was the Canadians).
At Arnhem, most of the blame was aimed at the Polish forces, who were dependent on the British for their very existence and who would be unable to complain. How those in charge 'got away' with this nonsense is beyond me as the Poles were only dropped on Day 5, which was at least 2 days after the Plan had already failed (remember - the forces at Arnhem were to be relived by Day 2 or 3 at the latest = so by Day 5 it should have been obvious that 'things were not going to Plan')

**Note 1.
The adverse weather from the afternoon of Day 3 did play a part, however whilst it delayed the main Polish landings from Day 3 to Day 5, because there was minimal ground support of the troops in Arnhem it had minimal impact on the battle of Arnhem. On balance, the adverse weather was probably to the advantage of the Allies (as it prevented the Luftwaffe making a bigger impact on the battle).
Could it have been different ?
The Plan lacked any sense of urgency - indeed, it was almost as if the Arnhem operation had been planned as a training exercise !
Unlike the hopelessly optimistic planners, I have no difficulty in believing that the Nazi forces in and around Arnhem would be quite capable of organising resistance as soon as the Allied forces were 'detected'. So, rather than give the Nazi's all morning to wake up and have a nice breakfast before dropping the paratroopers on them at lunch time, I will drop the paratroopers at night and in the middle of a massive air-raid. Next, instead of dropping them miles outside town (which gave the Nazi's plenty of time to organise an ambush), I will drop the paratroopers right onto the 4 crossings, both north and south ends, at the same time and with the aim of taking all 8 objectives before anyone can demolish anything and all before dawn. To minimise losses amongst the gliders, these will be landing as soon as it's light enough, i.e. straight after dawn, as close as possible to the crossings
Field-Marshall Walter Model, commander of the entire Army Group B, had his headquarters at the Tafelberg hotel in Oosterbeek. So one task of the first paratroopers landing at Zone V will be to eliminate him and his entire staff at the earliest possible opportunity. Obergruppenführer Wilhelm Bittrich, commander of the II SS Panzer Corps, had his headquarters east of Arnhem at Doetinchem, so is out of reach of the paratroopers (although I will have the US Air-force bomb his HQ as soon as it gets light anyway). Without doubt he will hear soon enough of the landings, so it won't take the 2nd SS long to react.
Indeed, I would expect the Nazi's outside Arnhem to react even without direct orders and with their usual speed (unlike the planners, who were apparently expecting the Nazi's to do nothing for 2 - 3 days). So part of my plan would be to prevent any advanced elements of the 2nd SS from entering Arnhem from the north/east during the first few hours of the battle, when the paratroopers are most vulnerable (i.e before they can dig in and be reinforced by the Glider forces) at the bridges. My plan would be to distract and discourage with a series of massive air-raids from midnight until noon the of Day 1. To further prevent them interfering, the second half of the paratroopers dropping at 'Zone V' would immediately move to mine the roads and dig in on the outskirts of north/east Arnhem. Hopefully the first half, having dealt with Model and his staff, will join them during the night with the Glider forces arriving soon after dawn.
Finally, I would NOT assume that all Nazi forces in and around Nijmegen would remain fixated on the US attack. So, on Day 1, after securing the crossings at Arnhem, I would have my forces dig in and prepare against a possible Nazi attack from the south. On Day 2, I would send the Poles to assist the US forces and XXX Corps coming up from Nijmegen (unless, of course, my forces in Arnhem come under attack by significant enemy forces from the north, in which case the Poles go to Landing Zone V instead)
I accept that there is a risk of 'blue on blue' action (especially with trigger happy US fighters). The RAF bomb at night, the fighters and fighter bombers will fly during the day, however 1 hour at dawn and dusk will be kept 'fighter free' for the transport aircraft. In addition, on the morning of Day 1, if all is going well, the US air-force bombers (and their escorts) will be flying, so the fighter-bombers will be kept away.
So my Plan starts at midnight of Day 1, with a contineous series of heavy RAF bomber raids on the KNOWN positions of 2nd SS Panzer Corps (consisting of 9th SS and 10th SS Panzer Divisions).

As the RAF rains bombs down on the Panzers, 1 and 2 Para would be landing before dawn right next to the actual bridges, whilst the first elements of 3 Para landing at 'Zone V' would attack Model in his HQ with the following elemenbts moving to block the roads into Arnhem from the north and east. Some of the paratroopers at the bridges will also mark the LZ's for the glider landings to follow at dawn. The main Glider Landing Zones would be the actual Polish Zone (south of Heveadorp / Oosterbeek), the planned Polish Zone (just south of Arnhem) and (along with 3 Para) 'Supply Drop Zone V' (this would form the 'blocking force').

Whilst co-ordination might present some problems, one thing should be guaranteed - during the night the Nazis outside Arnhem would have their heads down (whilst Model and his staff are having theirs blown off) so there would have been a very good chance that they would have missed the initial landings.

With 100's of aircraft in the sky, it's to be hoped that no-one outside Arnhem would spot the paratroopers being dropped 'on the town' whilst huge numbers of bombs were being dropped to the north and east of the town. Further, any gliders spotted coming down soon after dawn might well be mistaken for bombers forced down by Flak or the Luftwaffe, especially as the US fighters would soon be arriving to shoot up anything that moves north and east of Arnhem.

At dawn the US Air-force will take over with some 'precision' daylight raids on the 2nd SS (and it's hQ) as the target area. The US bombers would have a fighter escort, although this would be restricted to pilots who could tell the difference between a glider and a ME109/FW190 (so some bombers might well have to go in un-escorted :-) )

Note that the main aim of the bombers is to keep 2nd SS 'occupied' and away from Arnhem. However, if the troops on the ground report elements of 2nd SS approaching Arnhem at dawn on Day 1 (which is possible, since they could have received reports of the paratroopers any time after midnight), the bombers will be 'diverted' whilst their escort will be vectored against 2nd SS (and the fighter bombers scrambled early).

Troops and equipment from the Gliders landing at the actual and planned Polish LZ's will move to reinforce the paratroopers of Para 1 and Para 2 who dropped at Heveadorp (rail bridge and ferry) and Arnhem (pontoon and road bridge).

The most difficult task goes to 3 Para. The first elements will attack Models HQ, the second move off to secure the roads coming into Arnhem from the north and east (where they would dig in, just in case any of 2 Panzer manage to escape the continuing rain of bombs and head toward Arnhem before dawn - and before the US Airforce arrives to stop them), whilst only the third section would remain to secure their LZ. Depending on the threat situation at dawn, the forces landing by Gliders will need to both hold the lZ and move to support the 'blocking force'. These gliders must contain some 17pdrs, which should reach the paratroopers at their 'dug in' positions well before noon (which should be well before any Tiger tanks of the 2nd SS can arrive)

By noon, all the crossings should be firmly secured by well dug in British forces, after which it will just be a matter of holding out against the inevitable Nazi attempts to retake the crossings until XXX Corps arrive. Also by mid-day the US bombers should have provided further distraction (and done further damage) to 2nd SS, however there will be no fooling them any further. So a continuous stream of 'on call' fighter-bomber support will be used to support the ground forces and overwhelm any  opposition from 2nd SS who will be soon approaching the town.

The transport aircraft will perform a second airlift on Day 1. Arriving near dusk, as the fighter-bombers withdraw, 4 Para and more Gliders will arrive. The Gliders would deliver troops and 17 pdrs (which are capable of taking on Tiger tanks) to all 3 LZ's (and especially Supply Zone V, for the blocking force). The destination of 4 Para will be controlled by the troops on the ground (by default, they go to LZ V to join the blocking force). This should mean 3 Para now has enough troops to hold Oosterbeek (and link up with the Paratroopers holding the woods north of Heveadorp).

The reinforcements arriving south of the river (at the planned and actual Polish drop position) would would dig in overnight to hold the LZ's and south side of the crossings against any Nazi forces coming up from the Nijmegen area the following day.

Overnight, the RAF will continue to drop bombs to the north and east of Arnhem (where, it is hoped, the 2nd SS are still trying to recover from the previous raids)

Dawn of Day 2 would see the first Polish Brigade arrival. If all is going well, they will be sent to their planned LZ, after which they would advance south (to take Nijmegen from the North). On the other hand, if Nazi forces are attacking from the north, the Poles go to Landing Zone V instead.

During Day 2, fighter bombers will focus of shooting up anything seen moving west, north and east of Arnhem (unless diverted by the Poles requesting ground support to the south)

There would be one final airlift arriving on Day 2 at dusk, delivering more supplies (and further reinforcements) to any (or all 3) LZ's, depending on the requirements of the troops on the ground.

Since the weather held long enough to allow Air operations until at least the early afternoon of Day 3, a continuous stream of fighter-bombers would be providing real ground support for the first 2 days to XXX Corps.

So there seems little doubt that any opposition would have been overwhelmed and that the tanks of XXX Corps would have crossed Nijmegen bridge and linked up with the Poles by the end of Day 2, and be across the Rhine by the morning of Day 3