

Battle of Arnhem (Market Garden) - 17 Sept. 1944
This game/map is still 'under construction'
Right click and 'Save link as' for steves-Arnhem-v1-set.zip (contains Market Garden Units, Tiles plus both maps, Arnhem-hist-v1 and Arnhem-Steve-v1 (.lev, .src))
See my Market Garden (overview) page for an overview of Market Garden. See my page for a Crimson Fields Nijmegen-Arnhem simulation. For a more detailed account of the Battle of Arnhem, see wikipedia (but note that their diagrams of Arnhem miss out many of the crucial roads, which results in some rather incomprehensible movement by the forces involved)
The Crimson Field battle starts after the paratroopers have dropped. In the 'hist' map, the drops are as per history (and the flawed British plan) whilst the 'Steve' map follows my own ideas (see at end of this page)
BE WARNED - the glider transports are removed at the end of the turn they first appear. If you move to a 'LZ' (Landing Zone) hex, you have plenty of time to 'unload' the troops. IF YOU CHOOSE ANY OTHER LANDING HEX, ANY UNITS STILL ON-BOARD AT THE END OF THE GLIDERS FIRST TURN WILL BE LOST (this simulates losses caused by landing on a 'non-optimal' hex). The same applies to reinforcements arriving by glider (they must land at the remaining LZ hex's on the same turn they appear, or you must unload everything on that turn)
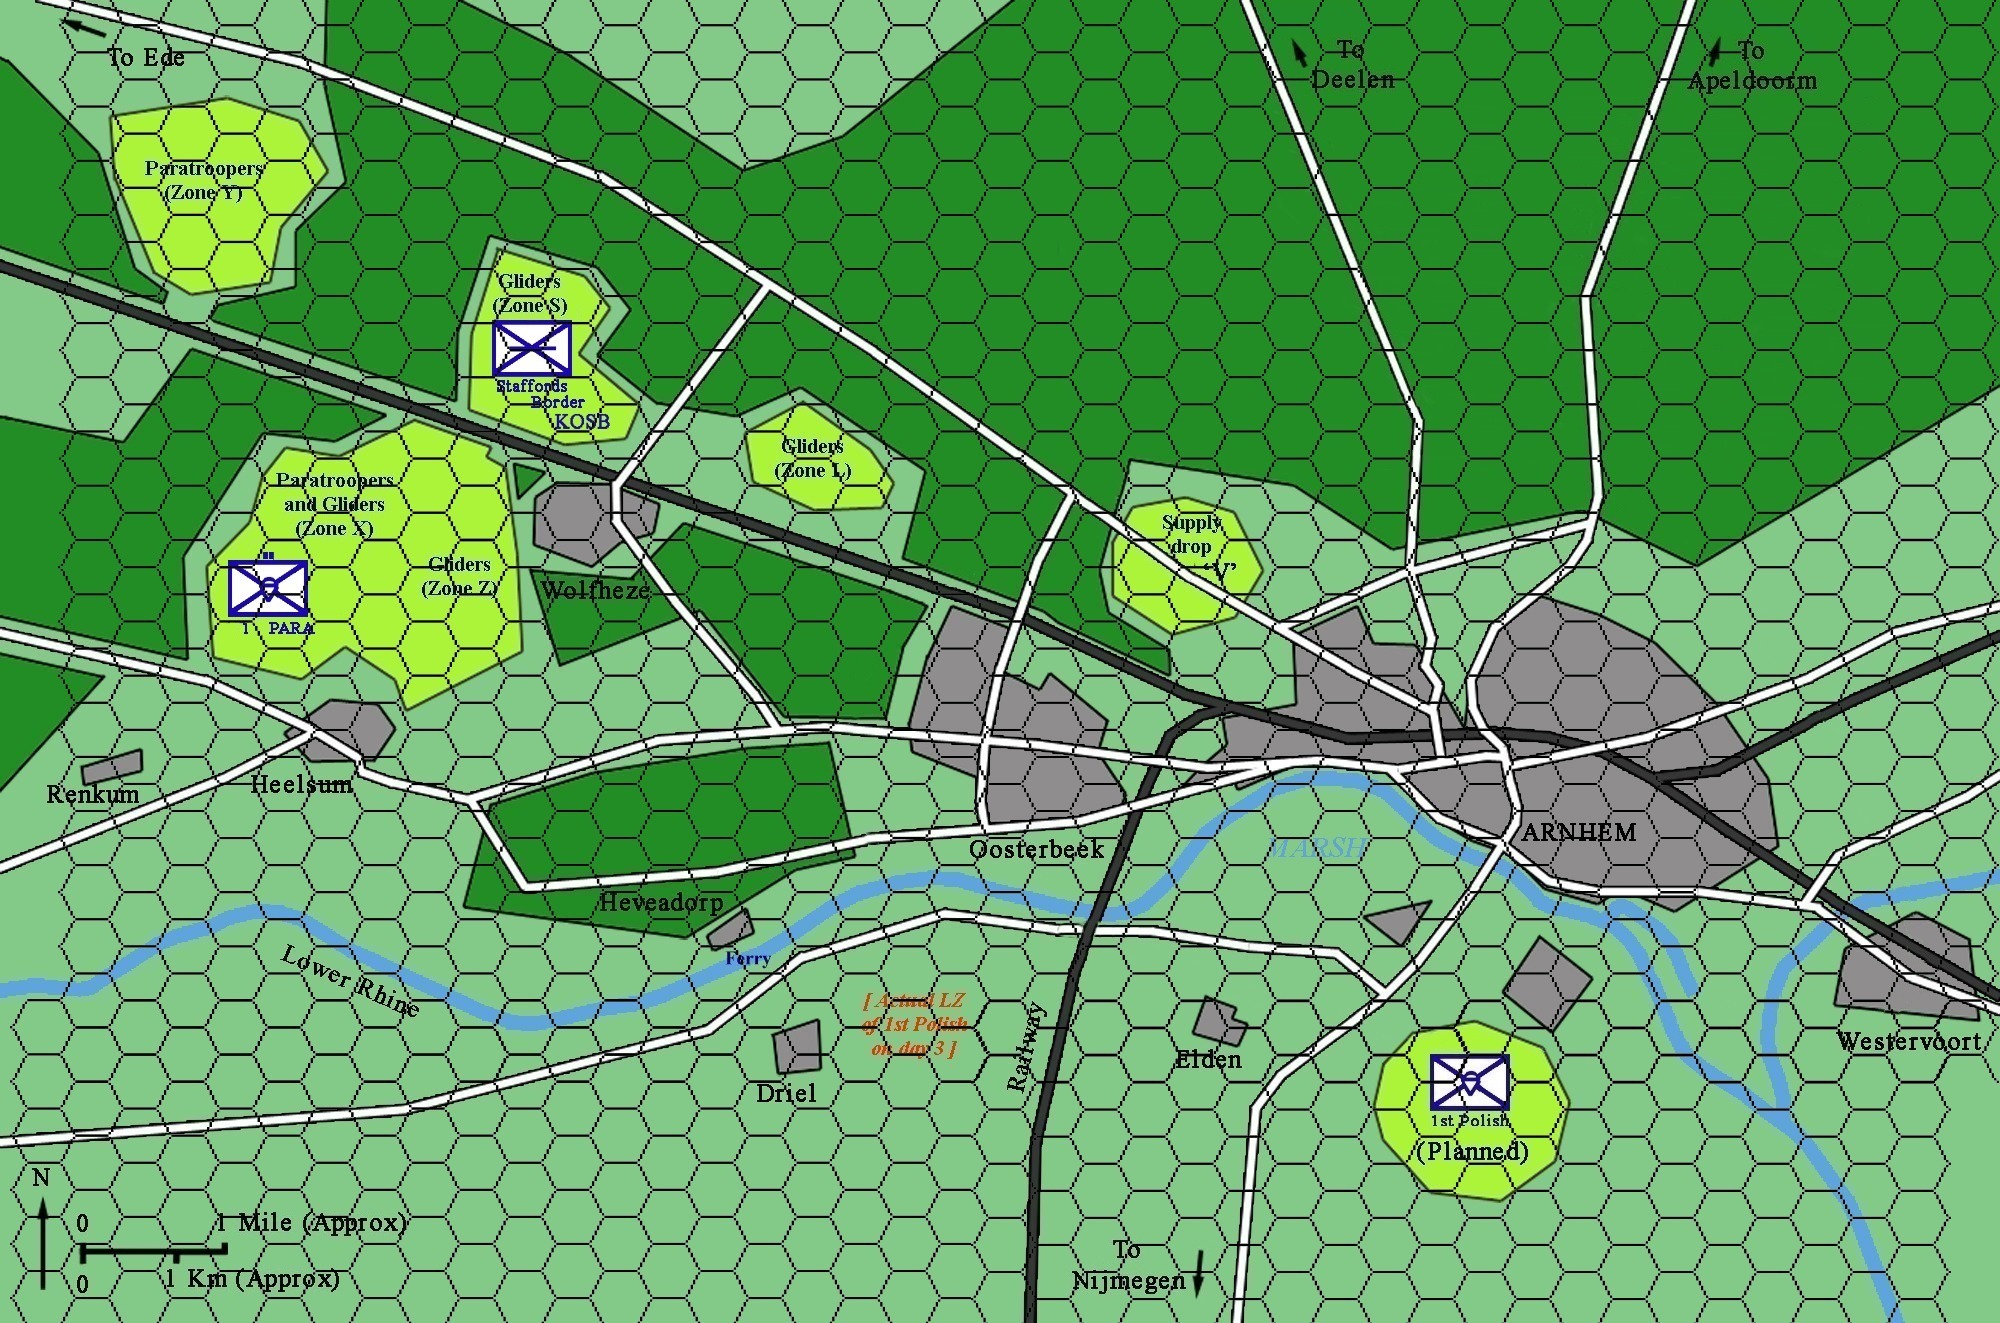
Historical deployment
At noon on the 17th Sept 1944, the residents of Arnhem and their German occupiers look up from an early lunch to the sound of hundreds of aircraft approaching from the south west. Soon thousands of white patches are appearing in the clear blue sky = "it never snows in September" says Lieutenant Joseph Enthammer, a Wehrmacht artillery officer based in Arnhem, as he picks up the phone to raise the alarm.
Generalfeldmarschall Walter Model, commander of Army Group B, also has a good view from the windows of his HQ at the Tafelberg Hotel in Oosterbeek. The paratroopers all appear to be landing way beyond Wolfheze, some 5 miles to the west ... "What are the stupid Allies up to now ?" he wonders
In all, almost 10,000 men were to take part on the Allied side, with over 2,500 paratroopers landing on the first day
Model issues immediate orders to all available units in and around Arnhem to start moving to oppose the landings and informs Obergruppenführer Wilhelm Bittrich (who commands the II SS Panzer Corps, currently refitting some 30km to the north east of Arnhem) of what is happening. Every German in and around Arnhem can see the parachutes and some are already moving to take up defensive positions even before orders reach them.
As hundreds become thousands and then the gliders start to appear, Model recognises the danger - the enemy is arriving in such massive numbers that his HQ will soon be overrun.
So, as the first gliders are landing, he and his staff pack up and leave for Bittrich's HQ at Doetinchem (some 40km to the east of Arnhem). He just has time to order General Friedrich Kussin, Feldcommandant of Arnhem, to inform Berlin of the landings at Arnhem.
On the road out of Arnhem he is already planning how to defend the town. On arrival at Bittrich's HQ he immediately gives orders for 2nd Panzer to start moving - however Bittrich has already anticipated this order and the Recce Battalion of 2nd SS Panzer is already on it's way
Thus surprise - which was never likely - was lost before the first paratrooper even reached the ground.

Within a hour or two Model will start getting reports of the other landings and he will have no difficulty in putting 2 and 2 together to reach 4 and the whole of the Market Garden plan.

All he has to do is stop the Allied ground forces whilst containing the paratroopers - which can be 'mopped up' after they run out of supplies. If he can, he will save the bridges, but if it looks like Allied tanks will reach Arnhem, the bridges will have to be blown
The first of your forces are down - can you capture one or more crossing and hold on long enough to be relived ?
Steves deployment
It's just after midnight as the RAF heavy bombers pass overhead to carpet bomb the area some 30km north east of Arnhem where 20th SS Panzer Corps are refitting - again.
An hour later and there seems to be no letup in the bomber stream. This is the 3rd time in as many weeks that the RAF have struck at 9th and 10th Panzers, although they don't seem to be getting any more attention than any other Panzer unit on the western front.
Model in his HQ at the Tafelberg Hotel in Oosterbeek doesn't even bother to report it - he's given up trying to get any Luftwaffe night fighters to intervene. Goering has guaranteed to Hitler that no more bombs will fall on Berlin, so he keeps all his night-fighters patrolling the skies over Berlin which he believes is the reason why the RAF have shifted to other targets. Model worries that the reason why the RAF have stopped trying to raze Berlin to the ground is that the rumours of 'Bomber' Harris's arrest (and pending trial for war crimes) are true. If so, then the RAF might never switch back to 'city busting' - already their efforts against the railway (and canal) network have started to impact delivers of replacement tanks and other supplies and munitions. With petrol becoming scarce and the Allied fighter-bombers attacking everything that moves on a road it's becoming harder and harder replace meterial losses. Perhaps Admiral Reader is also right and the increase in U-boat losses as they arrive and leave port really is down to large numbers of RAF bombers being re-assigned to Coastal operations (although as the U-Boats now arrive or leave port at night it's hard to believe the RAF could possibly be the reason). However he does worry that hundreds of bombers at a time could be used in ground support attacks against his few remaining Panzers = could this be a foretaste of worse to come ?
So just after 1am he picks up the telephone to speak to Obergruppenführer Wilhelm Bittrich (commander of II SS) at his HQ in Doetinchem, 30km to the east of Arnhem but once again it seems the cursed Dutch resistance has cut the lines ! He instructs the radio room to send an encrypted message to Bittrich. Half an hour later he has his reply - Bittrich reassures Model that he has been receiving radio reports of the bombing ever since midnight and that the RAF bombs are (as usual) dropping randomly over an area of at least 100 sq miles and (as usual) are doing nothing but making temporary 10 foot wide craters in the soft soil. Unless a bomb actually drops directly on top of a your trench, you are virtually immune from any effect.
Once again Model decides that if the RAF have been diverted to 'tactical' targets then they are wasting their time - there's no way they can hit targets they can't see. Model hopes that once they discover that it's almost impossible to damage Panzers by dropping bombs randomly into the forest at night they will go back to aiming at cities and leave his battered forces alone. Reassured that losses will be minimal, both commanders decide to get some sleep
At the stroke of midnight, as usual, the Germans changed their Enigma keys. The flurry of messages generated by the RAF bombers over Arnhem helps Hut 6 to break the new day key befor 2am. As the decrypts come in, it is confirmed that Model is at his HQ, so Arnhem 'Case Mauve' (target Model) is a 'go'.

The bombing continues all night, however at 4am it seems the worst is over as fewer bombs seem to be dropping - but this is because many of the bombers are dropping paratroopers instead. Five Companies (each about 100 men) of the 3rd Parachute Battalion are being dropped directly onto both ends of each of the Lower Rhine crossing's. Two Companies are split between the north and south ends of the Ferry and Rail bridge (so about 50 men onto each), and 3 Companies onto the Pontoon and Road Bridges (one Co. on the North end of each, half a Co. on the south ends). The rest of 1 PARA (about 1,500 men) are dropping into the empty fields to the north of the Town (between Oosterbeek and Arnhem ('Landing Zone V') and directly onto the roads leading to Deelen).

The bombers dropping paratroopers are all equipped with improved versions of the H2S ground scanning radar. This allows almost perfect navigation when prominent ground features can be seen - such as rivers. They are accompanied by others with a full bomb load. However, instead of a 'city busting' bomb load (one 4,000-pound blast bomb plus 12 containers of 236 4-lb incendiary bombs) or an 'industrial demolition' load (14x 1,000-pound HE bombs) these aircraft carry 4,500x 3lb hollow charge Anti-Tank bomb-lets (with anti-handling fuse) developed from the PIAT round.

The bombers drop to 3,000ft as they approach Arnhem (the ideal height, above small calibre AA guns but too low for the large calibre guns to 'track' effectively). After the paratroopers are dropped the bomber stream turns to the north / west and the positions of the highest concentration of 2nd Panzer vehicles (as reported by the earlier bombers and marked with coloured incendiary bombs). Now, as they approach the target area, the modified ground-view radar (H2S) system is starting to show up large metal objects (such as tanks), irrespective of the trees (or camouflage netting). This was as expected (by this date, air-airborne radars were capable of showing up a metal object as small as a U Boat periscope - and hollow charge Anti-Tank bomb-lets, used in 'sets' of 500 at a time, have turned out to be even more effective against U-boats then the 24x 65lb 'hedhehog' (itself 10x more effective than depth charges)).

As the pilot holds the aircraft on a steady course (at a fixed 150mph and height of 3000ft), the bomb aimer hit's the 'calibrate' button. Half a dozen bomb-lets are released whilst the H2S 'tracks' them to the ground. As the bomb-lets fall, motorised wire cross-hairs move over the H2S screen to show where any future bomb-lets will land. The bomb-aimer instructs the pilot to adjust his course slightly toward the brightest 'blip' on the screen - with any luck it's a Tiger ! Just before the blip passes under the cross-hairs he presses the 'drop' button. Over 2,000 bomb-lets are released to form a pattern on the ground 40m wide by 50m long (2000sq m), with an average spacing of 1m between bomb-lets. As a second 'blip' approaches the cross-hairs, he presses the button a second time, releasing the last of the bomb-lets. With luck he might have hit a Panzer or two ! The 120 aircraft equipped with 4,500 bomb-lets each make a total of 240 'aimed' attacks and saturate the area with over half-a-million bomb-lets.

There were actually less than 60 tanks (21x Jagdpanzer IVs, 8x Panthers, 16x Panzer IV, 15x Tigers) in the area, however anything made of metal (200 odd armoured cars plus many gun tractors, other tracked vehicles, artillery pieces, ammunition and fuel trucks and stores etc.) would stand a high chance of being hit. Something as large as a Tiger (3.5m x 6.3m) caught in a 40x50 pattern could suffer a dozen hits. A U-boat, 40m x 4m, could suffer more than 100 hits ...

The hollow charge will have no problem penetrating the thin top armour of any tank (even less so the skin of a U-boat). If the tank turret is hit, the 'ready' ammunition held there might well explode, whilst any hit on an engine bay was almost guaranteed to disable the vehicle (which might well catch fire).

Of course 90% of the bomblets will drop into soft ground and fail to explode on impact. However the 'anti-handling' fuse will cause the Germans a lot of difficulties when they try to move their vehicles.


By 5am, as Model sleeps fitfully in his bed with the sounds of bombing to the north east, the paratroopers are down. Three companies depart LZ V to secure the roads out of Arnhem to the north, however they make a short diversion to the Villa Heselbergh, Apeldoornseweg 228 (and the adjcent school buildings) where General Friedrich Kussin, Feldcommandant of Arnhem (and his staff) have been since 3 september 1943. Another 4 Companies, along with the Engineering Co. move into Oosterbeek, with 2 Companies plus the Engineers going straight to the Tafelberg Hotel (Model's HQ).

At 5.30am Model awakes as the over 300 men from the 1st Parachute Battalion and the Engineer Company assault his HQ. At the same time, another 300 are entering the Heselbergh villa and school biildings at 228 Apeldoornseweg. Doors and windows are blown out using PIAT's (firing the High-Explosive (HE) grenade rather than the hollow charge Anti-Tank round) after which they throw in phosphor grenades.

Model's and Kussin's bodyguards are overwhelmed as dozens of 'Tommygun' ('TA-5 Pistol' = a short-barrel Thompson sub-machine gun) wielding paratroopers storm down the corridors toward their rooms throwing grenades into every doorway and spraying bullets everywhere. The paratroopers know exactly where to find both men - Kussin has been 'fingered' by the Dutch Resistance and Model's Communications Officer specified his exact rooms when his 'hot line' to Hitler was installed (details that were picked up and revealed by Ultra - and confirmed by his cleaning staff which includes many member of the Dutch Resistance).

Also since 5am, 5 Companies (500+ men) of 2nd Parachute Battalion have been spreading through the streets of Oosterbeek seeking the houses where Germans are billeted (the Dutch resistance has been out since midnight chalking swastika's on the pavement in front of these houses). At the same time as Model's HQ is attacked they go in.

Model just has time to instruct the radio operator to warn Wilhelm Bittrich before he dies in his rooms (when grenades are thrown in after he refuses to surrender). After Models death, there is a short pause (whilst the paratroopers give the radio operators a chance to send their message), after which the bloodbath continues.

By 6am it is all over for Model, Kussin, their staff and most of the Germans in Oosterbeek, many of whom are killed in their beds before they even realise what was happening.

Meanwhile, all 8 river crossing objectives have been taken by the paratroopers, some of whom are how removing explosives from the road and rail bridges. Paratroopers from the Heveadorp Ferry have entered the Heveadorp woods and linked up with 2nd Parachute Battalion in Oosterbeek.  Leaving one Company to secured the pontoon and road bridge, two Companies of 3rd Parachute Battalion make their way into Arnhem, also seeking out the houses were Germans are billeted.

The 1st Parachute Battalion have turned from Models HQ toward Arnhem. Whilst the Tafelberg Hotel burns behind them, they move from street to street flushing out the Germans many of whom are trapped in their billets and are fighting whilst half dressed

3 PARA soon reach the railway, trapping the Germans in east Arnhem between themselves and 1 PARA. By dawn the last of the Germans in esat Arnhem have been eliminated, and the combined force turn to the west where the last hundred or so Germans in Arnhem have started to organise themselves into a last ditch resistance.

By now one of the two 'deteched' companies of 1 PARA who landed near the Apeldoorm road are well dug in whlst the other has arrived at the roads leading out of Arnhem to the east. Some of these paratroopers were dropped with a folding bike and a pair of anti-tank mines. They cycle up the roads leading north out of Arnhem for some distance to plant their mines. Other bikers are equipped with the PIAT (a primitive RPG which was effective against most Panzers, although only against the sides or rear of the Tiger). They dig into the woods at the sides of the roads just in front of where the mines are laid. Whilst they wait for the rest of the 2nd Parachute Battalion to get back from taking care of Model, they prey that 2nd SS will be too busy recovering from the RAF boms to send tanks south just yet, since they, their PIAT's and a few dozen mines are all that stands between Arnhem and the Panzers (which will make retreat 'not an option'). Of course, if all goes well with the glider drop they know thay can pull back an hour ot two after dawn when the 17pdrs arrive ...

Wilhelm Bittrich (commanded of 2nd SS) is in a quandary - it seems the bombing has been going on for most of the night in what now looks like an all out effort - and reports are coming in of some surprisingly accurate new type of tiny bomb which seems to be doing an amazing amount of damage to his vehicles - is this really just a diversion ?  but if not, to what end ? He was woken soon after 5am by confused reports of fighting in the streets of Oosterbeek and then comes news that Model's HQ has been taken. From 5.30am, he has started to get phone calls from Arnhem reporting paratroopers in the streets advancing from the east - are the British coming for him next ?

He knows Model's phone lines were cut before he came under attack and then, at 6am, his phone lines suddenly go dead. It seems his worst fears are justified - the massive bombing effort is now explained - the Allies are going all out to destroy 2nd SS Panzer and it's command ! He gets on the radio to inform Berlin he expects his HQ to come under imminent attack whilst instructing the 2nd SS Panzer to move as fast as possible to block the British forces that he believes are even now coming for him from Arnhem.

The 2nd SS reply that the RAF bombs have made the roads almost impassible - the earlier bombs have cratered the roads and, when forced off road, vehicles are running into dozens of the almost impossible for the driver to see new bomb-let which is blowing off wheels and damaging tracks. Progress will be slow as his infantry search for a path through the undergrowth and mark any bomb-let found, which then has to be destroyed with rifle fire (they have discovered the anti-handing fuse the hard way). However they promise the Reconnaissance Battalion will arrive at his HQ in no more than 2hrs even if it has to drive through the forest on flat tyres and bare rims !

Bletchley Park decodes the messages and, by 6.15am are able to pass the word to the Arnhem force commander, "Case Blue White". Each element of 2nd SS Panzer and each possible destination has been given a 'Case' colour. So 'Blue White' is 'Dutch resistance reports Recce Bat. of 2nd Panzer moving toward Bittrich's HQ', 'Blue Green' is 'Dutch resistance reports Recce Bat. 2nd Panzer (element) is moving to Arnhem', 'Red Green' is 'Dutch resistance reports 2nd Panzer Tigers moving toward Arnhem' and so on. Because this sort of simple 'code' is easy to remember, no one in the field will be allowed to write it down - so the only way to 'crack' the code is to capture someone who knows it's meaning (in this case, that's each of the four Para force commanders and his deputy, each of the lead Glider pilots, all of the Hamilcar glider pilots and each of the lead US Air-force 'master bomber' pilots)

At first light, 6.30am, as the final RAF bombs are falling on 2nd Panzer (or at least on vehicles somewhere near where they are based), the first gliders are released (at a distance of about 2 miles from their landing zones). As Model feared, many dozens of bombers have indeed been diverted to support tactical operations - in this case, the towing of gliders. As a result, far more artillery and anti-tank guns, including many 17pdrs, will be landing on Day 1 than might otherwise have been possible. The early dawn sun (and paratroopers with lights) allow the pilots to choose their landing points.

The "Case Blue White" message means that the 2nd SS Panzer Tigers are not yet on the move, so all 16 of the heavy Hamilcar gliders each bringing in a 17pdr anti-tank gun can aim for LZ 'V' (and avoid the risks associated with trying to get the heavy 17pdrs down directly onto the roads leading out of Arnhem to the north and east).

As the dawn sun lights up the sky, the last of the Germans in Arnhem are still holding out in a few Hotels and other buildings. They have no-where to go, as all the roads out of Arnhem are now in the hands of the British. They look up to see hundreds of gliders coming in to reinforce the paratroopers. They have only small arms and are becoming short of ammunition, having only what was available in their billits. Many are 'reservists' and militia, old man and boys, doing garrison duty as no-one else was available - some are starting to think about surrender.

It's 7am and the sun is up, the gliders are down and starting to unload. Unlike the historical case, every Jeep landed by my gliders (including those 'assigned' to towing guns or ammunition) is equipped with a '50 cal' (0.5") heavy machine gun. Soon the streets of Arnhem echo with the fire of the 50 Cal machine guns and the crump of artillery fire as dozens of Jeeps deploy their 25pdr 'pack howitzers' and 6pdr guns against the Germans still holding out. Surrounded, with northing but small arms to defend themselves (and a few quickly used up Panzerfaust), and with no overall command, one by one the survivors are forced to surrender ...

By this stage of the war, all the British guns finally have HE capability. In fact there is even an anti-infantry 'cannister' round

In addition to the guns and other stores, tens of thousands of mines will be flown in. Soon every road leading out of Arnhem will be blocked with hundreds of mines (and hundreds more shown in front of the defensive positions on the outskirts of the Town and the edges of the woods)

The first US Air-force bombers with their escorts will soon be approaching Arnhem from the south. Knowing that 2nd Panzer has been ordered to defend Bittrich's HQ, some of the bombers (followed by stream of almost 200 Meteor Jet fighter-bombers) are being diverted to Doetinchem, just to give his HQ a good plastering, feed his fears and distract him from thinking about the Allies ultimate objectives. Who knows ? one of the US bombs (or the Meteors, who will shoot-up anything they spot north and east of Arnhem) might get lucky ...

Worse, for the Germans, both the US bombers and the Meteor Fighter-Bombers are employing the new anti-infantry 250lb 'fragmentation' bomb. Equipped with a 'proximity fuse, these bombs explode ABOVE the ground. The result, against 'soft' vehicles and infantry is devastating. Throwing yourself to the ground just results in a bigger target - even those in trenches are not safe ..

The first US airborne landings of Market Garden will not start before noon. With no reports of any other landings, Bittrich will spend all morning under air bombardment preparing for a ground attack on his HQ that will never come. By the time he hears of the US landings (and puts 2 and 2 together) the heavy equipment from the British gliders will be well dug in and it will be much too late to dislodge the British from Arnhem. The 2nd SS Panzer, still under constant bombing, will be unable to lend support to the defense of Nijmegen .. instead the British at Arnhem might even send the Poles to help the US take Nijmegen bridge by attacking it from the north ...
Now it's over to you ....
Unlike the historical planners, in my game considerble thought has gone into the likley opposition. Fore-warned is not only fore-armed but also a chance to setup an ambush (or at least call for air-strikes). So here's what you might be facing :-
From the north / north east :- II SS Panzer Korps, SS-Obergruppenfuhrer Wilhelm Bittrich (consisting of (the remains of) 9th 'Hohenstaufen' (2,500 men, commanded by Harzer, with HQ at Beekbergen outside Apeldoorn) and 10th 'Frundsberg' Panzer Division). The 9th SS had a Panzergrenadier brigade, a reconnaissance battalion (the 9th SS Reconnaissance Battalion was based at Beekbergen), an artillery battalion, two batteries of self-propelled guns and a company of tanks. In total the II panzer Cirps ahd perhaps 6-7,000 men, but less than 60 tanks (21x Jagdpanzer IVs, 8x Panthers, 16x Panzer IV, 15x Tigers), 200 armoured cars (and other APC's) and about the same again of various mixed towed artiliery and anti-tank guns. From the west :- To the west of Arnhem was Kampfgruppe Von Tettau, a force equivalent to seven battalions made up of all manner of German units (including Das Heer, Luftwaffe, Kriegsmarine, rear echelon and Waffen-SS troops) under the command of General Hans von Tettau at Grebbeberg. This included the SS Non-commissioned officer school SS Unteroffizierschule Arnheim and the 16th SS Training Battalion under the command of SS Sturmbannführer Sepp Krafft = see below Unterführerschule 'Arnheim' (Training School) Kampfgruppe 'von Tettau', commanded by SS-Standartenführer Michael Lippert. Based 80 kilometres to the west of Atnhem, on the Waal. Two Battalions of 4 Co. each. Historically 1 Bn. remained on the Waal whilst the rest started to move at 18:00 Day-1 (i.e. within 5 Hrs of the first landings). They went by bike via Grebbeberg and were in action the following morning (overrunning the east of Oosterbeek LZ's) At Arnhem, the partly Dutch SS Wachbattalion 3 was attached to Kampfgruppe Von Tettau and the 3rd Battalion of the 34th SS Volunteer Grenadier Division Landstorm Nederland training at nearby Hoogeveen (it was quickly attached to Harzers 9th SS Panzer Division when they arrived at the battle on 20 September (Day 3)).
The Germans will call in forces from Wehrkreis VI, the Wesel area and General Friedrich Christiansen's Armed Forces Command Netherlands. By the end of the fighting, Day 9, the Germans had at least 12,000 and perhaps as many as 20,000 men in the Arnhem area.
Needless to say, if all had gone to plan, these forces would have been up against 30 Corps Tanks rather than a few thousand lightly armed Paratroopers
Aside - the 17pdr's at Arnhem
The only gun that was 'guaranteed' to take out a Tiger was the 17pdr. So it was vital that these were included in the Arnhem force, and indeed some were. The problem was that a combination of poor planning and bad luck drastically reduced the number of 17pdrs available.
A 17pdr weighs in at 4,624lbs, so it can only be carried by the heavy Hamilcar glider, of which only some 39 were available. Historically, there was little reason to make more gliders available because there were insufficient towing aircraft (but see Steves game)

Poor planning meant that some of the precious Hamilcar gliders were allocated to 'nonsense' tasks and only 16 to the carrying of 17pdrs - which were split into two separate days landings. Historically, there were two anti-tank 'batteries' (each with 8 17pdrs) assigned to the Arnhem operation.

The 17pdr was difficult to move and setup in a hurry, so was all too easy to loose (get left behind) in a fluid battle. It was best used defensively, well dug-in with a clear field of fire. It is thus vital to get it into position BEFORE the enemy tanks atrrive. It is NOT the sort of gun you would want to use in street fighting !

Plainly the planners, sitting in their Whitehall Offices had never seen German Panzers 'in action', or they would have known that the paratroopers could be facing Tigers with a few of hours of their landing (and 17pdrs landing on Day 2 were NOT going to arrive in time to make a difference)
Historically, we had 1st Airlanding Anti-Tank Battery, RA (which landed on Day 1) and 2nd (Oban) Airlanding Anti-Tank Battery, RA (which landed on Day 2).
Each Battery consisted of 6 Troops. Four troops each had 4x 6pdr (mounted on the Mk III (Airborne) Carriage, so it would fit in a Horsa glider), whilst the other two had 4x 17pdrs each (a Hamilcar glider arried each 17 Pdr together with it's tractor).

On Day 1, the 1st Airlanding Ant-Tank Battery went in, but two of the 17pdr Hamilcars were lost en-route and 2 more were lost on landing (when their gliders overturned). Bad luck had led to a 50% loss already, leaving only 4 17pdrs on the ground. By the end of Day 1, half of these had been lost leaving only 2 in action.

On Day 2, it was the turn of the 2nd (Oban) Airlanding Anti-Tank Battery. They lost one 17pdr en-route and another when two gliders landed short (and they could only salvage one gun), a 25% loss. This added 6 more 17pdrs to the 2 still operational.

By Day 4, two more 17pdrs had been lost (6 left) and by Day 9 only 1 was still operational (plus 3 6pdrs)
Map and Scale
The map-scale is 130 hex wide by 80 deep, approx 8 hex per km.
The unit-scale is based on the Company (approx 100 men).
In the British Army, the smallest unit is the Section (4-12 men) of which 2+ is a Squasd (8-24), 2+ a Platoon/Troop (16-50), and 2+ Platioons a Company (100-250).

A Battalion (400-1,000) would have 4+ Co., a Regiment (1-2,000 men) is 2+ Battalions, a Brigade (1,500-3,500) is 3+ Regiments

A Division (usually 10-15,000 men) would be 2+ Brigades (or 4+ Regiments). A Corps is 2 or more Divisions.
Glider scale is approx 12 Horsa / 8 Hamilcar per unit (which means a Horsa Unit can carry 12x28 = 336 / 100 = 3 Infantry Units, a Hamilcar 8x40=320 / 100 = = 3 Infantry Units). Other Units represent 8-10 actual pieces (so one gun (6pdr, 17pdr, 25pdr etc) Unit represents 8 to 10 guns, one Tank unit represents 8-10 tanks, as is one Jeep, one Bren-Gun Carrier etc. etc.)
The Hamilcar Unit (8 gliders) is limited to one 17pdr Unit (nominally 8-10 guns), or 2x Bren-Gun carrier Units.

The Horsa Unit (12 gliders) is a limited to 1x6pdr+Jeep.
The British
During the run-up to D-Day, 'bomber' Harris refused to allow 'his' bombers to be 'distracted' from murdering German civilians. He was over-ruled and the bombers diverted prior to D-Day. On D-Day itself there were many night flying operations and both gliders and paratroopers were landed successfully. However Harris was left in a position of power and was able to return to 'city busting' after the D-Day landings. He was thus allowed to refuse any of 'his' modern heavy bombers being 'wasted' on airborne operations. The only aircraft he would release were obsolete types that didn't have the range to reach German cities.
This led to a constant shortage of sufficient transport/towing aircraft and meant that the 1st Airborne Division (plus the 1st Polish Brigade), would have to be dropped in three separate lifts. Obsolete aircraft with obsolete navigational equipment and '2nd line' crews led to an inability to effectively fly at night or even in less-than-perfect weather.

The lack of British aircraft and crew with night flying experience was nicely matched by US inexperience in night flying, so, when the Market Garden plan called for simultaneous air-drops of both the British and US forces, there were no objections from the US side to a landing at mid-day.

As a result this meant only one lift could be completed per day, and thus th Arnhem force would require three successive days of good weather.
In Steves game, 'bomber' Harris is not simply 'over-ruled' just prior to D-Day (1944). Instead, Churchill has been over-ruling Harris on regular occasions, insisting that specific targets be hit against Harris own wishes. Eventually, with the support of the British public (sickened by the deaths of 45,000 German civilians in Hamburg in a firestorm caused by Harris and his 'City Busting' massed-bomber raids over 7 nights in July 1943) he finally sacks Harris in August 1943.
Following further revaluations of his rabid anti-German views expressed in a series of open letters published in the press advocating the extermination and mass-murder of German civilians 'one city at a time until they are all dead', 6 weeks later (September '43), Harris is arrested and charged with the first ever case of War Crimes. He spends the rest of the War in the Tower of Lindon, where he remains until his Trial in Nuremberg, 1945, where he is the only Allied defendant. After his conviction, he faces the hangman (unlike his 'opposite number' Goering, who commits suicide), convinced to the last that he did no wrong
Initially, the main effect of Harris' removal is to shift the RAF focus from 'city busting' back to the Ruhr industrial areas. However further analysis of the success of the 'Dam Busters' raid (1617 May 1943, against the wishes of Harris) leads to a total re-evauation of how to effectlvly 'take out' German war production and whole list of potential 'spot' tragets. But the 'British by night, US by day' policy still holds, so a huge technical effort goes into improving navigation and bombing accuracy by night. This leads to a development of the H2S ground scanning radar coupled to an automatic bomb release. Soon the RAF are switching from high level 'bomb the country side' to more low-level attacks at 2,000 to 3,000 ft (just above the effective range of light anti-aircraft guns, and below the optimum engagement height of heavier guns). As the system is improved, they are start to hit even 'tactical' targets (roads, rail lines, shunting yards, canals etc.), especially in France, with increasing accuracy (all in an effort to 'cut off' the Germans in the run-up to D-Day). The days of the "1,000 bomber raid" are now over - there will be no more expansion of the bomber force. From now on it will be increasing accuracy, not increasing numbers, that will make the difference. Future raids will never exceed more than a few hundred aircraft - and with multiple targets attacked each night by as few as a dozen aircraft, the German night-fighters can no longer concentrate on a single massive bomber 'stream' following a single course to a single target. Extensive use of 'window' and newly developed specialist radar jamming aircraft will make it hard for the German defenders. When the German night-fighters try to use their own radar they will discover that the British bombers have been fitted with sensitive detectors that automatically aim and fire the 50 CAL machine guns that have replaced the useless .303's in every the turrets. The bombers are also fighting back against the German ground defences - the British have developed both 'anti-radar' and 'anti-searchlight' bombs (these are just ordinary 1,000 pound bombs with steering vanes activated by photocells or a radar receiver that glides the bomb down the searchlight/radar beam). For the Germans, worse is to come - the Wallis 'Tallboy' has given priority and over 100 of these 12,000 pound 'earthquake' bombs are used to massive effect against the V-weapon complex at Peenemünde on 17th August 1943. The place is reduced to rubble = 90% of the scientists and technicians are killed, many buried in their bomb shelters which collapse on their heads to become their tombs. Von Braun is lucky to escape with only a broken arm and temporary deafness. The attack has little effect on the V1 program (which had started test flights at Peenemünde on 28 October 1942, and had now been perfected and already released to production), however the V2 test effort is pushed back at least 6 months. The loss of scientists and technicians results in a diversion of expertise from other programs (such as the ME262) and will lead to a massive decrease in V2 reliability. The X-craft attack of 22 Sept 43 on the Tirpitz fails to sink the ship, but does extensive damage. This will take until April 1944 to fully repair = Churchill monitors the progress of the repairs from the Ultra decrypts. In mid-March, with the specialist repair-ship Neumark still docked nearby, just after 2am, whilst the highly skilled workforce sleep on-board, 24 Lancaster's use their H2S radars to auto-drop their Tallboy bombs into the moonless sky from 20,000 feet. These bombs are fitted with the new radar homing heads, carefully adjusted to pick out the H2S radar return from the massive, stationary, metal ship against the background water. The auto-release systems of 4 of the Lancaster's fail (when they become confused by the other bombs being dropped nearby) - and whilst the bombardiers hit the manual release as soon as they realise what's wrong, the radar aiming heads are unable to change the bombs course far enough to hit the Tirpitz. Two other suffer radar homing failure and miss the target. Of the 18 bombs that are successfully dropped and home, half are direct hits on the Tirpitz. These bombs gut the ship internally from stem to stern. 5 of the other bombs hit on or near the Neumark, leading to it's utter destruction and are even near enough to buckle the side armour of the Tirpitz. This would have turned the ship over if it wasn't for the 3 bombs that detonate on the other side. The one remaining bomb hits the Tirpitz but fails to explode, passing all the way through the ship to embeds itself in the sea bed. This is discovered a couple of hours later, when it explodes directly under the wreak of the Tirpitz, splitting the ship into two, when the time fuse, designed to prevent the radar homing head falling into German hands, expires. The U-boats are not having it easy either. The British have taken the concept of the 'acoustic torpedo', invented by the Germans, and are using it to devastating effect. Tuned to 'recognise' the sound of U-boat diesel or electric engines, they have been dropped as 'mines'. Tethered to bases sitting on the continental shelf outside the U-boat pens, they are triggered when a U-boat passes nearby. Whilst detection distance is 'short', this means that the torpedo can be quite small (it only needs a range equal to the detection distance). However, the small size is made up by numbers - tens of thousands have been dropped on the approaches to the U-boat pens. Worse, the British have incorporated a mini-sonar system into a 'self-homing' torpedo. Dropped automatically by patrol aircraft when their H2S Radar detects anything as small as periscope - or launched manually from a convoy protection vessel - the torpedo's active sonar guide system more or less guarantees a hit.
The heavy bombers of the RAF remain under Army control and are subordinated to Monty for the Arnhem operation.
Unlike the historical case, when Whittle's Jet engine, which he first demonstrated running in April 1937, was virtually ignored until 1944, in my game things are diferent.

After the RAF wins the Battle of Britain in June 1941, Churchill intervenes and Rolls Royce is instructed to 'switch focus' from further incremental improvements in the Merlin engine and put all it's efforts into developing the Jet engine.

As a result, the RB41 Nene engine (a development of the Whittle design) is ready by mid '43 (historically, Oct 44) and the Meteor F3 Jet fighter has been produced in secret (and in significant quantities) before D-Day (June 44).
The 'refocusing' of Rolls Royce means the whole Merlin engine design is handed over to the Americans on 8th December 1941 (one day after Pearl Harbor) = this is a 'strategic' decision by Churchill, who, recognising that the future belongs to the Jet, wants the US focused on piston engines instead ....
Historically, the Merlin engined P51D Mustang was only deployed in Europe from mid '44, however with the Merlin in mass production in the US from 1942, the P51D Mustang arrives in Europe a year early (mid 1943) and immediately leads to a reduction in US Bomber losses and increasing Luftwaffe losses
Kept secret from the Americans (as well as the Germans) over 300 Meteor F3's are built. These first appear in the skies over Europe on D-Day, 6 June 1944. The Americans are impressed, but soon realise that it's short range (1/4 that of the Mustang) makes it unsuitable as a bomber escort, so they decide to stick with the P51D Mustang (range, with drop tanks, 2055 miles)

The Meteor F3 had a 500 mile range, however even with airbases right on the coast, half of that is needed just to cross (and cross back) over the almost a hundred miles between Portsmouth, England, and the Normandy beaches. So with half it's fuel needed just to get from UK to the beaches (and back again), it's 'combat' time over Gold, Juno and Sword is rather less than 30 minutes. With the Luftwaffe swept from the skies, it quickly become apparent that the Meteor, with it's 20mm cannon, is best used in a Fighter-Bomber role. The British have already considered this use , so the Meteor is already equipped with the 'hard points' needed to carry bombs. Soon the majority of Meteors arrive over the battlefield with 2x 500lb bombs.

After D-Day, with the secret out, and the first V1 flying bomb appearing over the UK on 13 June 1944, the Meteor F3 is called home. At 490mph, it is the only aircraft capable of catching the 400mph V1. Since the V1 flies in a straight line at a fixed altitude, the F3 pilot can hardly miss - it soon becomes a 'turkey shoot' (as the US say).

This highlights the defects in the Meteor 20mm cannon that are causing frequent jams, however these problems are soon remedied and the Meteor is soon accounting for some 90% of the V1's with anti-aircraft artillery, equipped with the new proximity fuse shell, taking out almost all the rest.

When Hitler learns that almost no V1's are reaching London, he goes crazy (arguably, he already is), demanding even more resources be diverted into the V2 and that every ME-262 in existence be immediately converted and used as a bomber. It's range was 650 miles (would have been less with bombs) but Calais to London is only about 100 miles, so this would be 'doable' - except by the time they arrive the Meteor F4 is waiting for them.

With 'air development priority' given to the Meteor program, before Sept '44 the Meteor F4 is in mass production (historically, it only first flew in May '45) and the Spitfire and Hurricane production lines have been converted into Meteor production lines.

This is just in time to counter the first (and only) wave of 200 ME-262 'bombers' on 5 Sept 1944. The ME-262 has a range of 650 miles (maybe a bit less with bombs), but London to Arnhem is 'only' 251 miles, so they can just about reach London from the then current 'front line', but only by flying on a direct line. They will be gong in at low level and at night in an effort to avoid British radar (and the heavy AA guns, which by this date are all radar controlled and using proximity shells).

Fore-warned by Ultra, the British have positioned every searchlight and light AA gun in the south of England onto the predicted path - and as many heavy guns as possible onto a 10 mile stretch of coast pointing out to sea. As the ME262's approach the coast, literally hundreds of heavy AA guns open fire on them with proximity fused ordinance = it turns out that the gun Radars can be lowered to the horizontal when 'looking out' over the flat sea. Although only 28 aircraft are shot down directly, shell splinters are sucked into the jet engines of another 13. With their engines failing, the pilots jettison their bombs and try to crash land or ditch in the channel (they are too low to bail out).

The remaining aircraft enter the 'killing corridor'. Every hill or slight elevation on the path to London has a searchlight and a dozen AA guns on it. As the air fills with 20mm, 30mm and 40mm shells, the ME262 pilots discover again how vulnerable their jet engines are to any metal object coming their way. Half way to London, and 3,000 AA guns later they have lost 20 more aircraft. As the losses continue to mount, some of the survivors deviate from the killing ground of the AA corridor - only to be pounced upon by Meteor F4 night-fighters. Others try to get lower, only to fly into barrage balloon cables !

Of the 200 ME262's that start out, only some 100 reach their target. Each dropping 2,000lbs of bombs, they do minimal damage. They now have to return - however if they are to avoid running out of fuel they have no choice but to take the same direct route home. To avoid the light AA, they climb to higher altitude - where more F3 night-fighters are waiting for them. 31 aircraft are lost before they reach the UK coast, however they knock down 18 F4's in return (it would have been more if the 262's hadn't been forced to leave most of their ammunition behind in order to carry a higher weight of bombs).

Crossing the UK coast, the radar controlled heavy AA account for another 8 aircraft shot down direct, with 11 more lost when damage caused by proximity shell splinters leads to their jet engines failing over the channel. As the cross onto France, more of Meteor F4 night-fighters are waiting for them. These take out 13 more ME262's for the loss of only 2 of their own, as the ME262 guns are empty ..

Soon ME262's are starting fall out of the sky as their fuel tanks run dry - evading the night fighters in England and France has taken it's toll. Of the 200 that started out, only 21 make it back to a Germany airfield (5 gliding in on fumes) and all have some damage (2 are total write-offs when their under carriage collapses). One pilot later dies of this wounds, however two of those who survive after bailing out over France on the way home manage to evade capture and make it back to Germany - where an insane Hitler blames them for the disaster and has them shot.

With 90% losses, the ME262 'revenge bombers' are a spent force. Even with Hitlers insane demands, German industry just can't replace the losses, especially as the remaining aircraft factories, even those underground, are being eliminated one by one by dozens of 'Tallboy' earthquake bombs.

However, despite these losses, German war manufacturing is maintained if not actually increased, especially as much component manufacturing has been 'farmed out' to small industrial units in cities (where they remain virtually untouched, although power is an issue now the RAF and US forces are targeting power stations). However they are finding it harder and harder to move anything anywhere. The rail and canal network has been virtually eliminated and with petrol (and even coal) now in short supply, munitions and supplies are starting to be delivered tot he front by horse and cart !
With all figher production switched to the Meteor F4, the F3 has been 'downgraded' to the fighter/bomber role.
As a result, almost the entire F3 force is assigned to Arnhem ground-attack, whilst the F4's will focus on air-defence and fighter operations.
Meanwhile let's look at tank developments.
In Steve's game, Churchil has been reading all about the perfomance of the Soviet T34 (and KV) Tank ever since the Germans first encounted them on 23 June 1941. The Ultra decrypts give him a 'ring side seat' of Panzer III's and IV's outclassed by T34's. So, following the First Moscow Conference (September 29 October 1, 1941), when Allied aid to the Soviet Union is agreed, he demands, and recieves from Stalin, full engineering plans and manufactiring details of the T34. This is followed in Spet. 41 by dozens of examples, bought back by the otherwise empty ships of the Artic Convoys starting in August 1941. Although full plans and sample T34 tanks have thus been in British hands since end of 1941, officials in the Army Office have ignored them and pushed ahead with their own pet-project, a new design of 'Infantry Tank'. When Churchill demands action, instead of switching focus, they simply re-name their Infantry Tank the 'Churchill'. Lack of urgency (and diversion of resources to Harris and the RAF heavy bomber program - Harris is not 'bought to book' until end 43) means the 'Churchill' Tank is not ready until July 1942. By this time, even the Army Office realise that the 2pdr (40mm) gun with which it was deigned is inadequate and the 6pdr (57mm) is being fitted (at this exact same time, the Germans are producing the Tiger 1 with it's 88mm gun) When the Churchill Tank is deployed in the disastrous Dieppe Raid (Aug 42), it's short-comings are exposed for all to see. The British public, who get to "read all about it" in the Times, demand action. Luckily, the failure of the operation is placed on the highly expensive but totally useless Churchill Tank, not the man (and not the troops). Churchill is livid - he storms into the Army Office and has over 50 officials arrested and sent to the Tower charged with treason ! Whilst he would like to have them shot (and his approval rating in the eyes of the general public (and Tank crews) has drastically increased), it is pointed out in Parliament that whilst they may have disobeyed a direct order, as civilians thay can't be punished by death. Churchill is forced to relent, and a week later they are sacked but released. However, since this means they are no longer in a 'reserved occupation' he is able to have them all drafted into the Army and assigned to the Tank Corps (with whom they will eventually take part in the D-Day landings, loading and unloading stores on the beaches, since Tank crews are typically made up of the under 60's :-) ). The Churchill Tank production is wound down, with all remaining tanks being converted into 'specials' (eg flame-thrower etc.) and used for D-Day. Development switches to a British version of the T34. With a 17dpr gun and a Merlin 1500hp engine (replacing the Russian T34 500hp engine) delivering 3x the power, the sloped armour could be almost doubled to 100mm and, with significantly uprated (and better quality steel) suspension, it could still move as fast as the original. Designated the 'Churchill Bear', it proves capable of taking on, and often beating, the German Tiger (which has 120mm armour but that was 'flat', and whilst the long barrel 88 (Tiger II) was better, both the Tiger 1 & II (700hp engine) were much slower). It totally out-classed the Panther (80 mm sloped, 75mm gun). Massive resources are thrown into the project and the Bear is (just) ready for D-Day. Initially available only in small numbers they are assigned on the basis of 'one per British Tank platoon'. However the other 4 tanks in the platoon are Sherman Firefly's (Sherman's with 17pdr gun) Historically, the 17pdr was design is complete by end of 1941 and entered UK production in spring '42, but did not see action until Feb '43 (in North Africa when 100 guns were rushed over to counter the Tigers). In Steves game, the 17pdr design is immediately shared with the Americans who start production in mid 42. However, it is not until the Battle of Kasserine Pass in February 1943 that it becomes obvious that the Sherman's 75mm gun is inadequate and unable to deal with the Tiger. The 17pdr anti-tank gun, however, is present in some numbers and shows what it is capable of. At the end of Feb '43, Eisenhower demands the immediate introduction of the 17pdr into the Sherman production line. In May 43, Eisenhower learns that 2 US Generals are responsible for preventing the introduction of the 17pdr. He has them arrested for treason and shot. Churchill, who, in Aug 42, tried and failed to do the same to those in the War Office responsible for the Churchill Tank fiasco, sends his congratulations .. and immediately demands that all British Sherman's be retro-fitted with the 17pdr Just over a year later, by D-Day June 1944, all the British, and many of the US Shermans are 17pdr armed.
Years of night flying means the RAF has no problem with night operations. Further, sufficient crews will be available to allow two air-landing operations per day.
Finally, with the diversion of significant numbers of bombers to paratroop and towing duties, well before the Arnhem operation, means additional forces can be trained and air-lifted (and additional gliders built and used).

So Steves plan calls for two airlifts per day with the first taking off in the dark (and the paratroopers landing at night), although the gliders will be landing at 'first light' (to minimise losses). The second lift will be at dusk on Day 1 and the 3rd just after dawn on Day 2.

Note that the 3rd lift dawn timescale is not to achieve surprise = rather it's to get the forces onto the ground as fast as possible (and before the weather turns).

Depending on the situation of the ground, a 4th airlift on Day 2 at dusk will bring in additional paratroopers.

By the end of the war the British Army had raised seventeen parachute and eight airlanding battalions. The following Battalions were trained in air-operations (P=Paratroop, AL=Air Landing (glider)) and would ahve been available, but were not historically used in Market Garden (source, Wikipedia) :-
1st Royal Ulster Rifles (AL) = 4 Co.
12th Devonshire Regiment (AL) = 4 Co.
2nd Ox and Bucks Light Infantry (AL) = 4 Co.
1st & 2nd SAS Regiment (actually both Brigade strength) (P) = 8 Co.
4th, 5th, 6th, 7th, 8th, 9th & 12th, 13th Parachute Battalion (P) [10th and 11th did take part] = 32 Co.

(AL) = Air-Landing i.e. glider troops. If more towing aircraft had been available, it is not unreasonable to assume that sufficient gliders would also have been available for all the AL troops.
The 1st Airborne Division
The 1st Airborne (commanded by Major-General Robert Urquhart) consisted of the 1st and 4th Parachute** Brigades, the 1st Airlanding (glider) Brigade and the 1st Polish Parachute Brigade, a total of 8,969 men. Most of the man-power details below are taken from www.marketgarden.com
** whilst the men parachuted in, their heavy equipment would be delivered by gliders.
The 21st Independent Parachute Company was dropped first to act as 'pathfinders' for the main force and marking the drop-zones (DZ) and landing-zones (LZ). The jumped at about 12.30 hours over Wolfheze.
Reluctance to part with their gliders constrained the paratroopers to Drop Zones (DZ's) that were adjacent to glider Landing Zones (LZ's)
Major-General R. E. Urquhart + Divisional HQ & defence platoon :- 142 men (in 7 C47) + 29 Horsas.
US Air Support Signals Teams:- 2 teams, each of five Americans from the 306th Fighter Control Squadron with two British jeep drivers, in 4 Waco gliders
GHQ Signal Liaison Regiment Detachment (Phantom):- 10 men.
6080 and 6341 Light Warning Units, RAF:- 45 men in two Mobile radar units, 4 Horsas (Day 2).
'1 PARA', the 1st Parachute Brigade
This consisted of the 1st, 2nd and 3rd Parachute battalions, the 16th (Parachute) Field Ambulance and the 1st (Parachute) Squadron Royal Engineers (RE) as well as the 3rd (Airlanding) Light Battery Royal Artillery (RA) with 75 mm howitzers, 1st (Airlanding) Anti-Tank Battery RA with 6pdr and 17pdr guns along with a Royal Army Service Corps (RASC) detachment, a total of some 2,283 men.
Brigade HQ:- 82 men (9 C47) + 8 Horsas. (1 Co.)
1st Parachute Battalion:- 548 men (in 34 C-47) + equipment in 7 Horsas (6pdr), one Hamilcar (2x Universal Carriers), 5 Co.
2nd Parachute Battalion:- 525 men (in 34 C-47) + equipment in 7 Horsas (6pdr), one Hamilcar (2x Universal Carriers), 5 Co.
3rd Parachute battalion:- 588 men (in 34 C-47) + equipment in 7 Horsas (6pdr), one Hamilcar (2x Universal Carriers), 5 Co.
16th (Parachute) Field Ambulance:- 135 men (in 6 C-47) + 6 Horsas. (1 Co.)

1st (Parachute) Squadron (RE):- 143 men (in 9 C47) + 4 Horsas (1 Co.)
3rd (Airlanding) Light Battery (RA):- 75 mm howitzers, 372 men, 57 Horsas (Day1) +33 Horsas (Day2)
1 Forward (Airborne) Observation Unit (RA):- 73 men (in Horsa accompanying other units).
1st Airborne Divisional Signals: 348 men (in Horsa accompanying other units).
1st Airlanding Anti-Tank Battery (RA):- Six Troops, four troops ea. 4x 6pdr (mounted on the Mk III (Airborne) Carriage), two troops ea. 4x 17pdrs. Total 191 men, 30 Horsas, 8 Hamilcars.

9th (Airborne) Field Company, Royal Engineers:- 194 men, 22 Horsa.
21st Independent Parachute Company:- 186 men, 12 Stirlings.
1st Airborne Reconnaissance Squadron:- 181 men, 22 Horsa.
250 (Airborne) Light Composite Company:- 226 men, 4 C-47, 34 Horsas + 3 Hamilcars (total of 3 platoons, Jeep mobile)
Note that a company was typically 80150 men,
The 4th Parachute Brigade
This consisted of the 156th, 10th, 11th Battalions plus the 7th KOSB, a total 1,914 men (Brigadier Hackett).
Brigade HQ + defence platoon:- 86 men, 9 C47, 8 Horsas. 156th Parachute Battalion:- 479+ men, 34 C47, 7 Horsas + 1 Hamilcar 1Oth Parachute Battalion:- 582 men, 34 C47, 7 Horsas + 1 Hamilcar 11th Parachute Battalion:- 571 men, 34 C47, 7 Horsas + 1 Hamilcar 2nd Airlanding Anti-Tank Battery (RA):- 168 men, 24 Horsas + 8 Hamilcars 4th Parachute Squadron (RE):- 155 men, 9 C-47, 4 Horsas 7th battalion, Kings Own Scottish Borderers (KOSB):- 765 men, delivered in 56 gliders (8 failed to arrive, loss of 3 6pdrs, and 3 Mortars)
1st Airlanding (glider) Brigade
The brigade's glider infantry battalions consisted of 806 men in four rifle companies (so approx 200 men per company).
Brigade HQ & defence platoon:- 69 men in 11 Horsas1st Battalion (The Border Regiment):- 788 men 56 Horsas + 1 Hamilcar 2nd Battalion (South Staffordshire Regiment):- 767 men in 62 Horsas + 1 Hamilcar (landings spread over Day 1 & 2)
Each rifle company had four platoons plus a support company. The support company had two Anti-tank platoons (each with four 6 pounder guns), two mortar platoons (armed with six 3 inch mortars), and two Vickers machine gun platoons. Each company also had Universal Carriers (which were used to support the mortar and machine-gun platoons)

Wikipedia states that the Brigade required only 62 Horsa (plus one Hamilcar) gliders, however this is plainly incorrect - a Hamilcar can only carry 2 Universal Carriers (so 4 Hamilcar are needed if each Company is to have it's own pair of UC's).

A Horsa can only carry a maximum of 28 troopers, so 806 men requires at least 28 gliders. The 4 rifle Co. ea. have 2x Anti-tank platoons ea. with 4x 6pdr so that means the Brigade has 32x 6pdrs. This require an absolute minimum of 32 gliders for the guns (+towing Jeep) alone, which leaves only (62-28-32 =) 2 gliders for the 6pdr ammunition !!! Since each 6pdr usually had 2x Jeeps+ammunition trailers, 32x 6pdrs would need another 64 Horsa for their ammunition

It's a safe bet to assume the glider count needs to be doubled to 124 Horsa (since some troops will be in the gliders with the 6pdr guns and ammunition, whilst others are with the UC's, we can 'round it down' to 120), PLUS it's a safe bet that they would need other supplies (food and water for a start, not to mention ammunition for the mortars etc) so that gets us back up to about 150.

Some 273 gliders landed on Day 2, leaving about
2nd (Oban) Airlanding Anti-Tank Battery, RA (which landed on Day 2)
Consisted of 6 Troops. Four troops each had 4x 6pdr (mounted on the Mk III (Airborne) Carriage), whilst the other two had 4x 17pdrs each.
1st Polish Independent Parachute Brigade
Total of approx 2360 men in 114 Dakota aircraft. The heavy equipment (consisting mainly of the anti-tank battery) were allocated 45 Horsa gliders. The first 10 Polish gliders landed on Day 1, the remaining 35 gliders on Day 2 at LZ 'L' (where strong opposition meant they lost 7 out of the 10x 6pdr). The paratroops themselves would not drop until Day 5.
Most of the man-power details taken from www.marketgarden.com).
Brigade HQ (Major-General S. F. Sosabowski):- 104 men ( 1 Co.)
1st Battalion: 354 men (organised into 3 Co. + HQ, Pioneers, MG and Mortar sections). 7 PIAT, 3x 2", 2x 3" mortar, 1 flame, 1 MG. = 3 Co.
2nd Battalion: 351 men = 4 Co.
3rd Battalion: 374 men = 4 Co.
Anti-Tank Battery: 132 men in 3 troops ea. 2?(note 1)x 6pdr + 3x Jeeps. (landed Day 3, saw action supporting the British paratroopers at Oosterbeek)
Engineer Co.: 133 men, 1s PIAT, 3x Flamethrowers, 1x 2" mortar. (landed Day 3)
1st Polish Airlanding Light Antiaircraft Battery: 3 troops, ea. 3x 20mm AA guns + 3x Jeeps.
Signels Co.: 93 men.
Medical Co.: 90 men.
Light Artillery Battery: 4x 75mm pack-howitzer 6x Jeeps (6 men went in with 1st British Airborne Division, however all the 75mm guns were left behind due to a shortage of gliders)
Note 1. Other reports say "7 out of 10 Polish 6pdr's were lost" - if correct then most likley there were 3x guns per Troop (+1 in HQ) or 5 Troops (less likley).
Note that soon after take-off from UK, the weather situation was re-assessed and the Poles were ordered to turn back. However only 31 aircraft received the message. The direct result was that some 30% of the Brigade never made it to the landing grounds
The Gliders
Approx 610 of the smaller Horsa/Hadrian were used** at Arnhem. They could carry 7,130lbs = two pilots plus 28 troopers or a Jeep +6Pdr, +25pdr / +75mm Pack Howitzer or +ammunition trailer (typically, each Jeep+6pdr or Jeep+25pdr would have 2 Jeep+ammunition trailer) or 2 Jeeps
The typical tow aircraft was an obsolete 4 engine bomber (the Halifax or Stirling). In theory these could tow 2 Horsa gliders at the same time, however at Arnhem (perhaps due to the distance - they all took off from UK airfields) each glider had it's own tow aircraft.
Note that the small body width of the Horsa glider required the 6pdr carriage be redesigned before it would fit.
Historically, 39 Hamilcars were used. These could carry up to 17,600lbs = 40 troopers or a 17pdr+tractor and crew, or up to two Universal ('Bren-Gun', a .303 light machine-gun) Carriers, one Carrier plus a Jeep or 3 Jeeps or a 25pdr gun + tow vehicle. It could also carry a light tank (Vickers "Tetrarch" Light Tank Mk VII (with the 2pdr(40mm) gun or a 3" (80mm) howitzer) or the US M22 Locust with 33mm anti-tank gun), however, historically, this capability was not used at Arnhem. Each Hamilcar required it's own tow aircraft.
** Historically, just over 300 Horsa gliders took part in the first lift, 273 in the second. This leaves 20-30 for the 3rd lift (the Polish 'heavy weapons') which took place on Day 3. The Hamilcars allocated to the 3rd lift were never used and the Polish Paratroopers where delayed to day 5 (by which time most of their glider equipment had been lost)
In Steves game, with more bombers being available for towing, and resources freed from the need to replace Bombers lost in 'city busting' operations, more than double the number of Hamilcars will be available and as many Horsa will be used as required (i.e. the limit would be the number of trained troops, not the aircraft/gliders needed to carry them)
Unlike the historical case, I am well aware of the large numbers of Armoured Cars available to the German forces.

So 40 of my Hamilcars will carry the Vickers "Tetrarch" Light Tank Mk VII with the 2pdr(40mm) gun. These will oppose the German Armoured Cars and NOT go up against Panzers :-)

All my Universal Carriers are the T16 US built version, longer, with a more powerful engine and which is used to tow the 25pdr pack-howitzer artillery piece or the 6pdr anti-tank gun. A second T16 tows the ammunition trailer. At Arnhem, the 6+2** man gun crew are carried 'piggy back' style on the two T16's. Once the 6pdr has been deployed and it's crew and ammunition dropped off, the T16 goes into battle as a street fighting vehicle.

** Both the 25pdr and 6pdr normally have a 6 man-crew, however at Arnhem each gun is accompanied by a 2 man sniper crew. I have noted that German Tank commanders like to ride with their heads exposed to obtain a better view. The snipers role is thus to put bullets in those heads at the first opportunity. All 8 men are equipped with Thompson submachine guns (40 round magazine) as their 'personal weapon'.

To make the vehicle more suitable for street fighting, a wire mesh clam-shell type 'canopy' has been fitted. Grenades thrown at high trajectory (or from above) will thus roll off (instead of dropping into the vehicle). The canopy can be partially retracted (to allow mortar rounds to be fired from the vehicle), or fully retracted and folded against the sides (to allow up to 4 additional men to be carried 'piggyback' style).

In the T16, the all but-useless .303 'Bren-Gun' (with it's 20/30 or 100 round magazine) has been removed and replaced by a pair of 50 Cal (US) belt fed heavy machine-guns (one front facing, the other at the rear on a swivel mount).

It has a 4 man crew - one driver/front gunner, one rear 50 Cal gunner plus either a sniper team (with sniper rifle and PIAT (the spring launch mechanism means there is no 'blow back' so it can be used safely from within a vehicle, and it has both Anti-tank (hollow charge) and HE projectiles) or a 2 man 3" Mortar team. At Arnhem, like the other paratroopers, all 4 crew are equipped with the Thompson submachine guns (40 round magazine) as their 'personal weapon'.

The Mortar can be fired from within the vehicle (at front targets, +/-30 degrees only), or dismounted (along with it's ammunition boxes and 2 man team).

In keeping with that great British tradition, all men carry a Bayonet that can be fitted to the front of their Thompson's :-)
(note - my forces use the Thompson with the fast-swap 40-round 'double capacity' can magazine, and never the 'gangster-style' 50-round but almost impossible to reload in a hurry drum magazine (which was also more prone to jams)).
Historical operations
There would be one operation per day, landing at noon. It took 2 days to bring in the whole of the British 1st Airborne. Bad weather then delayed the Poles to Day 5
Day 1. The 1st Parachute Brigade and most of 1st Airlanding (glider) Brigade.
13 Hamilcars used at LZ 'Z', of which 8 carried a 17pdr (plus towing vehicles and crews) and the other five carred Universal Carriers (2 each).

Day 2. The 4th Parachute Brigade and the rest of 1st Airlanding (glider) Brigade.
273 gliders arrive, 69 at LZ-S and 204 (carrying Divisional vehicles and artillery) at LZ-X, of which 15 Hamilcars land at LZ 'X', of which 8 carried a 17pdr, 4 carried eight Universal Carriers and the final 3 were packed with ammunition and stores. Adverse weather resulted in delayed take-off and when they arrived at Arnhem in the afternoon they were met with German AA fire.

On Day 3 the plan called for the Polish 1st Independent Parachute Brigade, along with air-landing of supplies etc.

The pland was for 10 of the precious Hamilcars to land at LZ 'W' with engineers from the American 878th Aviation Engineer Battalion and their equipment (which included bulldozers, cranes and graders). The idea was that they would to construct a forward airfield in landing zone 'W' after the gliders had been cleared away (note 1) !!

Whilst the 3rd Hamilcar lift never took place due to bad weather, some Horsa gliders did manage to get in to Zone L with the Polish 'heavy equipment' and supplies (most of which were lost almost immediately)
Note 1. What ON EARTH were the planners thinking ?? The Polish Light Artillery had to be left behind due to lack of gliders (and the whole operation was desperately short of 17pdrs with which to hold off the 2nd SS Tigers), so allocating 10 precious Hamilcars to some madcap 'build an airport' scheme just shows how 'out of touch with reality' the planners were ..
For further details see Wikipeadia
Steves game
The arrest of 'bomber' Harris results in RAF night bombing being switched away from Berlin and onto other closer/easier targets. This reduces bomber losses and means fewer replacements need be built. Further resources are freed by curtailing increases in the bomber force. These resources - and especially engines - are reallocated to fighter-bomber production (for every 4-engined bomber not built, 4 fighter-bombers can be built instead). Soon large numbers of Meteor Jet Fighters (which historically commenced operations on 27 July 1944) are coming off the ex-bomber production lines. Re-focussing of research effort means that many of these will be the Meteor F4. Instead of the 100 odd Jet fighters historically built by Arnhem, over 600 will be available - and 2/3rd of these will be supporting Market Garden from Day 1.
With experienced night flying crews and as many modern bombers as needed made available for paratrooper (and glider) operations, the paratroopers drop at night. Also on Day 1, two glider operations are sent in (at dawn and dusk). Priority is given to getting the 17pdrs in as early as possible since these are heavy to move and take time to dig-in properly (and I want my forces to be fully ready when the Tigers arrive - which could be as early as the morning of Day 1 - although (unlike the historical plan, which simply ignored the existence of the 2nd SS) my plan is to keep 2nd SS 'occupied' (and it's commander 'distracted') for as long as possible)
The need to replace fewer bombers (or increase bomber force) means there are also enough resources to build more gliders, especially Hamilcars.

I will use 800+ Horsa gliders (historically 600+) to bring in Anti-Tank and Light Artillery Brigades, along with all the other stores and ammunition needed.

Further, instead of the historical 39 Hamilcars, at least 100 will be available. Over half will be allocated to bringing in either 17pdrs (1 per glider) and 'T16' Universal Carriers (2 per glider). The rest will bring in the "Tetrarch" Light Tanks (which will fight it out with the German 'Sdkf' Armoured Cars) - and none wasted on some pointless 'experiment' (such as the bringing in of ordinary stores) or to support some insane 'runway' building project. The one exception will be the air-support mobile radar (see later).

The 'T16' Carrier is used to tow 6pdr, 25pdt, ammunition and can even used with the 17pdr (to drag it in a hurry eg. for 're-aiming', during a battle, without using it's vulnerable tow truck). It is also used as a general purpose 'tractor', to pull guns and Jeeps out of crashed gliders or soft ground etc. and to move gliders to make way for the next wave.

Finally, armed with 2 50 Cal heavy machine guns and anti-grenade canopy meshing, it is an extremely useful 'urban fighting vehicle'.

My goal is at least as many Universal Carriers as I have 17pdrs.

Day 1, after midnight, the 1st Parachute Brigade are dropped along with the (split over 9 different DZ's)
During the night, Model and most of the Germans in Oostreneek and Arnhem will be 'dealt with' by the paratroopers.

At dawn, it's the turn of 1st Airlanding (glider) Brigade.
48 Hamilcars bring in 16x 17pdrs, 32x Universal Carriers, 14 "Tetrarch" Light Tanks and two mobile radear systems, whilst 300 Horsa bring in the rest of the brigade and it's Jeeps with 6pdrs, 25pdrs, ammunition and other supplies, all to LZ 'V'.

The biggest potential threat (the 2nd SS Panzers) could arrive from the north at any moment (maybe even before dawn). To counter the Panzers, this is where the first 17pdrs must be positioned. To counter their Armoured cars, the "Tetrarch" Light Tanks will also sent there (provision will ne made for the Tetrarch's to assist in cleaning Arnhem, if needed)

Since I anticipate 'interferrence' from the Luffwaffe ME109/FW190 (and maybe even Stuka's), priority will be given to setting up the 2 mobile radar units (also carried into Arnhem historically), however these will now land at dawn on Day 1 (LZ V) along with the air controllers and their multiple powerful radios. As soon as the air controlers make with the forward airbase in Belgium, Meteor F4 Jet fighter and F3 fighter-bomber support will be 'on-call' (and could be overhead Arnhem within 15 minutes).

Day 1, dusk. The 4th Parachute Brigade and the rest of 1st Airlanding (glider) Brigade. They will be split equally between LZ 'P' (the histotrical 'planned' Polish LZ) and LZ A (the histortical 'actual' Polish LZ).

At dusk, my plan (Note 1) is for 40 Hamilcars to be split 20 each to LZ 'P' and LZ 'A'. Eight deliver 17pdrs (8 to each LZ), 8 each 2x Universal Carriers (so 16 to each LZ) and the rest "Tetrarch" light tanks (4 to each LZ). At least 300 Horsa will be used (split 150 and 150) to bring in Jeeps with 6pdrs, 25pdrs, ammunition and other supplies.

Note 1. The troops on the ground will be in contact with the Hamilcars (and the supporting Horsa carrying the 17pdr ammunition). If things have not gone according to plan at LZ 'V' and many of their 17pdrs / Light Tanks have been lost, up to two 17pdr from each of LZ P and A and all the Light Tanks will be diverted to 'V'

Day 2 dawn. The 1st Polish Brigade lands at either LZ 'V' (if 2nd Panzer is attacking from the north/east) or is split between LZ 'A' and LZ 'P'. Instead of 10 Hamilcars historically allocated to some insane 'build an airport' scheme, I have 20 to bring in 8 more 17pdrs, 8 more Light Tanks and 8 more Universal Carriers (all of which will support follow the Poles, where-ever they land).

Instead of sitting around in England waiting to be airlifted into Arnhem, the US Engineers will have spent the last 2 months building a massive forward airbase in Belgium.

This will operate some 400 Meteor F3 Jet fighters in fighter-bomber configuration (built from resources saved from not building heavy bombers) plus 200 Meteor F4 Jet fighters (the result of Rolls Royce switching focus, since end of '43, from engines for the bomber force to the development of the Jet engine, thus bringing the F4 forward by some 8-9 months) and which is now starting to replace all Spitfires in production.

The Meteor F3 achieved 490mph (788km/hr) whilst the Meteor F4 managed 570-590mph (the FW190 achieved 350-410mph and the ME262 530mph). It was armed with four 20mm cannon in the nose and could carry two 1,000lb bombs or sixteen 90lb rockets under the wings. Endurance was 504miles (or about 1hr) with normal load. Distance from the Belgium base to Arnhem is less than 200km (about 15 minutes flight time for the Meteor, which would give it 30 minutes endurance over Arnhem).

If Market Garden succeeds, the US Engineers and their equipment will be loaded into trucks and driven in the path made by the tanks of 30 Corps to Arnhem where they will start work on the next forward airbase.

About 200 (historically, 40) Horsa will bring in the Jeeps, 6pdr, 25pdt, ammunition and suppliers of another Anti-Tank and Light Artillery Battery. About 20 of these will carry bicycles (there should easily be room for 40 peer Horsa, on top of heavier supplies). This will deliver 400 bicycles to each LZ, thus providing enought for a whole Polish Battalion (about 360 men).

If the Poles land at 'A' and 'P', then, by the end of Day 2, a decision will be made based on situation at Nijmegen. If the bridge is still in German hands, two Polish Battalions plus their anti-tank guns and light artillery (and anything else mobile in the 'A' and 'P' areas) will be sent south (on cycles and in Jeeps and Bren-Gun Carriers). The distance from Arnhem to the Nijmegen bridge over the Waal is only about 20km, an easy 2hr. ride.

Starting at dusk on Day 2, they might even have time for a couple of hours sleep befor launching a midnight assault on the Nijmegen bridge
How it went, historically
The other Allied air-drops managed to capture all of the other bridges intact, which is what allowed XXX Corps, against fierce opposition, to move as fast and as far as they did
However 30 Corps was still at laast 10km short of Arnhem when the paratroops, after holding out 3 times longer than Planned (and twice as long as anyone thought possible), were finally finished off by the end of day 9.
By the end of the operation, the obvious failure to achieve 100% complete success allowed the Americans to get their own way. So the Allies returned to the 'tried and tested' (Blood and Guts) method of simply overwhelming the Nazi forces by attacking them head-on more or less every-time (which, of course, is exactly what the Soviets had been doing ever since Stalingrad (the one exception was at Kursk, where they allowed the Nazis to attack first and waste their tanks on the well prepared Soviet defences - however that's another story))
Just like Dieppe, the fault laid in the Plan, not the troops. Needless to say, this did not stop those 'in charge' from placing all the blame on the Polish forces (who were only dropped on day 5, which was at least 2 days after everyone should have realised that the Plan wasn't going to work and that the battle for Arnhem had already been lost).

As usual, when a Plan goes wrong, scapegoats are found amongst the 'outsiders'. In this case it was the Poles, who were dependent on the British for their very existence and who would be unable to complain.
The Map
Due to the relatively few units involved, and the need for 'enough' detail of Arnhem, I set the scale to 0.5km per Hex.
Detail of the Arnhem area (25x41 'gridded' map)
The full map depicts the area from about 10km south of Grave to 10km north of Arnhem, which is about 60km by 40km wide. This gives us a full map 120 hex high by 80 hex wide
Crimson Fields can cope with large maps without problem = it falls over when there are 'too many' units (in my experience that's when the total unit count exceeds about 1,000)
Having a decent sized map allows for a reasonable amount of maneuvering as well as allowing a reasonable time scale.
Time scale
Tanks, on road, can travel at 7 (heavy) to 9 (light) hex speed. Across country, that is reduced to 3-4 hexes. If the map is 120 hexes 'tall', then it can be crossed in about 13-17 turns by road, or 30-40 turns across country. Taking the 'worst case' of 40 turns to do 120 hex's equals 3km per turn.
The Allied forces were expected to achieve 40km a day (which I would agree is an impossible target). In fact, they actually achieved about 10km a day. I'm going to set a 'target' of 20km a day (about the same as the ancient Roman Legions were expected to achieve, so should be achievable even for Infantry marching on foot). A speed of 3km/turn means the 'target' of 20km (40 hexs) can be done in about 7 turns == which thus sets 1 day
We want to allow the final III Corps reinforcements (who arrive on the far south of the map at the start of day 7) to reach Arnhem (about 100 odd hexes away by road) by the end of day 9, i.e. about 50km in 3 days.

At 7 turns a day, that gives them 21 turns to do 100 hexes, so they need to achieve an average speed of 5 hexes a turn. This is no problem even for heavy tanks on roads (7 hexes a turn) but can't be done cross-country (even light tanks can only travel 4 hexes a turn), all of which is about right.

So, if III Corps are unable to cross the Arnhem bridge without their reinforcements, the roads had better be kept clear for them, since all the Nazis would then have to do is to block the roads (to force them to go cross-country) which means they can't arrive in time.

Note that day 1 is a 'short' day (as the first paratroopers only landed at Arnhem at 12.40pm), however if we allow 4 turns, it's still just about possible to move from the landing zones to Arnhem road bridge on 'day 1', unless, of course, you encounter Nazi resistance :-)
The game
The ideal way to play is against human opposition ('hot seat' mode). Alternatively, against the AI, you should play the Allies (the AI can't cope with multiple 'objectives').
Initially, the Allies focus will be on the airborne forces (Market) i.e. the British / Polish at Arnhem and the US 82nd Division (3 Brigades) at Grave / Nijmegen where you need to take the bridges.
At the start of game day 2 (more or less 'on plan', unlike real life when it was day 7-8), the first elements of XXX (30) Corps (Garden) will arrive at the far southern edge of the map (about 30km from the bridge across the Waal at Nijmegen which should be in the hands of the US paratroopers by then).
You will need to get them across the Nijmegen bridge and on to Arnhem so they can link up with the British paratroopers, who should be holding the Arbhem bridge. At least one Tank of XXX Corps must cross the Arnhem bridge before end of day 9 for the Alllies to 'win'.
The Allies have 3 British and one Polish Brigade at Arnhem and US 82nd Division (3 Brigades) at Grave / Nijmegen and (from day 2) XXX Corps.

You win by taking (both sides of) the Rhine Bridge at Arnhem and "holding until relieved" i.e. until at least one tank of III Corps crosses the bridge.

You loose if you haven't been relieved by the end of day 9 (turn 63).

The Arnhem force consists of Infantry, 'armed Jeeps' (a sort of very weak APC) and 'Bren-gun carriers' (a weak light tank, on par with an open top Pz I).

You also get some light Anti-Tank guns (these are 'towed' (i.e. carried) by jeeps), and a few mines (these can carried by jeeps (who aren't carrying an AT gun) and by the Bren-gun carriers and remember - the British 6pdr A-T gun has no HE ammunition, so is of limited use against 'soft targets', however the A-T ammunition was effective against armoured cars and Panzer III, less so against the Pz IV and of little use against a Tiger or Panther)
The battle starts after the initial glider and paratroop landing on 'day 1'. As in 'real life', most of your forces are dropped some 8-13 miles from your objective. You may start off immediatly or your paratroopers can wait to join up with their glider borne equipment (jeeps etc).
Whatever you do, you can expect the Nazis already in Arnhem to oppose you (and will need to deal with these before the main Nazi forces arrive).
To reach the pontoon and road bridge at Arnhem, your forces will pass the Heveadorp ferry and then the (which was mined and ready to blow) Rail bridge at Oosterbeek.
When the paratroopers reached the north end of the rail bridge, the Nazis on the south side were able to blow it up. However you might like to consider how using the ferry could help you save the rail bridge and how this could be used to help you take the far (south) side of the main road bridge.

The Plan expects you to secure the north end of the road bridge first. Your superiors have learnt nothing since the Flak 88 was first turned on the British Matilda tanks in France, so no opposition is expected from the troops (believed to be) manning the (believed to exist) massive numbers of flak guns protecting the bridge.

Once you have secured the north end of the bridge, there will be plenty of time tomorrow to stroll over and secure the southern side as, according to the plan, the Nazis couldn't possibly think of that approach and won't be waiting for you.
The 82nd Americans will land about 10 miles to the South of Nijmegen (which is about 8 miles from Arnhem) where they need to secure the bridge over the river Waal ready for 30 Corps (who will arrive in 2 days, some 4 times faster than in real life).
Of course the Allies had more or less total Air supremacy, however (as in real life) initially you will get no combat air support (there being some, no doubt justifiable, concern that the dumb trigger happy Allied (read US) fighter pilots will mistake the slow moving multi-engined British transport aircraft towing large heavy gliders for the fast moving single engined Me109's or Fw190's of the Luftwaffe and shoot them all down).

Further, as in real life, there are insufficient transports to get everyone on the ground in one go. Allied air transport is apparently unable to mount more than one drop per day, so initially only 1/3rd of the forces allocated to the Arnhem will arrive on Day 1. The remaining 2/3rds will be arriving in two more drops, on day 2 (rest of the British) and (planned) on day 3 (the 2nd Polish Brigade).

Since the Plan anticipated that 30 Corps would reach the southern end of Arnhem bridge by day 3, it is hard to understand why the Plan also called for the Polish paratroopers to be dropped onto the southern side of the bridge at the same time.

In real life bad weather delayed the Polish reinforcements (and the Nazis were waiting for them), so the drop didn't quite 'go to plan'.

However, in the game I assume that by this time your forces have found a way to contact 'base'. This means you will get control over where and when the Polish Brigade lands (their transports will appear on the far southern edge of the map at the start of day 4).

Unlucky for you, the 9th and 10th SS Panzer (each less than half strength) divisions of the 2nd SS Panzer Corps are resting and refitting to the North and West of Arnhem. Your superiors have decided not to bother you with this 'unreliable' information (derived from Ultra intercepts and photo-reconnaissance) and have sent you off with only a few 'unnecessary' 6pdr Anti-Tank guns, although (plainly due to some mistake) you also have some 'unnecessary' PIAT's and Anti-Tank mines (use them well).

The PIAT is a spring propelled hollow charge anti-tank grenade. It had an effective range of just over 100m (the Panzerfaust was half that), so was fine when used in built-up areas, and virtual suicide when used in the open (especially as it could only really be reloaded when standing up). It could penetrate 75mm (up to 100mm at 90 degrees** - the Panzerfaust was double that). Both the PIAT and the Panzerfaust were more effective than the puny US 'bazooka' (in fact, the US 82nd Airborne Division used captured Panzerfaust against the Nazis during Market garden).

**The Tiger I had frontal hull/turret armour of 100 mm (3.9 in), 60 mm hull side plates and 80 mm armour on the side superstructure/sponsons and turret sides and rear, all mostly at 90 degress
The American paratroopers at Grave/Nijmegen have been warned about the Nazis holding the Greosbeek Heights to the West of Nijmegen, and have been equipped with some SP Guns to help deal with them. Indeed, the Americans apparently had 'reliable' evidence (unsupported by Ultra, photo-reconnaissance or anything else) of "1,000 Nazi Tanks" (i.e. every last tank left to Nazis on the entire Western front) that are to be found in the Reichwald to the west and (apparently) believe that taking the Heights would 'trap' these in some (magical) way.
So, whilst those elements that landed at Grave successfully took the bridge over the Mass, those elements assigned to taking Nijmegen bridge over the Waal (which, when they landed, was essentially undefended), landed at Grosbeek and then focused on taking the heights (instead of wasting their time strolling up the road into Nijmegen). By the time they got around to thinking about securing Nijmegen bridge, the Nazis had arrived to defend it.
As soon as the Nazi commaned got over the shock of British Paratroopers landing next to his HQ (in Oosterbeek), they reacting with their usual speed. By mid afternoon on day 1 the 10th SS (infantry, artillery, a few tanks) had been ordered to oppose the US paratroopers at Nijmegen (where they will slow XXX Corps) whilst the 9th (infantry, APC's, a few tanks) was ordered to Arnhem.
In fact elements of the 9th were already moving - they were so fast off the mark that when they arrive at the Arnhem bridge they fail to find any British at all (the British are still slogging their way from their drop zones) !

So they cross the bridge and continue on to Nijmegen (instead of holding the bridge), only returning on day 2 (when news of the arrival of the first British at Arnhem bridge reaches them). Meanwhile, the 10th will dig in at Nijmegen on day 2 (whilst the US paratroopers at Nijmegen are still busy taking the Greosbeek Heights), and the Tiger Tanks of the 9th SS will arrive at Arnhem (down the road from the North) at the end of the 3rd day. Be warned that light Anti-tank guns have no effect on a Tiger.

Still in real life, the entire Allied ground-attack Air Force was 'all busy' helping XXX Corps for the first 6 days (command of the British bombers reverted to 'Bomber Harris' after D-day, so as your forces die trying to hold the bridge you can be comforted by the thought of the nightly 1,000 bomber raids that continued to massacre German civilians in Berlin and other places - lucky, really, since even at this stage of the war the US bombers were still dropping bombs on their own troops almost as often as on the Nazis, and the RAF still couldn't get most of their bombs within 5 miles of the target, so the last thing you need is 1,000 of 'Bomber Harris' finest dropping their bombs anywhere near you  ..).

In the game, you will get ground attack air support as soon as III Corps gets it's first tank across the bridge at Nijmegen (or else from day 6, as per real life).

The RAF will make daily supply drops, however due to the incompetence of the morons in command, some idiot with full plans of the entire operation was captured (at Arnhem) at the start of day 1, so the Nazis will know exactly where the supplies are going to be dropped. Due to more incompetence, your troops have no working 'long range' radios, so you will have no way of changing your supply drop zones (or, indeed, contacting your 'superiors' at all - which was lucky since they would, no doubt, have found some way to make things even worse).

In the game, you get control of the supply drops (which will include some more 'unnecessary' light Anti-tank guns) one day after III Corps gets it's first tank across the bridge at Nijmegen (i.e as soon as they get close enough to hear your short range radios, and allowing an absurdly short reaction time of only 24hrs).

From day 4, fighters become available to the Nazis, although they will (no doubt) all be too busy shooting down your re-enforcement and supply transport aircraft to be much of a threat to your ground forces.

Allied ground attack aircraft will be available from day 6 (and this will be reflected in the game, even if III Corps fails to gets it's first tank across the bridge at Nijmegen by then).

In real life neither they nor your transports had any fighter support = 'the plan' allocated no Allied fighters to the operation AT ALL, perhaps because the Allied command assumed the Nazis would fail react fast enough (no doubt based on their own reaction time of 'about a week or two') - or maybe they were more concerned about the trigger-happy US fighter pilots shooting down the transports (I guess, on balance, the transport pilots would rather be shot down by the Nazis than their own side)

In the game, I'm going to assume the Allies will react to the presence of the Nazi fighters on day 4 within 48hrs (yes, I know this is would be an unprecedented change in the Plan, which would normally take a week or two), so allied fighters will become available from day 6 (even if Allied ground-attack aircraft arrive earlier).

On day 7 the 82nd Americans will be reinforced, and further elements of XXX Corps will arrive south of Nijmegen. If they move fast enough they might just make it to Arnhem before the end of day 9 :-)
The fact that the Allies won WW2 came down to their massive advantage in men and materials. As mentioned elsewhere, it didn't matter that Nazi tanks killed Allied ones at a ratio of 10:1 when the Allies were building tanks 11 times faster than the Nazis. So the Soviet / US 'battle plan', which never really consisted of much more than "full frontal attack" worked because the Axis couldn't replace lost men and materials whilst the Allies could (and did) 10x over - and eventually this simply ground the Axis forces unto the dust (when the 'tanks remaining' score reached 'Allies 1, Axis 0')
At least one Tank of XXX Corps must cross the Arnhem bridge before end of day 9 (turn 63) for you to "win".
Note that, whilst it's possible to have the computer play the Allied side, it has no concept of the vital need to take and hold the bridges. On the other hand, it also has no concept of the need to blow the bridges before the Allies can capture them either :-)
The forces
British
Bren-Gun Carrier, 7-10mm armour, 1x MG, 1x PIAT, 30mph (48kmph) [since 1943, can tow 6pdr]

Jeeps with 6pdr and ammunition trailer
A light-weight version of the standard 6-pounder was designed specifically to fit into the Horsa Glider and used by both the British and Polish. Almost 100 6pdrs were delivered to Arnhem (each gun team actually used two gliders - one carried gun plus tow jeep, the other a jeep and two ammunition trailers.