

Nijmegen-Arnhem (Market Garden, 17 Sept. 1944)
( This game/map is still 'under construction' )
Right click and 'Save link as' for steves-NijmegenArnhem-v1-set.zip (contains Market Garden Units, Tiles and Nijmegen-Arnhem-v1 Map (.lev, .src))
For my detailed 'Armhem only' Crimson Fields scenario game, see my previous page
Background
By this stage of the war, the allied forces are suffering from an 'embarrassment of riches'. The paratroopers and airborne glider forces, formed from the best and most highly trained men, have been kicking their heels on the ground since D Day. Each planned use has been overtaken by events, as their selected objectives are captured by the Allied ground forces who have been advancing at break-neck speed.
However now the allied advanced has been held up by lack of supplies, which have to be trucked all the way from Normandy. This pause has allowed Monty to propose a use for the air-borne troops that, if he is fast enough, might just be possible before the ground advance resumes.
By D-Day, it's obvious that the war is won. So the usual inter-service rivalries are already overpowering the co-operation forced upon them by the Nazi's. Politics, never far away, has already overtaken sensible military decisions.

The sensible approach, after D-Day, would have been to conduct a series of blitzkrieg encirclements of the German forces, trapping them in France. Instead, at American insistence, frontal attacks are conducted all along the line, allowing the Germans to fall back into Germany. When they accidentally cut off the Germans in the Falaise Pocket, the vital need to stop them escaping via the final gap, in this case between Chambois and St Lambert, seems to have escaped them.

After Paris, they should have pushed on as fast as possible to Antwerp, or at least some other major channel port, before the Nazi's had a chance to destroy the docks.  Capturing a major channel port intact, of course, would have made a massive difference to the supply situation. Instead, as the supply situation gets worse, arguments continue on the best way to deploy the airborne troops.

Everyone wants to be part of those most elite divisions. So much so, that there are now 3 times as many men as there are aircraft available to carry them, even when some aircraft are going to be towing two or three gliders each.

Now that Harris has his bombers back, nothing is going to distract him from flattening whatever is left of the Germany cities. Like everyone else he knows the war is won and soon he will have to stop the bombing. In the meanwhile, he's not going to give up any for some silly Army requirement. If it's anyone's job, it's a task for the American Army Airforce. They, of course, are going to be too busy transporting the American troops.

To avoid the Nazi's 'guessing what was about to happen', the ground attack by XX Corps was held back until AFTER the air-drops went in. Marginal weather then delayed the take off and the forces did not start dropping on Arnhem until after mid-day
Even so, the airbourne plan called for all the bridges to all be taken on 'day 1' and for the relief forces, XX Corps to reach the final bridge, at Arnhem, on Day 2 or Day 3 'at the latest'.
In the event, the forces taking Nijmegen were 'distracted' (and failed to take the Bridge first, preferring to 'consolidate their position' by taking the overlooking heights). However the time lost was not as crucial as it might have been because XX Corps were delayed in reaching Nijmegen bridge anyway.
When they DID finally arrive at Nijmegen, they then waited 18 hrs before deciding to push on to Arnhem, by which time it was all over for the British paratroopers.
Since it's Monty's idea, the British get the prestige task of taking the 3rd and furthest, the bridge at Arnhem.
The closest drop zone north of the Bridge (see map, below) was 'reserved' for 'supplies'. The almost ideally positioned drop zone south of the bridge, but also just south of a swamp was allocated to Pole paratroopers. There is, in fact, a very wide tree lined boulevard leading to the bridge on the northern side. Without doubt gliders could have landed there. However safety first was now the order of the day.

Not only would there be no night drops, but aircraft would only take off from Britain during daylight and good weather. This limited the air drop to one a day.

Even with American help, the British forces will require 3 separate drops. Since politics made the decision that the British had to go in and capture the bridge first, the Poles were relegated to the reinforcement role and only due to arrive on Day 3.
It was after noon before the first paratroopers started landing outside Arnhem (12.40pm to be exact). These 'pathfinders' were followed by the rest of 1,2 and 3 Para and the gliders with their 'heavy' equipment, although some of the jeeps needed by the 'advanced force' to 'rush the bridge' never made it, their gliders having been 'lost' on the flight over. With half the day gone and half the advance attack force lost, things were going wrong right from the start
However the air drop was essentially unopposed and achieved reasonable accuracy with the paratroopers avoiding the roofs and gardens of houses (unlike 2 plane loads of the US 82nd Airborne Division on D Day who had ended up being dropping into trees and houses all over Sainte Mere Eglise). However at Arnhem the main glider zones chosen were miles away from the Bridge.
The 'advanced' (or Recce) force started off toward their objectives by mid afternoon, 'only' a couple of hours after the first landings.
The game starts in mid-afternoon of Day 1 (i.e. after the air drop and as the various units are preparing to depart for their objectives
The Game Map
Due to the relatively few units involved, and the need for 'enough' detail of Arnhem, I set the scale to 0.5km per Hex.
The full map depicts the area from about 10km south of Grave to 10km north of Arnhem, which is about 60km by 40km wide. This gives us a full map 120 hex high by 80 hex wide
Crimson Fields can cope with large maps without problem = it falls over when there are 'too many' units (in my experience that's when the total unit count exceeds about 1,000)
Having a decent sized map allows for a reasonable amount of maneuvering as well as allowing a reasonable time scale.
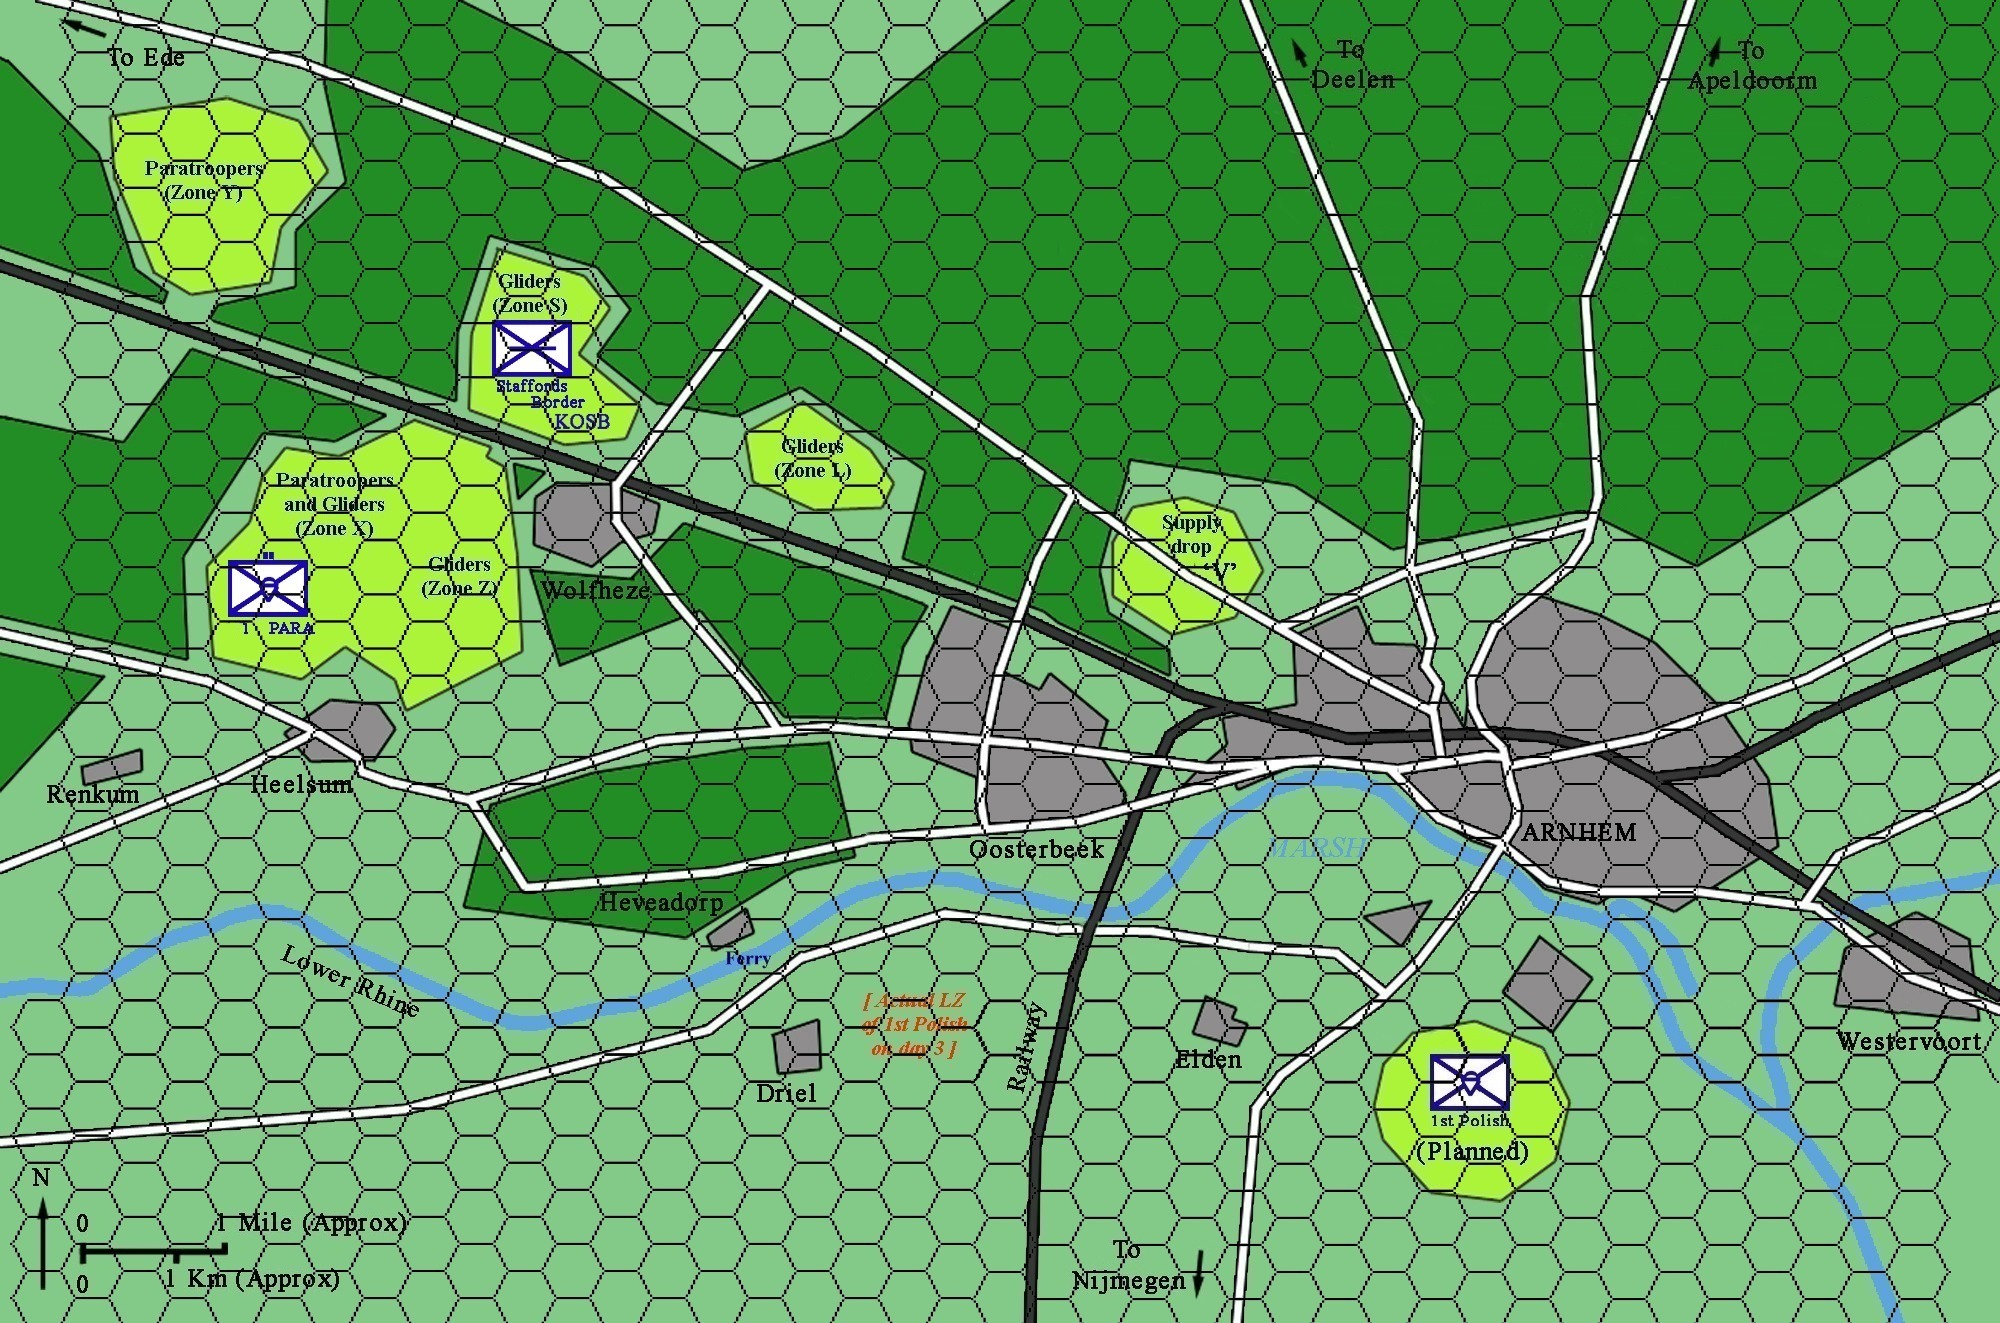
Detail of the Arnhem area section (25x41 'gridded' map)
Time scale
Tanks, on road, can travel at 7 (heavy) to 9 (light) hex speed. Across country, that is reduced to 3-4 hexes. If the map is 120 hexes 'tall', then it can be crossed in about 13-17 turns by road, or 30-40 turns across country. Taking the 'worst case' of 40 turns to do 120 hex's equals 3km per turn.
The Allied forces were expected to achieve 40km a day (which I would agree is an impossible target). In fact, they actually achieved about 10km a day. I'm going to set a 'target' of 20km a day (about the same as the ancient Roman Legions were expected to achieve, so should be achievable even for Infantry marching on foot). A speed of 3km/turn means the 'target' of 20km (40 hexs) can be done in about 7 turns == which thus sets 1 day
We want to allow the final III Corps reinforcements (who arrive on the far south of the map at the start of day 7) to reach Arnhem (about 100 odd hexes away by road) by the end of day 9, i.e. about 50km in 3 days.

At 7 turns a day, that gives them 21 turns to do 100 hexes, so they need to achieve an average speed of 5 hexes a turn. This is no problem even for heavy tanks on roads (7 hexes a turn) but can't be done cross-country (even light tanks can only travel 4 hexes a turn), all of which is about right.

So, if III Corps are unable to cross the Arnhem bridge without their reinforcements, the roads had better be kept clear for them, since all the Nazis would then have to do is to block the roads (to force them to go cross-country) which means they can't arrive in time.

Note that day 1 is a 'short' day (as the first paratroopers only landed at Arnhem at 12.40pm), however if we allow 4 turns, it's still just about possible to move from the landing zones to Arnhem road bridge on 'day 1', unless, of course, you encounter Nazi resistance :-)
The game
The ideal way to play is against human opposition ('hot seat' mode). Alternatively, against the AI, you should play the Allies (the AI can't cope with multiple 'objectives').
Initially, the Allies focus will be on the airborne forces (Market) i.e. the British / Polish at Arnhem and the US 82nd Division (3 Brigades) at Grave / Nijmegen where you need to take the bridges.
At the start of game day 2 (more or less 'on plan', unlike real life when it was day 7-8), the first elements of XXX (30) Corps (Garden) will arrive at the far southern edge of the map (about 30km from the bridge across the Waal at Nijmegen which should be in the hands of the US paratroopers by then).
You will need to get them across the Nijmegen bridge and on to Arnhem so they can link up with the British paratroopers, who should be holding the Arbhem bridge. At least one Tank of XXX Corps must cross the Arnhem bridge before end of day 9 for the Alllies to 'win'.
The Allies have 3 British and one Polish Brigade at Arnhem and US 82nd Division (3 Brigades) at Grave / Nijmegen and (from day 2) XXX Corps.

You win by taking (both sides of) the Rhine Bridge at Arnhem and "holding until relieved" i.e. until at least one tank of III Corps crosses the bridge.

You loose if you haven't been relieved by the end of day 9 (turn 63).

The Arnhem force consists of Infantry, 'armed Jeeps' (a sort of very weak APC) and 'Bren-gun carriers' (a weak light tank, on par with an open top Pz I).

You also get some light Anti-Tank guns (these are 'towed' (i.e. carried) by jeeps), and a few mines (these can carried by jeeps (who aren't carrying an AT gun) and by the Bren-gun carriers and remember - the British 6pdr is primarily an anti-tank gun, so is supplied with no HE ammunition, so is of limited use against 'soft targets', however the A-T ammunition was effective against armoured cars and Panzer III, less so against the Pz IV and of little use against a Tiger or Panther)

Since, according to 'The Plan', there are no German tanks anywhere nearby, you have to wonder why almost 100 6pdr anti-tank guns were sent instead of the rather more useful 'mountain' 25pdr. Of course you do get 4 times as many useless 6pdr shells per ton than 25pdr shells, so perhaps it was just some moronic bureaucratic told to keep the weight down.
The battle starts after the initial glider and paratroop landing on 'day 1'. As in 'real life', most of your forces are dropped some 8-13 miles from your objective. Your infantry may start off immediately or your paratroopers can wait to join up with their glider borne equipment (jeeps etc).
Whatever you do, you can expect the Nazis already in Arnhem to oppose you (and will need to deal with these before the main Nazi forces arrive).
To reach the pontoon and road bridge at Arnhem, your forces will pass the Heveadorp ferry and then the (which was mined and ready to blow) Rail bridge at Oosterbeek.
When the paratroopers reached the north end of the rail bridge, the Nazis on the south end were able to blow it up. However you might like to consider how using the ferry could help you save the rail bridge and how this could be used to help you take the far (south) side of the main road bridge.

At some point your scouts might discover the pontoon bridge that appears on the Reconnaissance photographs but that your superiors have decided not to tell you about in case it distracts you from taking the road bridge. As a precaution, the defenders have uncoupled and moved the centre Pontoon section. This also appears on some Reconnaissance photographs that yiu havn't been supplied with

The Plan expects you to secure the north end of the road bridge first.

Your superiors have learnt nothing since the Flak 88 was first turned on the British Matilda tanks in France, so no opposition is expected from the troops (believed to be) manning the (believed to exist) massive numbers of flak guns protecting the bridge.

Once you have secured the north end of the bridge, there will be plenty of time tomorrow to stroll over and secure the southern side.

According to the Plan, since the Nazis couldn't possibly think you might approach from the north end, they won't be waiting for you.
The 82nd Americans will land about 10 miles to the South of Nijmegen (which is about 8 miles from Arnhem) where they need to secure the bridge over the river Waal ready for 30 Corps (who will arrive in 2 days, some 4 times faster than in real life).
Of course the Allies had more or less total Air supremacy, however (as in real life) initially you will get no combat air support (there being some, no doubt justifiable, concern that the dumb trigger happy Allied (read US) fighter pilots will mistake the slow moving multi-engined British transport aircraft towing large heavy gliders for the fast moving single engined Me109's or Fw190's of the Luftwaffe and shoot them all down).

Further, as in real life, there are insufficient transports to get everyone on the ground in one go. Allied air transport is apparently unable to mount more than one drop per day, so initially only 1/3rd of the forces allocated to the Arnhem will arrive on Day 1. The remaining 2/3rds will be arriving in two more drops, on day 2 (rest of the British) and (planned) on day 3 (the 2nd Polish Brigade).

Since the Plan anticipated that 30 Corps would reach the southern end of Arnhem bridge by day 3 (at the latest), it is hard to understand why the Plan also called for the Polish paratroopers to be dropped onto the southern side of the bridge at the same time.

In real life bad weather delayed the Polish reinforcements (and the Nazis were waiting for them), so the drop didn't quite 'go to plan'.

However, in the game I assume that by this time your forces have found a way to contact 'base'. This means you will get control over where and when the Polish Brigade lands (their transports will appear on the far southern edge of the map at the start of day 4).

Unlucky for you, the 9th and 10th SS Panzer (each less than half strength) divisions of the 2nd SS Panzer Corps are resting and refitting to the North and West of Arnhem.

Your superiors have decided not to bother you with this 'unreliable' information (derived from Ultra intercepts and photo-reconnaissance) and have sent you off with only a few 'unnecessary' 6pdr Anti-Tank guns.

You have been warned of the enemy infantry that is believed to be billeted in the area. But so as not to bother you with the task of dragging artillery around, you don't get any. Back home there are warehouses full of 25pdr pack-howitzers or 'mountain guns' designed for the abortive Norwegian Campaign, but these have been forgotten about, and anyway no-one is going to authorise release to the Air-borne troops.

Finally (plainly due to some mistake) you also have some 'unnecessary' PIAT's and Anti-Tank mines. These are quite capable of disabling any Nazi tank by damaging it's tracks (use them well).

The PIAT is a spring launched rocket propelled hollow charge anti-tank grenade. It had an effective range of just over 100m (the Panzerfaust was half that), so was fine when used in built-up areas, and virtual suicide when used in the open (especially as it could only really be reloaded when standing up). It could penetrate 75mm (up to 100mm at 90 degrees** - the Panzerfaust was double that). Both the PIAT and the Panzerfaust were more effective than the puny US 'bazooka' (in fact, the US 82nd Airborne Division used captured Panzerfaust against the Nazis during Market Garden).

**The Tiger I had frontal hull/turret armour of 100 mm (3.9 in), 60 mm hull side plates and 80 mm armour on the side superstructure/sponsons and turret sides and rear, all mostly at 90 degress
The American paratroopers at Grave/Nijmegen have been warned about the Nazis holding the Greosbeek Heights to the West of Nijmegen, and have been equipped with some SP Guns to help deal with them. Indeed, the Americans apparently had 'reliable' evidence (unsupported by Ultra, photo-reconnaissance or anything else) of "1,000 Nazi Tanks" (i.e. every last tank left to Nazis on the entire Western front) that are to be found in the Reichwald to the west and (apparently) believe that by taking the Heights they would 'trap' these in some (magical) way.
So, whilst those elements that landed at Grave successfully took the bridge over the Mass, those elements assigned to taking Nijmegen bridge over the Waal (which, when they landed, was essentially undefended), landed at Grosbeek and then focused on taking the Heights (instead of wasting their time strolling up the road into Nijmegen). By the time they got around to thinking about securing Nijmegen bridge, the Nazis had arrived to defend it.
As soon as the Nazi commander got over the shock of British Paratroopers landing next to his HQ (in Oosterbeek), they reacting with their usual speed.
The local Resistance had, of course, informed their incompetent SIS 'handlers' in London of the presence of Nazi HQ, and no doubt this was confirmed by Ultra intelligence. However your superiors have decided not to bother your with this 'unreliable' information. Instead you have been warned not to trust the local Resistance who, it seems, might tell you 'tall tales' in an effort to lead you into an ambush
By mid afternoon on day 1 the 10th SS (infantry, artillery, a few tanks) had been ordered to oppose the US paratroopers at Nijmegen (where they will slow XXX Corps) whilst the 9th (infantry, APC's, a few tanks) was ordered to Arnhem.
In fact elements of the 9th were already moving - they were so fast off the mark that when they arrive at the Arnhem bridge they fail to find any British at all (the British are still slogging their way east from their drop zones) ! So they cross the bridge and, still finding no opposition, continue on to Nijmegen (instead of holding the bridge). They do, however, return on day 2 (when news of the arrival of the first British at Arnhem bridge reaches them).

Meanwhile, the 10th will dig in at Nijmegen on day 2 (whilst the US paratroopers at Nijmegen are still busy taking the Greosbeek Heights), and the Tiger Tanks of the 9th SS will arrive at Arnhem (down the road from the North) at the end of the 3rd day. Be warned that light 6pdr Anti-tank guns have no effect on a Tiger.

Still in real life, the entire Allied ground-attack Air Force was 'all busy' helping XXX Corps for the first 6 days (command of the British bombers reverted to 'Bomber Harris' after D-day, so as your forces die trying to hold the bridge you can be comforted by the thought of the nightly 1,000 bomber raids that continued to massacre German civilians in Berlin and other places - lucky, really, since even at this stage of the war the US bombers were still dropping bombs on their own troops almost as often as on the Nazis, and the RAF still couldn't get most of their bombs within 5 miles of the target, so the last thing you need is 1,000 of 'Bomber Harris's finest' dropping their bombs anywhere near you  ..).

In the game, you will get ground attack air support as soon as III Corps gets it's first tank across the bridge at Nijmegen (or else from day 6, as per real life).

The RAF will make daily supply drops, however due to the incompetence of the morons in command, there will be no reconnaissance flights. Due to more incompetence (based on the need to keep radio power as low as possible to avoid the enemy 'overhearing' you), your troops have no working 'long range' radios,so you will have no way of changing your supply drop zones (or, indeed, contacting your 'superiors' at all - which was lucky since they would, no doubt, have found some way to make things even worse). Since a lack of radio contact obviously means everything is going to Plan, unless you are able to secure the supply drop zones in the open ground north west of the bridge, most your supplies will be lost to the Nazis.

Supplies will come in the from of 'crystals' that you may use in your 'mobile workshops' to 'repair' units.

You will get control of the supply and reinforcement drops (which will include some more 'unnecessary' light Anti-tank guns) one day after III Corps gets it's first tank across the bridge at Nijmegen (i.e as soon as they get close enough to hear your short range radios, and allowing an absurdly short reaction time of only 24hrs).

From day 4, fighters become available to the Nazis, although they will (no doubt) all be too busy shooting down your re-enforcement and supply transport aircraft to be much of a threat to your ground forces.

Allied ground attack aircraft will be available from day 6 (and this will be reflected in the game, even if III Corps fails to gets it's first tank across the bridge at Nijmegen by then).

In real life neither they nor your transports had any fighter support = 'the plan' allocated no Allied fighters to the operation AT ALL, perhaps because the Allied command assumed the Nazis would fail react fast enough (no doubt based on their own reaction time of 'about a week or two') - or maybe they were more concerned about the trigger-happy US fighter pilots shooting down the transports (I guess, on balance, the transport pilots would rather be shot down by the Nazis than their own side)

In the game, I'm going to assume the Allies will react to the presence of the Nazi fighters on day 4 within 48hrs (yes, I know this is would be an unprecedented change in the Plan, which would normally take a week or two), so allied fighters will become available from day 6 (even if Allied ground-attack aircraft arrive earlier).

On day 7 the 82nd Americans will be reinforced, and further elements of XXX Corps will arrive south of Nijmegen. If they move fast enough they might just make it to Arnhem before the end of day 9 :-)
The fact that the Allies won WW2 came down to their massive advantage in men and materials. As mentioned elsewhere, it didn't matter that Nazi tanks killed Allied ones at a ratio of 10:1 when the Allies were building tanks 11 times faster than the Nazis. So the Soviet / US 'battle plan', which never really consisted of much more than "full frontal attack", and this worked because the Axis couldn't replace lost men and materials whilst the Allies could (and did) 10x over - and eventually this simply ground the Axis forces unto the dust (when the 'tanks remaining' score reached 'Allies 1, Axis 0')
At least one Tank of XXX Corps must cross the Arnhem bridge before end of day 9 (turn 63) for you to "win".
Note that, whilst it's possible to have the computer play the Allied side, it has no concept of the vital need to take and hold the bridges. On the other hand, it also has no concept of the need to blow the bridges before the Allies can capture them either :-)
The forces
British
Bren-Gun Carrier, 7-10mm armour, 1x MG, 1x PIAT, 30mph (48kmph) [since 1943, can tow 6pdr]

Jeeps with 6pdr or ammunition trailer
A light-weight version of the standard 6-pounder was designed specifically to fit into the Horsa Glider and used by both the British and Polish. Almost 100 6pdrs were delivered to Arnhem (each gun team actually used two gliders - one carried gun plus tow jeep, the other a jeep and two ammunition trailers.

Command Jeep with 'long range' radio and heavy machine gun
These are the Recce force.

Mobile repair unit
When supplied, can repair your other units. Be warned - they are weak and easily destroyed

Infantry
Both paratroopers and glider troops. Like all airborne troops, they have a higher than normal attack value (machine guns) and a lower defence value (overly aggressive behaviour mitigates against taking cover)