The Super Capacitor UPS
Super Capacitors come as 5.5v 'button cells', from 1F @ 50p to 4F @ 80p, or as 2.7v 'can' types, 100F @ £1.15 to 500F @ £1.50 = all prices eBay, post-free from China, Dec 2016
The intrinsic voltage rating of all Super Caps appears to be 2.7v (those I've seen rated at 2v5 all appear to incorporate some sort of 'protection' circuit which, I'm guessing, is responsible for the 'missing' 0v2).

The '5.5v' cells are constructed from a 'sandwich' of two 2.7v cells 'back to back'. This means all you have to do to get a high capacitance '5v' is wire two 2.7v 'can' types in series - the voltage is (apparently) always divided equally, although 'Balancing boards' (at about £1 each in Qty 10pcs) can be used (these contain a voltage monitor circuit that 'shorts' the Cap with a trio of low value resistors to drain excess power when an 'over volt' condition is seen)

The drawback is, the total capacitance (C) of two capacitors (C1) and (C2) wired in series is given by the formula 1/C = 1/C1 + 1/C2. So a pair of cheap 500F Super Caps. wired in series to give 5.4v will be reduced to 1/C = 1/500 + 1/500 = 250F.
To use SuperCaps as a UPS, you can't just wire a pair in series across the 5v power input to the Pi
Well, you could, but this would not only be extremely inefficient (less than 10% of the capacitor's stored power would be used before the voltage dropped to a level at which the Pi crashed), it would also be rather 'unkind' to the power supply (at power-on, a flat (discharged) Super Capacitor 'looks like' a short circuit as it attempts to take 'infinite' current and charge up :-) )
Power regulation
To make maximum use of the power stored in the Super Cap we need to use a DC-DC 'buck' regulator between the Caps and the Pi. The regulator lets us discharge the Super Cap until it's 'almost flat' whilst continuing to supply at least 4.75v to the Pi
A typical cheap LDO regulator - such as the MIC2920A - operates down to 2v input and can deliver 400mA at 5.0v = but watch out for the minimum in-out 'differential' of 1v (which means it can't handle input voltages within 1v of the output). A LM2596 based DC-DC step up/down converter, which will deliver 5v from anything from 3v to 30v, can be had on eBay for 99p.

The (25p more expensive) dual inductor XL6009 and LM2577 based up/down designs, whilst perhaps better regulators, are not suitable since they typically limit at 3.8 Vin (and we want to extract every mV we can).

The more modern MT3608 operates down to 2v (it cuts out at 1.98v input) and is available on eBay for 99p or less. However this is also a 'step up only' converter. The input must be at least 1v lower than the output - so whilst it's fine for a rechargeable (3x NiMH) battery UPS design, it's of little use with a 5.4v SuperCap stack design - and whilst it would work fine with single 2.7v SuperCaps it would only extract '0.7v' of power before dropping out at 2v !

NB. When considering DC-DC voltage converters found on eBay, you need to read the specs and watch out for the 'hype' = for example, some LM2577S / LM2596 based up/down designs whilst 5x more expensive typically have a minimum input voltage requirement of 4v !!

Note also that most 'up-down' converters have to be 'de-rated' at low voltages - for example, a typical "2 Amp" rated DC-DC step-up/down converter can only deliver 300mA when the input is 3V and the output is 5V (since the Pi Zero only consumes between 100mA (idle) to 250mA (with an operating camera), that's fine, but don't expect to power much else form the same supply)
For maximum UPS 'run time', we need to extract as much energy as possible from the Super Caps. So that means using a LDO regulator with the minimium Vin limit - whihc seems to be about 2v
The Energy stored in a Capacitor is = 1/2 CV^2 (i.e. Capacitance times Voltage squared)

Two 500F caps. stacked to give 5.0v, that's 1/2 * 250F * 5^2 = 3125 Jules. However we can't extract all of this - if the regulator drops out at about 2v this leaves 1/2 * 250 * 2^2 = 500 Jules behind, so we can only extract 2625 Jules.

A Pi Zero at 100mA * 5.2v is consuming 0.52W of power.

Energy = Power * Time, so we have 2625 = 0.52 * T, giving us T = 5046s, or about 84 minutes ! (ignoring losses)
Charging
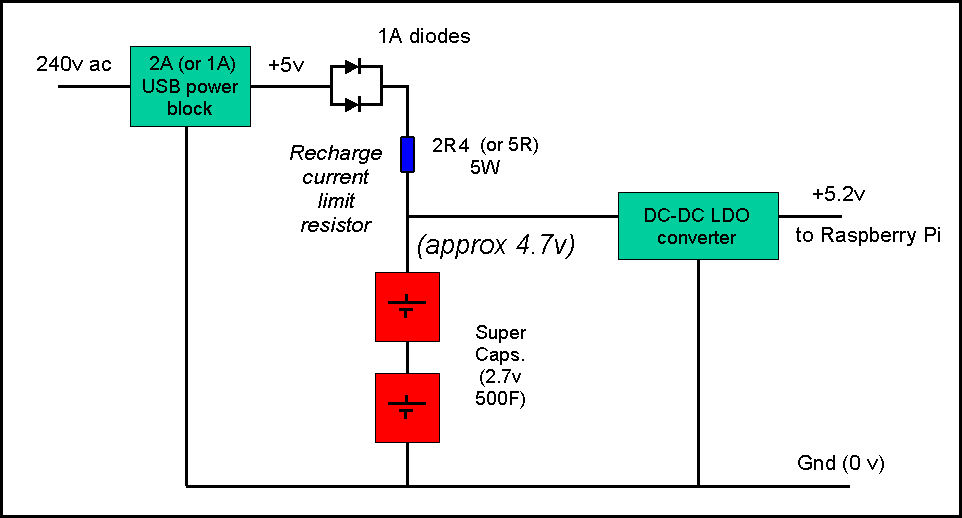
A flat Super Cap will appear as a short circuit, so we need to limit the 'charging' current. The simplest method is just to wire a resistor in series with the Cap.
To prevent the Super cap 'back driving' the power supply, a diode will be needed. To minimise Vf, a pair of 1A Schottky diodes will be used - these have a Vf of about 0.4v at 1A but this drops to about 0.2v at 100mA (so 1/2watt diodes should be fine).

If the power supply is capable of supplying 2A at 5.2v, then the series resistor has to drop 5.2-0.4 = 4.8v at 2A. This gives us a value of 2.4 ohms (rated at 5 watts).
The switch-over circuit
Instead of switching between the incoming USB power and the Super Cap output regulator, we can just power the Pi from the Super Cap. regulator all the time. This means the USB 5v input is simply wired 'direct' to the SuperCaps and avoids the need for any sort of 'switch over' circuit at all
Using the Super Cap. output regulator to directly power the Pi at all times has an additional advantage - the system now becomes 'immune' to low voltage / noisy mains USB power blocks.

Voltages etc. above are for a 2A powerblock. If a 1A USB power-block is used, the current limit Resistor has to be 5 ohms. If the Pi draws 100mA, this drops 0.5v which, after subtracting the diode 0.2v drop, limits the Super-Caps Vmax to about 4.3v (from 4v7), reducing the UPS time to about 58mins
Boosted intermediate voltage design
The power stored (1/2 C V^2) in a given number of capacitors is the same, irrespective of how they are organised (i.e. in series or parallel). However, the higher the 'start' voltage, the more power we can extract before the output regulator drops out = if we start at 4v and the regulator cuts at 2v then we can only extract 50% of the power - but if we start at 20v by the time the regulator cuts out at 2v we will have extracted 90% of the power ! The drawback is that stacking the capacitors for a higher voltage means we have to boost the input 5v to that higher voltage (or use a higher voltage input power supply)
As an exercise, let's consider doubling the SuperCap 'stack'. 'Design A' consists of 2 pairs stacked 500F caps. Each stack which deliver 250F at 5.4v, so 2 stacks = 500F (at 5v4). 'Design B' is a 'stack of the stacks' i.e. 4x500 are arranged as a single stack giving 1/C = 1/500 + 1/500 + 1/500 +1/500 = 125F at a voltage of 2.7*4 = 10.8v. If we 'derate' both Designs by 8% that's 5v and 10v.

Power stored 'Design A' = 1/2 * 500F * 5v^2 = 6,250, Power stored 'Design B' = 1/2 * 125F * 10v^2 = 6,250 (as expected, the same)

Residual power at 2v, for 'Design A' = 1/2 * 500 * 2^2 = 1,000, but for 'Design B' = 1/2 * 125 * 2^2 = 250 J (i.e. 4x less !)

So the 'usable' power for 'Design A' is 5,250J, but for 'Design B' it's 6,000J.

UPS Time for 'Design A' = is 5,250J/0.52W = 10,096s (about 2.8 hours). For 'Design B' it's 6000/0.52 = 11,538 (about 3.2 hours).
The higher the 'stack' voltage, the lower the significance of the regulator 'cut out' voltage (and the less 'residual' power will be left behind. A LM2596 step-down converter can accept input voltages up to 40v, however a LM2596 step-up limits at 35v. This means the practical stack voltage limit is 35v, so stacking 10 @ 2.7v would be quite possible. However, even 4* 500F SuperCaps delivers over 3 hours of UPS time, so 10 would be 'over-kill'. Instead I look at what can we achieve using 100F SupetCaps
100F SuperCaps can be purchased 10pcs at a time for approx. £14 (eBay China), although 500F rated units are only about double that, so the only reason to stick with 100F cans is to keep the overall size down. 500F cans are 35mm dia x 60mm, 100F cans only 22mm dia. x 45mm (so would fit into a 1" high, 10" long by 2" wide case (the 500F cans would need a case 1.5" high, l14" long by 2.5" wide).

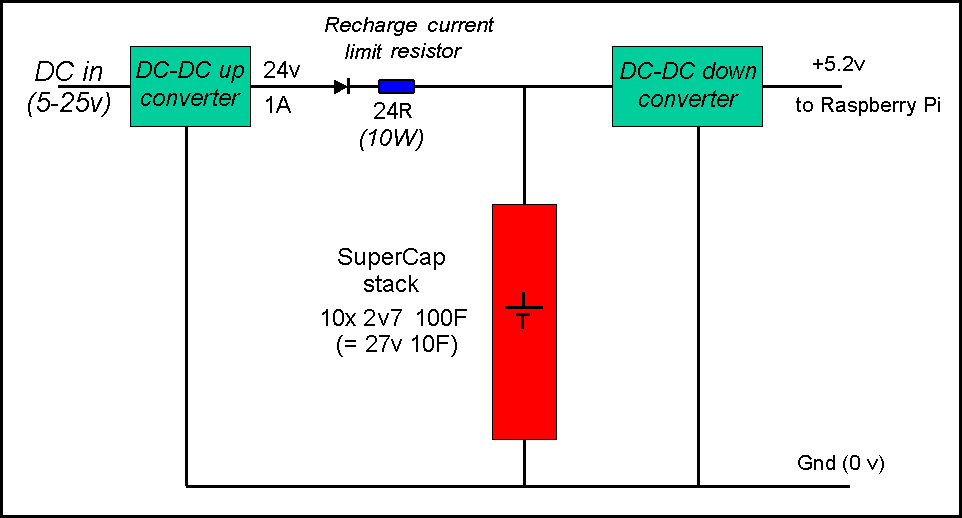
A stack of 10@100F delivers 10F (or 10@500F = 50F) at 27v. To avoid the need for 'over-volt' boards, the 'stack' should be de-rated by at least 10%, so that's 24v

Super-Cap stack using 10x 100F @ 2v7 = 27v 10F charger to 24v
The LM2596 step-up regulator needs to be limited to 2A at 24v at 'power-on', when the Caps are 'flat', so if a simple series resistor is used this will need to be 12R.

Note this assumes the input supply is capable of delivering whatever the DC-DC converter needs - for 2A at 24v that means 4A at 12v in (or about 10A at 5v !!)

It will take some time to fully charge up a 10F stack. Indeed, the '5*RC' constant for 12 ohms into a 10F stack is 600s = 10 minutes !

Fortunately, we don't have to fully charge the stack before the output regulator 'cuts in' and the Pi come live - we only have to exceed the output regulator Vin min (2v is assumed).

In fact, since the 'self discharge' resistance for Supercaps is very high, it's 'not unreasonable' to assume the stack start voltage will be where-ver it was after last use.

Even if the UPS was allowed to 'run flat', when the output regulator cuts out 2v should be left. So the stack should start from at least 2v (rather than from 0), except, of course, when it's first plugged in (or after it's been left in storage for a long time and has 'self discharged')

So, how long to reach 2v (from flat) ? I found this really useful web site where I discovered the answer is almost 10.5 seconds !
When I realised that the 'peak power' for the 12ohm resistor is 48watts and even after 10s it would still be dropping 22v (so dissipating 40 watts) I decided to look at something rather more clever ..
A "DC Constant Current Step Down Voltage Regulator LED Power Supply Battery Charger" can be had on eBay for £2.68.

This will 'do the trick' BUT needs to be supplied with an input voltage at least 2v higher than the (max) output (so would need at least 26v to 'power-up' a 24v 'stack'). Since 26v power supplies are rather 'rare', in practice the input will be 24v and the stack limited to 22v (or less). The 'good news' is that a 24v DC 2A mains supply is not too expensive - but why not just use the 'raw' power output ? Well, standard power supplies won't work into a 'short circuit' ... so we are back to needing an in-line resistor ..

I next looked at purpose built 'battery chargers', however whilst 24v 'battery chargers' can be found on eBay these are aimed at 'commercial vehicle' batteries and are way too expensive. I did find a £15 charger for LiION power packs for cycles, but again these won't tolerate a 'short circuit'.

I thus ended up looking at 'Constant current' power supplies (intended to drive LED strips) and found a 24v 2A unit can be had for about £5 (direct from China) or double that (from a UK reseller) and is reasonably compact (110x78x.35mm). The "S-50-24" model (apparently) incorporates some voltage adjustment and will work into a 'short circuit', limiting to 2A. So, 'job done'.
PoE as the power-source
Since the most likley use of a UPS will be for a Pi CCTV camera, we need to consider the use a PoE as the power-source
A typical PoE system will be capable of delivering 24v at 1A.

Limiting the current to an 'almost flat' Super Cap stack to 1A require a series resistor of 22 ohms.

Max. power dissapation at 1A would be 22 watts.

If the Pi draws 100mA (at 5v), that would be approx 25mA at 24v leading to a 0.55v drop. Adding another 0.2v for the series diodes limits the Super Cap stack to 23.25v
Shutting down the Pi
The Pi needs to shut itself down before power is totally lost, ESPECIALLY if it's likely to be 'writing' to the SDHC card (as it will be in the case of a CCTV application when Ethernet comms is lost). For more details see :-
(-) Auto shut down
Shutting down the Pi
Shut down is by software 'command'. So what's needed is some way for the Pi to 'discover' that it's running on batteries and that the battery power is about to 'run out'. This does not have to be very 'clever', just 'reliable' (we don't want to shut down when there's plenty of power remaining and we don't want the Pi to be writing to the SDHC card when the power fails).
If you are using LiPO batteries, then you need to stop using them before they are totally flat (a LiPO battery can't be recharged from totally flat)

Most systems cut the LiPO off at 3.0v - and it's easy enough to wire up a Zener diode together with a 'Op Amp' style comparator that will 'flip the switch' when the battery reaches 3v0
To give the Pi a chance to shut itself down after power is lost, fit a decent capacitor across the 5v supply = if you trigger 'power lost' at 4.9v, then the Pi has until the capacitor drops below 4.75 to shut down cleanly
Pimoroni clean-shutdown code
If you wire your 'low power' detection to any GPIO pin between #4 and #27 (Hi = run, Lo = low power), you can use the existing clean-shutdown daemon from Pimoroni (for more details, see end of this page)
Detecting 'Mains lost'
From this 'How To' reference and the Raspberry Pi GPIO pins spec, it's obvious that the pin you choose to 'sense' the power state can be controlled by software to enable a 'default 0' (internal pull down resistance).
To 'detect' a 24v supply as 'mains-enabled' = 'logic 1', we have to 'pull-up' the pin above 1.3v (or 2v = reports differ) but it's vital not to exceed 3.3v (or at least limit the current to 0.5mA). The internal 'pull down' appears** to be about 50k. For a 24v supply to 'pull up' this up to 2v requires a 24/2x50k = 600k resistor. Current flow into the pin from the 24v would be 22/600k = .04mA (well within the .5mA limit)
**The internal pull down is specified at 40-65k.
So, the cost of 'detect mains lost' is approx 1p (one resistor) !
Ethernet loss as system shutdown
If your Pi is being used as part of a CCTV camera, and has PiPO (or other) battery backup, you might want to keep it running (and saving to SDHC card) even when the Ethernet cable is cut :-)
However if you are only using PoE (so Ethernet out = no power) or if the Pi is unable to funtion without the Ethernet, you ca use 'los of Ethernet' == 'power-down'.
Of cousre this is a lot easier with any model B Pi since they have built-in Ethernet. The Pi B+ and later have 2 LED's on the Ethernet socket itself :-

The Yellow LED is on for a 100-Mbps connection (and this off for 10mbs or when connection is lost) = same as '10M' LED on the B
Green LED is on for 'link established' and blinks for 'link activity' (and off for 'no link') = same as 'LNK' LED on the B

One Pi user has written custom software to monitor the Ethernet 'link' (the B 'system LEDS', which includes 2 Ethernet LEDS, '10M' or '100' and 'LINK' or 'LNK', are all accessible to the Python user, see here)
The 'best' choice on the B+ for 'Ethernet LAN down = power loss' would be to pick off the yellow LED (no modern Ethernet runs at 10mbs)
Detecting 'Low Battery'
For PI's with battery backup, the 'obvious' approach to discovering that 'we are running out of (battery) power' is to monitor the battery voltage 'directly' with some sort of 'voltage detection' circuit (e.g. built around a 741 op-amp and a Zener diode etc. (see image)). An alternative is to use a special 'low voltage detector (LVD) chip' (such as the STM1061).
For example, NiMH battery voltage holds up very well during the discharge cycle with quite a steep voltage 'drop off' as it's capacity is used up, so the 'drop off' point is easy to spot.
An alternative approch is to montor the supply 'input' voltage and compare it to the Pi volts = as soon as input drops below Pi, the '/Pwr off' can be triggered. The drawback to this approach is that quite a decent capacitor is needed on the Pi 5v line to keep the Pi running long enough to shut itself down

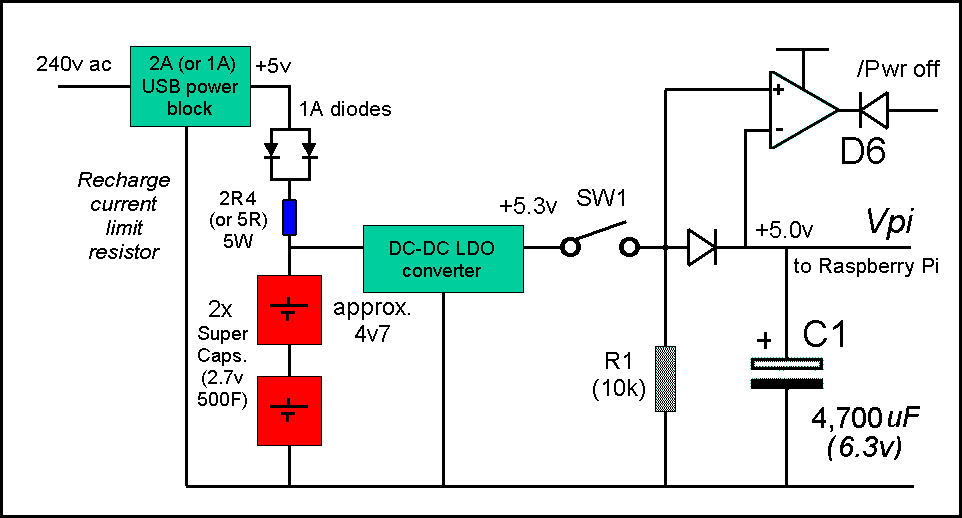
If you can vary the voltage of the Pi 5v supply, adding a single diode in series with the Vpi power line means a simple 'comparator' can be used.
So long as the regulator is supplying power, the '+' input will be higher then the '-' and the comparator output 'hi' = 5v (D6 prevents this reaching the Pi i/o pin which is limited to 3v3 input max.).
When the regulator 'cuts out' and drops below Vpi (which is supported by capacitor C1) '/Pwr loss' goes 'Lo' (0v) and this is passed to the Pi i/o pin via D6.
If you are using LiPO batteries, then you need to stop using them before they are totally flat (a LiPO battery can't be recharged from the totally flat state). The typical cut-off point is 3v0 (so you need to 'trigger' the 'power-off' at 3v1 and have the Pi respond with a 'disconnect' when it shuts down). If you are using a Powerbank, this will 'switch itself off' as soon as it's internal battery voltage drops too low.

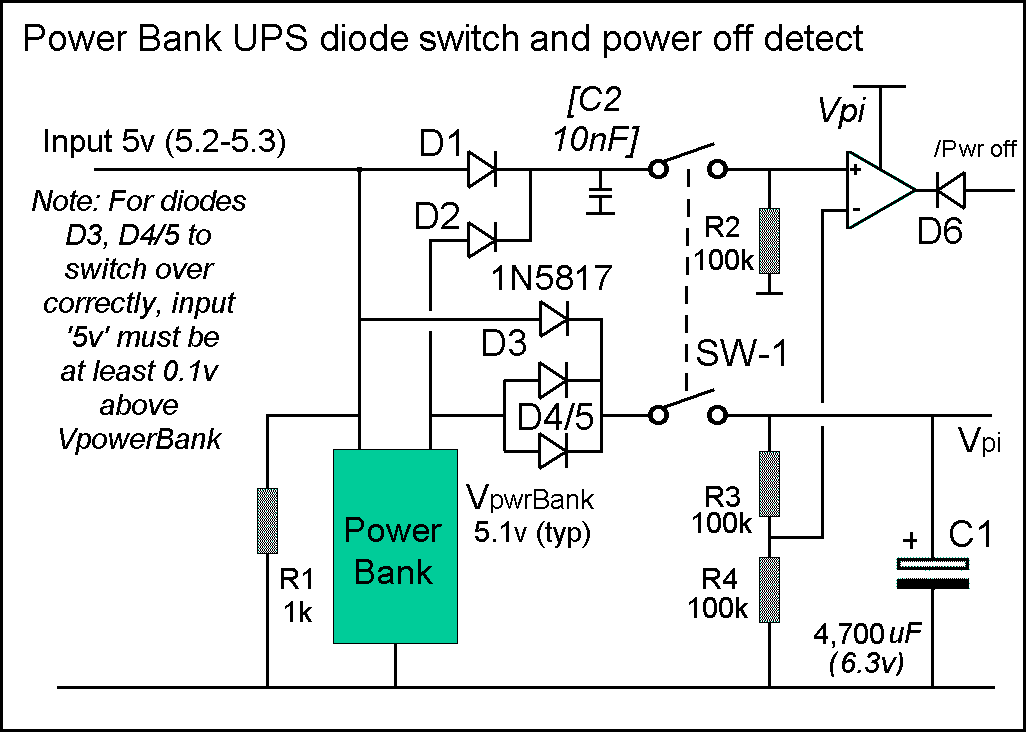
A more complex circuit is needed if you can't change the Pi power input voltage.
The circuit (right) 'monitors' both the supply input voltage and the actual battery voltage.
The comparator output will be Hi (5v) so long as the supply or battery '5v' is higher than the Pi 5v.
As soon as the power supply cuts off (and drops below the Vpi voltage) the comparator output will flip to the Lo (0v) state. Again, the capacitor on the Vpi line has to hold up long enough for the Pi to perform an 'orderly shut-down'.
One of the above approaches should work for all UPS designs.
This note last modified: 4th Jun 2017 15:27.