

Links to all my PIC tips, tricks and 'mini-project' notes
Whilst the mid-range PIC's can tackle many complex and otherwise almost impossible applications with ease, the challenge is to minimise cost by using the cheapest baseline PIC 'whenever possible'. Baseline PIC's can be had for less than 50p each = I purchased many 16F5x chips for between 40 and 50p each (mainly from CPC as 'remaindered' stock in their 'Bargain bin' section).
The even cheaper to use 12F675 (it has an internal OSC) can be found for as little as 20p (in Qty 10pcs, eBay), as can many other PIC's for less than £1 each. These PIC's are so cheap that you will soon start using them 'for everything' (especially as the PIC can often be used in place of a higher cost 'single function' digital chip - such as divider, ADC, PWM generator etc.) !
Buying the PIC in a 'TSOP' package is (sometimes) cheaper than the DIL/DIP package version = and whilst this costs you 10-20p extra for a mini-PCB TSOP-DIP 'converter', if you use a 'bigger' PCB than the PIC TSOP really needs you can mount other devices (resistors, caps, even osc. crystals) on the same board - and make use of the extra 'pin holes' to wire this up to the rest of your circuit
Below is a mix of programming tips and tricks, common circuit tricks and all the 'mini-projects' I've used the PIC for
I hope these details proves as useful to you as it does to me !
Below, click on the '+' to expand 'in place' (includes diagrams/images) or click the title URL (to view/download the text only version).
(+) 0004 Multi byte ADD - (24bit)
(+) 0005 new PIC 33 instruction set - (macros)
(+) 0006 Binary multiply methods
(+) 0007 8x8 - (multiply)
(+) 0008 8x16 - (multiply)
(+) 0011 Bi color LED driving
(+) 0012 One pin dual LED and button detect
(+) 0013 Input only multi button detect
(-) 001a One pin controls motor Fwd off Reverse
Controlling motor fwd/rev and off using a single pin
The 10F200-206 PIC's are cheap (I have paid less than 30p each for 10F208 in a SSOP package) but have only 4 user pins (3 i/o's and one input only). Of course the 3 i/o's could be used with a 'port expander', which would allow you to select one of 8 relays, however this is likely to cost (a lot) more than choosing a PIC with an extra 8 i/o pins in the first place ! Further, with only 4 pins in total, chances are you will need to use most of them as inputs anyway.

SO = how can we select between 'forward', 'reverse' and 'off' using only a single i/o pin ?

Most motors will be driven using 'PWM' = Pulse Width Modulation. So the single PIC pin needs to switch between 'forward' and 'off' (or 'reverse ' and 'off') at high speed

1) We start by noting that a PIC pin has 3 'states' = 'off' (input mode), 'Hi' (4v3) and 'Lo' (0v7).

Assuming a 5v0 Vdd supply voltage, we add a pair of resistors to form a 'voltage divider' at the pin. So, when the pin is 'off' (set to 'input' mode), it will be 'pulled' to the 'mid point' voltage (2v5).

To avoid problems with the input 'sense' circuits oscillating, the mid-point voltage must avoid the 'input threshold'. This is typically 2v0. Choosing 2v5 thus ensures the input always "sees" a '1'

2) We now have 3 discrete voltages, so it is now quite possible to construct a drive circuit with a 'mid off' position.

Since, at power on, the PIC sets all it's pins to input mode, by default, the motor will be 'off'

3) There are two basic ways to control the direction of a DC servo motor.

a) The 'simple' method is when a dual supply voltage is available. Sometimes called the 'half bridge', one wire of the motor is connectred to Gnd, the other to either '+ve' (for 'forward drive') or '-ve' (for 'reverse drive').

This is popular when high currents are involved since it only requires two high current (high cost) drivers

b) The 'H' or 'bridge' drive. A single supply voltage is used but both motor drive wires are switched.

Many 'H bridge' motor power drivers can be found, however most require the use of 2 - or even more - PIC pins.

As usual, most on-line PIC 'design tutorials' adopt the most direct and simplistic approach. A typical example can  be found here, which not only uses FOUR precious i/o pins but calls for a more expensive 16F690 'mid range' PIC with built-on PWN circuits !

To control the motor with the single pin, we require 'voltage control' of the H bridge, which can be achieved using low current MOSFETS.

It is usually not cost effective to design your own H bridge - both chips and PCB's can be had for less than the cost of the components alone.

For smaller motors (up to about 500mA) the L9110S should 'do the trick' (approx cost 20p for the chip alone or as low as 35p for a dual-drive PCB, eBay, China). For motor up to 2S drive, the dual L298N driver chip is about 99p, or on a PCB with heatsink, about £1.50 (eBay, China)

The 'Mid voltage' must be 'off' (as noted above). This means voltages between say, 2v0 and 3v0 need to be 'detected' and the H bridge switched 'off'. Most bridge chips come with a 'PWM' input (sometimes marked 'enable') that can be used to 'turn off' the drive.

By convention, a logic 'Hi' is taken as 'forward'. So 4v0 (or more) at the PIC pin should drive the H bridge 'forward'. Logic 'Lo' is thus 'reverse' drive, which requires 1v0 (or less) at the PIC pin be 'detected'.

The 'detect' circuit should use low-power MOSFET's. These are effectively voltage controlled devices and will minimise any current flows. This will minimise any effects on the PIC pin 'Mid' voltage (resistor divider) caused by the 'detect' circuit'. Even so, it is suggested that the entire 'detect' circuit be simulated using LTSPICE before being constructed
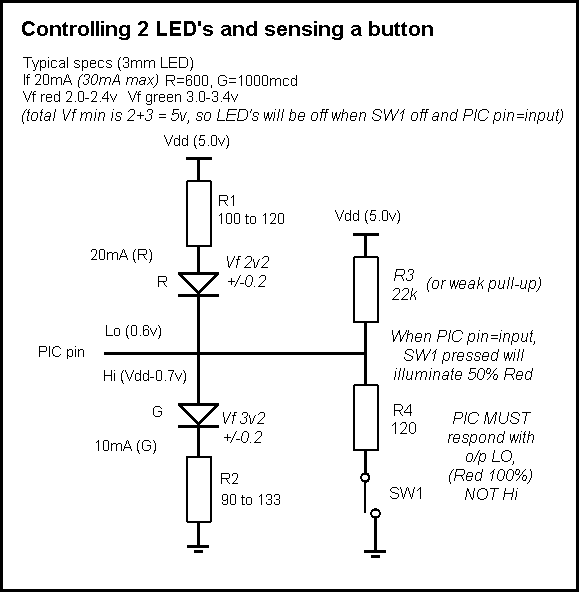
The 3 modes control starts with the "one pin controls 2 LED's" circuit (right)
This note last modified: 18th Jun 2020 18:15.